
Cleaning the
Ignition Switch (1990 Miata)
07/11/08
The Miata ignition switch is separable into two parts: the key assembly, and the electrical switch. The switch can be cleaned after removal from the key assembly.
The following has been edited from a Miata Forum thread.
0. Disconnect a terminal of the battery.
1. Remove the knee protector (2 Philips-head screws at its
lower rear edge).
2. To get at the ignition switch, you have to drop the lower
half of the plastic clamshell that covers the steering column. To do this,
there are four Philips-head screws accessed from below. One is deeply recessed.
Three of the screws are sheet metal types, and screw into plastic. One is a
fine-threaded machine screw and screws into a threaded metal boss. If you drop all
the screws into a container without looking, you can see where the machine
screw goes after the cover is dropped, by locating the threaded metal boss.
Once the screws are out, there are still very small guide projections, which
will hold the upper and lower halves together. I used a small screwdriver to
pry slightly on both sides to loosen them. Once free, the lower half will clear
the ignition key area and then drop down.
3. Next, there is a 6-terminal (white) connector that needs
to be unlocked and pulled off the switch assembly. (It was tight on my car.)
4. The switch portion of the assembly is held to the key
assembly by one Philips-head, self-tapping screw at the top of the assembly. If
never undone before, this screw is tight, and the head is also very close to a
metal tab on the dash. I had no screwdrivers that would fit in this area and
line up correctly with the head, so I used a Philips-head socket drive and a
small (non-ratchet) socket wrench handle to get into that area.
5. Once the screw is out, the switch assembly just pulls
straight out from the key assembly.
6. Next, slide the plastic cover off the six terminal
prongs.
7. I pried the upper circular portion of the white case away
from the locking tabs of the brown upper piece (first picture) and pulled it
off the lower piece. Do this carefully; I think I might have damaged one of my
locking tabs slightly. Note: Keep the lower piece down as shown in the right
picture while separating these pieces and afterward; otherwise you will be
looking for tiny springs after they come apart.
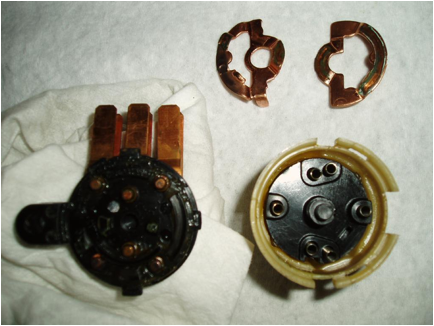
Ignition
Switch Pieces and Contacts (cleaned with paint thinner)
8. The two contacts you see above the right piece in the
pictures each have a guide tab on the bottom. They drop into small slots in the
base where all the springs are. When reassembling, make sure these tabs are in
fact in their slots!
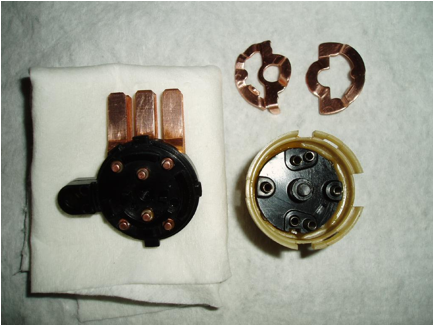
After
Polishing Contacts and Terminals
9. My cleaning procedure was my own... FYI, I used paint
thinner on the left piece and on the removed contacts that go in the right
piece; I left the right piece totally alone. After drying, there was still a
lot of oxide on the contacts. So I used Amway Chrome and Glass Cleaner
(essentially an abrasive) on a damp cloth to polish the oxide coating off the
contacts. Then I rinsed and dried the contacts.
Other methods suggested in the thread for cleaning the
contacts were Windex, Brasso, and erasers (pencil, typewriter).
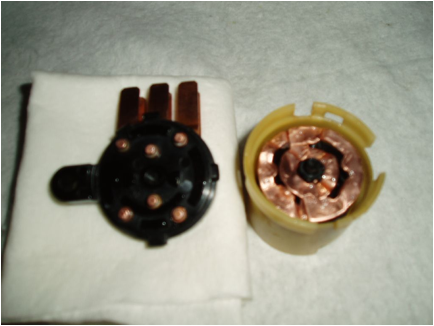
Contacts
Lubricated and Installed into Right Piece
10. For lubrication, which is a must according to this article, which helped me a
lot, I used dielectric silicone grease. I put some on the 6 terminal prongs as
well.
11. Reassembly is easy; just drop the semi-circular contact
pieces into their slots (left contact first, in the pictures). Locate the left
side plastic piece on top of the right piece, and press down evenly until the
tabs click into place.
12. Slide the white plastic cover over the 6 prongs and back
over the assembly.
13. At this point, if you want, you can push the assembly
into place, holding it with your left hand, and turn the ignition key with your
right, to check smooth operation of the switch before attaching it.
14. Reattach assembly with the screw, and plug in the
connector.
15. Reinstall the lower steering column cover. Be careful to
get those tiny guide pins back in their holes. It also will help to hold the
lower cover on while reinserting the attaching screws. (Remember where the
machine screw goes?)
16. Reinstall the knee protector.
17. Reconnect the battery.
| [Home] - [FAQ] - [Search] - [Sponsors] - [Forums] |
| [Garage] - [Clubs] - [Contact Us] - [Disclosures] - [More...] |
Copyright
©1994-2024, Eunos Communications LLC
|