
by jim-san
So you've decided to replace the convertible top on your Miata with a permanent hard top. The reasons for doing so are varied and will not be discussed here. We assume that you've done your research and have made your decision. Let's get started!
Tools Needed
While the permanent hard top can be installed while leaving the convertible top on the car (in the top-down position, of course) you may find it easier to install the permanent hard top with the convertible top removed. After all, if you are installing the permanent hard top, you will no longer need the soft top. There are other reasons for removing the convertible top as well. For example, you may have installed a roll bar that is incompatible with your glass window soft top and may have already removed it. Or you may want to reduce the weight of the car by removing the convertible frame. The remainder of this article assumes that the convertible top has been removed. See some of the other articles in the Garage for instructions for removing the convertible top.
You will soon see that this article contains some tips on what to do if things go wrong. Yes, things went wrong for me. That's because I didn't have all of this information in one convenient location! Hopefully you can avoid my mistakes and achieve a cleaner installation. Not that I'm complaining.
Step 1 (optional): Remove the seats
Why are we removing the seats to install a hard top? It's not absolutely necessary, but you may find that by removing the seats you have more room to work. It's up to you.
1. Disconnect the negative terminal on the battery. Use a 10 mm. wrench or socket.
2. Disconnect the wiring connectors, if any, under the seat.
3. Slide the seat forward and remove the two bolts attaching the seat rails to the floor pan. Use a 14 mm. wrench or socket for this. Remove the bolt attaching the seat slider to the drive train hump. This is a large bolt, so do not be surprised if it takes many turns of the wrench/socket to remove this one! Use a 14 mm. wrench or socket.
4. Slide the seat backward and remove the two bolts in the front that attach the seat rails to the floor plan.
5. Lift the seat out of the car.
6. Now is a good time to vacuum under the seat, where your vacuum nozzles can't normally reach. Keep any loose change that you find to offset the cost of the hard top.
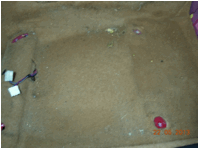
Figure 1: Driver's side seat removed
Step 2: Remove the quarter panel trim covering the seat belt towers
Some may find this step and the following steps rather traumatic since you will have to cut the quarter panel trim. If you have already installed a roll bar in your Miata, then you have become a hardened veteran when it comes to cutting interior panels. This step will be a piece of cake for you. If you've never cut interior trim, don't worry. It's not as bad as it sounds.
1. Remove the black metal cap at the top of the panel just behind the door. It is held in place by a 10 mm. nut that doubles as the boot fastener and by a Phillips head screw. Use a #2 Phillips screwdriver for the screw.
2. Remove the scuff plate on the door sill. On the NA models with the black plastic scuff plate, use a #2 Phillips screwdriver.
3. Remove the weather stripping that runs along the front edge of the quarter panel trim.
4. Remove the black plastic cover from the shoulder harness guide. It should just snap off using some gentle pressure.
5. Remove the bolt from the shoulder harness guide.
6. If you have a cockpit brace, remove the black plastic end covers. They should snap off using some gentle pressure.
7. Remove the cockpit brace by removing the bolts.
8. There is a plastic clip behind the shoulder harness that attaches the left side of the quarter panel trim to the right side. Remove the clip by pulling it back towards the rear of the car.
9. Remove the rectangular seat belt trim at the front of the panel. It just lifts up with some gentle pressure.
10. Remove another 10 mm. bolt from the side of the quarter panel trim. This bolt is nearer to the rear of the car. It does double-duty as a boot snap fastener.
11. Remove a plastic body panel colored fastener that is near the boot snap fastener. This is one of those plastic grommets that has a center piece and outer ring. Get your fingernails underneath the center ring and pull it out as far as it can go. Then, get your fingernails underneath the outer ring and pull it out. If necessary, use a plastic trim removal tool to remove it. You may be tempted to try to pry it out with a sharp knife or screwdriver. Resist the temptation! You may scratch the trim. Do not be surprised if the grommet breaks. These plastic grommets become brittle over time. If it breaks, do not worry. It's not absolutely essential.
12. There are two metal snaps on the inside of the quarter panel trim that snap into the car body. Gently pry the quarter panel towards the center of the car. The metal snaps should come out with some gentle pressure. Notice that the metal snaps just clip on to a plastic extrusion on the inside of the quarter panel trim. Be sure that they don't fall off and get lost when you remove the quarter panel trim! You will need them later. If they are loose, they can be bent using a pair of pliers and re-attached to the trim.
Step 3: Remove the front latches from the hard top
This is where it gets hard. You may be lucky and find that the screws holding the front latches to the hard top come out easily, but it's better to plan for the worst from the very beginning. Some OEM hard top owners (including me) have found that the three screws holding the latches to the hard top have had Loctite applied to them. For those unfamiliar with Loctite, it is an industrial adhesive used to lock and seal threaded fasteners; i.e. nuts, bolts and screws. While there are many Loctite products, the one we are most concerned with is Loctite Red. If Loctite Red has been applied to the screws holding the latches to your hard top, you will mangle the screw top heads while attempting to remove the screw.
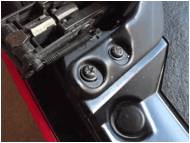
Figure 2: Mangled screw heads on hard top latch
The metal that these screws are made from is very soft and deforms easily. You may think that the screw is about to come out, but then - shoot! - the Phillips screwdriver head has mangled your screw. Now the fun begins! Fortunately, these instructions will tell you how to get that pesky screw out of there!
1. If you don't own a micro-torch, now is the time to go out and buy one. It will be a welcome addition to your tool kit. I bought the BenzOmatic micro-torch, but any other competing brands will, I assume, do just as well.
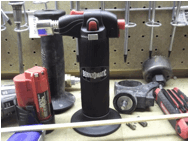
Figure 3: BenzOmatic micro-torch
2. Light the torch and apply heat to one of the screws. Don't worry about burning the paint off the latch or otherwise damaging the latch. It can take it. Apply the very tip of the blue cone of heat to the screw head. Heat for a good 45 seconds to one minute.
3. Turn off the torch and quickly get your Phillips screwdriver on that screw! Try to take it off. If it doesn't move, repeat point #2 above until you get it out. Don't worry, it will eventually come out.
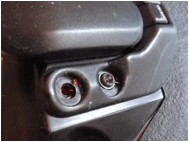
Figure 4: One screw removed. Note the Red Loctite
4. Repeat for the other two screws on this latch, and on the other three screws on the other latch.
5. If you didn't have these instructions before starting this project then you may have mangled the screw head so badly that, even after applying heat, you cannot get a grip on the screw head with your Phillips screw driver (see Figure 4 above). All is not lost. More extreme measures are required. Go to Step 4 below. Otherwise, you can continue on to Step 6.
Step 4 (optional): Drilling out those pesky screws
If you have removed all six screws using the heat method then you don't need to follow this step. This step is only for those unfortunate souls who have mangled the screw heads so badly that they need to be drilled out. The screw heads, I mean. Not the unfortunate soul.
1. Get out your electric drill and an appropriately sized bit and start drilling out the screw head. Drill only enough to pop the screw head off, leaving the screw shank still in place. Repeat for any other mangled screw heads on the latch.
2. Once all screw heads have been removed, remove the latch and apply heat to the screw shank as in Step 3 above. Be careful, because the SMC (sheet molding compound) that the hard top is made of will burn! It doesn't smell very pleasant either.
3. Turn off the torch after applying heat and put a pair of vise grips on the screw shank. Turn the shank until the screw comes out. If it doesn't budge, apply heat again.
4. Once all the screws have been removed, go on to Step 6. Unless you were unlucky enough to have mangled your screw shanks so badly that you cannot get a grip on the shanks with a pair of vice grips. In that case you will have to go on to Step 5.
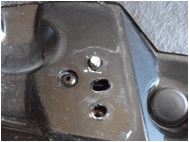
Figure 5: Shank protruding from top, ready for vice grips
Step 5 (optional): Removing mangled screw shanks
You're probably at this step because, like me, you didn't have the benefit of all the wonderful information in Step 3! Yes, you've gone too far and drilled the screw shanks out to the point where, even with the latches removed, you can't get the vice grips to grip the remaining shank. Don't despair! This is just another challenge that can be overcome.
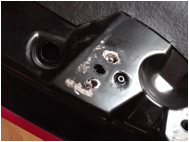
Figure 6: Mangled screw shanks. No hope for vice grips.
1. If you don't own one, go out and buy a 1/2" or 5/8" diamond drill bit. By now the people at Home Depot, Lowes or you neighborhood hardware store should be recognizing you. You are becoming one of their best customers.
2. At the point of the latch, the OEM hard top is made of approximately 1/8" of SMC (sheet molding compound), then a layer of metal, then a gap of approximately 1" before hitting the top of the hard top. This will be a point to keep in mind for later when doing any drilling. The metal layer has a threaded hole into which the screw normally inserts. This is the part that we want to keep undamaged.
3. Using the 1/2" or 5/8" diamond drill bit, drill out the SMC layer with the screw shank as the center. Stop drilling when you hit the metal layer. The SMC will form a fine powder, like talcum powder, during the drilling. When you have drilled out the SMC layer you will have a result similar to Figure 7.
4. With any luck you now have sufficient room to apply your vice grips to the screw shank. Use the mini-torch to heat the screw as in previous steps. When the screw is heated sufficiently, use your vice grips to unscrew the screw.
5. If this does not work, you may be forced to drill out the remainder of the screw shank. Creative swearing might help here. Remember that you have only about one inch of a gap before you hit the top of the hard top! You do not want to drill a hole through the top of the hard top. This would be bad.
6. Once you have removed any remaining pieces of the mangled screw shank, try to clean out the threads with an appropriately sized tap. I used a #12-24NC tap; you may or may not find that this works for you.
7. If you have completely ruined the screw thread, now is the time to take a beer break. I'll leave the choice of beer up to you. Don't despair, however. There's a solution later on to the ruined thread. Not pretty, but it's there.
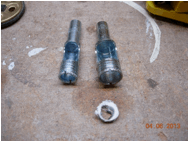
Figure 7: Diamond drill bits
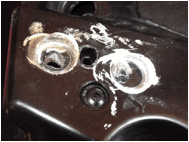
Figure 8: After drilling out the SMC layer
Step 6: Remove the side latches
The side latches are a piece of cake compared to the front latches. You may want to be extra careful and heat the screws with the mini-torch, but chances are the screws will be easy to take out. They may in fact be loose. I'll leave it up to you if you want to follow Step 3 for the side latches or not.
1. Using your trusty #2 Phillips head screwdriver, remove the three screws from each of the side latches. There, that was easy!
2. If you didn't take a beer break in Step 5 above, take one now. If you took a beer break already, then take another. You deserve it!
Step 7: Obtaining the Hard Top Mounts
Hopefully, you've already done this. If not, now is the time to do it. Unfortunately you will not be able to go to your local Home Depot, Lowes or hardware store where they already cheer as you enter the door. You will likely have to order these.
There are two that I know of, very likely there are others.
1. MiataCage (www.miatacage.com) makes hard top mounts in 0.125" aluminium, pre-cut and pre-drilled to fit the hard top. They can be ordered in red or black. These are the hard top mounts that I used. Any further instructions that are specific to these mounts are, not surprisingly, because these are the mounts that I used. I meant no disrespect to other manufacturers of other hard top mounts.
2. RennenMetal (www.rennenmetal.com) makes hard top mounts from 0.125" Type A36 Carbon Steel. They look to be about the same size and shape as the mounts from MiataCage.
3. Order your choice of hard top mount. There are a number of on-line vendors that you can purchase the hard top mounts from.
4. Take another break. This one may last several days, depending on how long it takes the postal service or courier company to ship the mounts to you.
Step 8: Cutting the quarter panel trim
The quarter panel trim has been sitting there patiently, waiting for you to finish your assault on the OEM hard top. Now, it's the quarter panel trims turn.
1. Position the quarter panel trim back in place, but without snapping the snaps back into position. There's a handy tube on the inside of the trim which inserts into the body panel and allows you to position the trim correctly. Notice that there's a "U" shaped depression in the metal body panel with two threaded holes in it. (In fact, there's a nut on the other side of the sheet metal.) This is where your Hard Top Mounts (referred to from now on as HTMs) attach.
2. Measure the distance from the edge of the quarter panel trim to the location of the "U" shaped depression and place the appropriate HTM on the quarter panel trim. Using a felt-tipped marker, make an outline of the HTM on the quarter panel trim.
3. You will likely have a "U" shaped outline on your quarter panel trim now. You can make the bottom of the "U" using a spade bit. I found that a 1" spade bit worked well here. If you don't have a spade bit, now is the time for another trip to Home Depot, Lowes or your local hardware store, where they will probably greet you by your first name by now. Of course, you could have bought all of this stuff in one trip. But maybe, as I do, you like to drive.
4. Once you have the bottom of the "U" made using the spade bit, use a new hack saw blade to cut out the outline that you have made. Don't cut out the top of the quarter panel where it turns 90° toward the outside of the car. Just cut a little bit into the top. You can use a scroll saw or Dremel-like tool to do this, but I like the hack saw blade. You may find it easier to make the cut using the bare hack saw blade; i.e. without using the hack saw handle itself.
5. Check the fit of your cut with the HTM in the car. Trim further if necessary. Repeat this step until you are satisfied with the opening.
6. File off any rough edges using a small file or emery paper.
7. Repeat for the other quarter panel.
Step 9: Re-install the quarter panel trim
This step is, as they say in the Miata Factory Service Manual, the reverse of the removal. I love it when they say that! As if it were that easy.
Step 10: Remove the latching points from the windshield frame
This should be relatively easy. Use a T-40 Torx drive for this. Keep the bolts since you will be using them later.
Step 11: Put the seats back in the car
Installation is the reverse of the removal. I love saying that!
Step 12: Put the hard top on the car
This should be relatively straight-forward for you by now. If not see other articles in the miata.net Garage section. Make sure that the hard top is properly aligned with the front windshield, the sides and is fitted snugly against the Frankenstein bolts.
1. Put the hard top on the car, as above.
2. Wrap a rachet strap (another trip to Home Depot or Lowes may be required) around the hard top just behind the edge of the rear window.
3. Rachet the hard top down tight against the car body, as if you were latching it in place using the now-removed latches. Make sure to get the hard top down tight, without of course cracking the hard top. Doing this with the doors open helps.
Step 13: Attach the mounts to the hard top and car body
Now the real fun begins! And you thought you were already having fun? Hah!
1. Try aligning one of the front mounts with the bolt holes in the windshield frame and with the hard top. Do not be too disheartened if they don't align precisely. As the instructions from MiataCage state, you are very likely working with a 20-year old car. You can't expect every car to be the same.
2. You may find that the front mounts have to be bent slightly to achieve a flush fit. This is where it is advantageous to be using mounts made of aluminium. If you don't have a full metal-working machine shop including metal brake in your basement, then you may find a vice and a rubber mallet just as good for bending the mount. Bend it until it fits.
3. You may also find that the bolt holes need to be enlarged or egged-out slightly. You can do this with a drill bit or with a round file with a bastard cut. I prefer the file. Again, this is where it is advantageous to be working with a mount made from aluminium.
4. Once you get the mount fitting to your satisfaction, use the T-40 Torx bolts to attach the HTM to the windshield frame.
5. You can re-use the Phillips head screws from the hard top latch to attach the mount to the hard top, but you may find (a) the head is too mangled and (b) you have had to enlarge the hole in the mount too much. I prefer to use an M6 hex bolt and washer for the hard top side of the HTM.
6. Next, you might want to try bolting the side mount that is diagonally across from the front mount; e.g. if you first installed the driver's side front mount, now install the passenger's side rear mount. Others may have different opinions and suggest you first do both front mounts, or first do both driver's side mounts. I don't know if it makes any difference. Do whatever feels best to you.
7. For the side mounts, you can re-use the bolts that attached the convertible top frame to the car. You will have six bolts from the convertible top. Only four are needed for the HTMs. Use two on each side for the lower bolt holes in the mount; i.e. that bolt the HTM to the car.
8. For the upper bolt holes in the mount; i.e. the ones that bolt the HTM to the hard top, you can re-use the Phillips head screws that were used to attach the latch to the hard top. Or you can use M6 hex bolts. The choice is yours.
9. You may have been unfortunate enough to have drilled out too much of the threaded hole in the hard top while taking off the latches. As a result, the thread may have been destroyed. In this case you can use a 1/2" hex head self-tapping metal screw and attach the mount to the hard top this way. This isn't pretty, but we're assuming that this permanent hard top is, well, permanently attached to the car and isn't likely to be removed.
10. Complete the remaining front and side latches and you're done! Enjoy your new permanent hard top! And now would be another good time to take a beer break. Or an iced tea break. We don't want to promote alcoholism. Now sit back and enjoy your accomplishment!
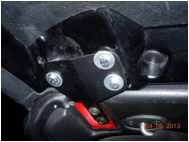
Figure 9: Front windshield hard top mount installed
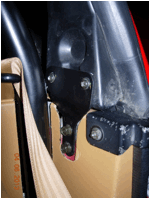
Figure 10: Side hard top mount installed
| [Home] - [FAQ] - [Search] - [Sponsors] - [Forums] |
| [Garage] - [Clubs] - [Contact Us] - [Disclosures] - [More...] |
Copyright
©1994-2024, Eunos Communications LLC
|