Changing Miata Brake Pads
Revised June 16, 1998
Changing the brake pads on the Miata is one of the simplest
"major" services you yourself can tackle. The following writeup covers the
basics of removing and replacing the front and rear brake pads on my 1993 base model
Miata. It should also apply to all 1990-1993 Miatas without anti-lock brakes. I
do not have experience with the 1994+ Miatas or those with anti-lock brakes but Steve
Swiger and James Leasure both commented to me that the process was the same on their 1995
and 1996 cars. Thanks guys!
Changing the brake pads on the Miata was much easier than I
imagined. I was a bit intimidated since I had never changed the brake pads on any car I
had ever owned, but reading through the Mazda Miata MX-5 Workshop Manual and the
Fall 1993 issue of Miata Magazine convinced me that it could be done. I have
written up my experiences and included photos to help those that are planning on changing
the Miata's brake pads themselves. There is also an excellent article written by Norman
Garrett in issue 98-II of the Miata Magazine.
The entire job can be done entirely by ones self in an afternoon. It
took me less than 3 hours, which included taking the pictures, making notes, and a soda
break or two.
This document will cover both front and rear pad replacement. It
does not cover removing your rotors and having them resurfaced. In my case, I felt the
rotors had worn evenly and smoothly and did not need resurfacing. If you are experiencing
any vibrations during breaking, or your rotors have deeply-cut grooves, you will need to
either replace or resurface your rotors (depending on their thickness).
Before beginning this project, make sure you have sufficient light,
time and tools. Much of what you will be doing is straightforward, but attempting to find
a small clip or spring in the dark would probably be quite difficult.
For starters, let's go over the minimum tools you will need. You
will need a jack, four jackstands (two minimum), lug wrench, metric wrenches (10mm and
14mm minimum), a 4mm hex key, a large pair of channel-lock pliers, sturdy string,
anti-squeal compound, high-temp caliper grease, and the replacement pads.
Fronts:
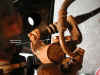
Since the front brakes do the majority of the braking, they tend to
wear out first. (Check out pad 'A' in this picture to see what I
mean) If you hear a profound squeal when applying the brakes, you have likely worn your
front pads down to the point where the "squealers" are contacting the rotor. In
my case, I had worn the pads so low that the "squealers" were coming in contact
with the rotors all the time. If you have reached the point I did where the
"squealers" make noise all the time, you should attend to your brakes as soon as
possible.
To begin removal and replacement of the front pads, securely raise
the front of the car and remove both front wheels. Once the wheels are removed, re-screw
at least 2 lug nuts back on the wheel studs. This will insure that the disc stays in place
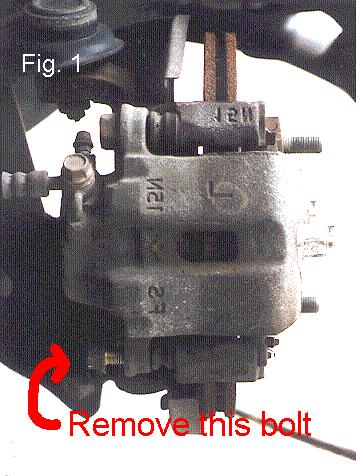
during our installation. Figure 1 shows the front brake caliper.
Remove the lower caliper bolt (arrow). Once this bolt is removed, the entire caliper can
be tilted up on the axis of the upper caliper bolt. Use the string to tie the caliper up
out of the way. Figure 2 shows what you will find underneath the
caliper (the caliper was removed for the picture). The letters A
correspond to the brake pads, the letter B to the springs, the letter C
to the frame, and the letter D to the rotor. With the caliper up and out
of the way, open the pads (A) up enough to remove the springs (B) from the pads. With the
springs removed, the pads can be lifted out of the frame.
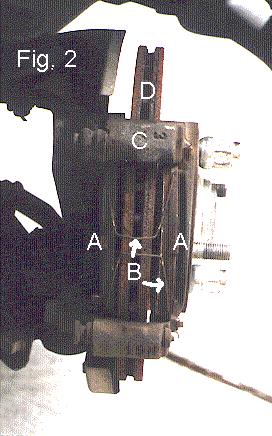
Now would be a good time to discuss the anatomy
of a brake pad. Letter A shows the front spring, letter B shows the front shim, letter C
shows the front "squealer", and letter D shows the front pad. If you will be
installing OEM Mazda replacement pads, check to make sure you have new springs, shims and
squealers. If you will be installing aftermarket pads, you will likely need to save your
old springs, shims and squealers. The squealers should slip right off the old pads. To
remove the shims, carefully pop them off the old pads - a flat-bladed screwdriver might be
necessary here.
Ok, now with the old pads removed, we are now ready to install our
new pads. Installation is pretty much the reverse of what we've just done. If you are
using aftermarket pads, apply some anti-squeal compound to the back of the pad before
cliping the shims back on. Once the anti-squeal has had a chance to set, clip the shims
on. Finally, slip the squealers back on. Now that you have either the complete OEM pads or
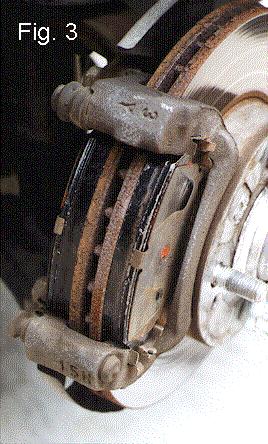
your rebuilt aftermarket pads ready, they just silde back into the caliper frame. Figure 3 shows my aftermarket pads. Note that the pads I used (Mintex
Silver Line) did not use the OEM springs to retract the pads off the rotors. I was
initially worried about the pads rubbing against the rotors, but after several years and
many miles I have not had any problems.
With the new pads back in the frame, all that remains is to retract
the caliper piston and bolt the caliper back on. To retract the FRONT
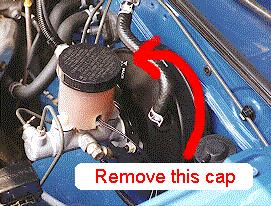
caliper piston, first open the cap on the brake master cylinder. If you aren't sure what
the master cylinder looks like, click here. Now, depending on
how full your master cylinder is, you may need to take some brake fluid out of it. When
you retract the pistons on all 4 brakes, you will likely overflow the master cylinder so
it's a good idea to keep check on the fluid level after each caliper is done. With the
master cylinder cap open, go back to the caliper and hold one of the old brake pads
against the piston. Take the channel lock pliers and squeeze the old pad against the
piston, pushing the piston back into the caliper. Once the piston is back in the caliper,
you should be able to lower the caliper back over the new pads. Once the caliper is back
down on the frame, all that remains is to add a liberal amount of high-temp brake caliper
grease to the lower caliper pin bolt and bolt the caliper back together. That's it!
Now, repeat the same procedure for the remaining front side.
Rears:
Replacing the rear pads is equally as simple as the front pads. The
main difference is in retracting the rear caliper pistons. Note: Improperly
retracting the rear caliper pistons could result in caliper failure and costly repairs.
With that out of the way, let's begin.
Remember that once the rear wheels are removed, you will need to
tighten down the rear rotors with a couple of lug nuts. This must be done to correctly
adjust the rear brakes.
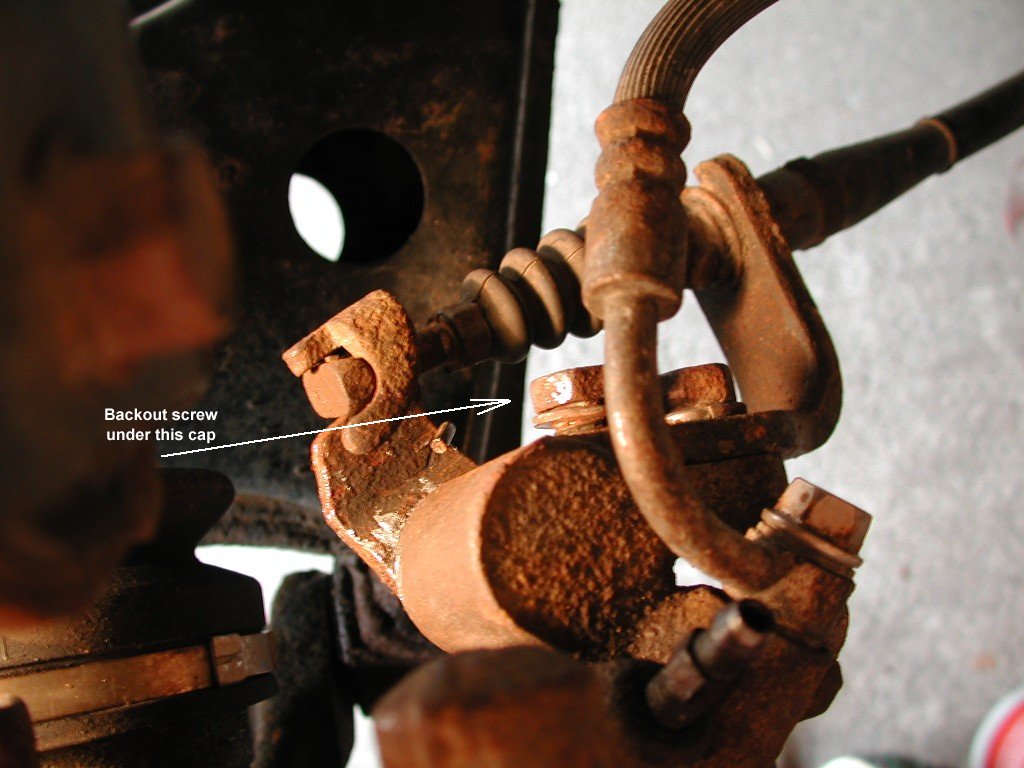
 The first step with the rear brake pads is to retract the caliper
piston. On the inside of the caliper is a 14mm bolt that acts as a cover for the manual
adjustment screw. (Click on photos for larger image.) An easy way to find this bolt is to follow the brake hose to the
caliper. There you will see two 14mm bolts next to each other. The one that covers the
manual adjustment screw is the one next to the one that bolts the brake hose to
the caliper. Remove this bolt and use the 4mm hex key to back the piston into the caliper.
Don't forget to have the master cylinder cap open and keep an eye on the fluid level.
Figure 4 shows the rear brake assembly. In order to unbolt the rear
caliper, first you must pull a black plastic cap off the lower caliper pin bolt head. With
the cap off, you can now unbolt the lower caliper pin bolt and pull (and tie) the caliper
up out of the way.
The first step with the rear brake pads is to retract the caliper
piston. On the inside of the caliper is a 14mm bolt that acts as a cover for the manual
adjustment screw. (Click on photos for larger image.) An easy way to find this bolt is to follow the brake hose to the
caliper. There you will see two 14mm bolts next to each other. The one that covers the
manual adjustment screw is the one next to the one that bolts the brake hose to
the caliper. Remove this bolt and use the 4mm hex key to back the piston into the caliper.
Don't forget to have the master cylinder cap open and keep an eye on the fluid level.
Figure 4 shows the rear brake assembly. In order to unbolt the rear
caliper, first you must pull a black plastic cap off the lower caliper pin bolt head. With
the cap off, you can now unbolt the lower caliper pin bolt and pull (and tie) the caliper
up out of the way.
With the exception of the 'M' shaped retractor spring, the front and
rear disassembly is identical. Remember if you are using aftermarket pads that you will
need to re-use the shims and springs. With the rears though, the 'M' shaped spring should
be usable on most (if not all) brands of pads. Also don't be surprised if the upper guide
falls off the frame. Simply hold it in place while you slide the rear pads back in.
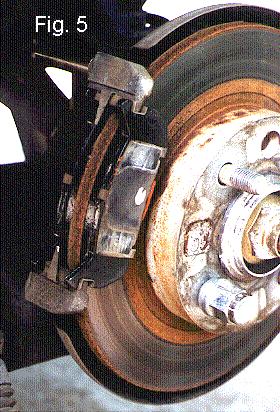
Once you have prepared the new pads for replacement, you can slide
them back into place. Figure 5 shows the new pads in place. You are
now ready to lower the brake caliper back down over the frame. I waited until after I
bolted the caliper back in place to clip the springs on. It just seemed easier. With the
caliper back down on the frame, apply a liberal amount of high-temp brake caliper grease
to the caliper pin bolt and bolt the caliper back in place.
All that remains now is to manually adjust the rear brakes. Slowly
spin the rear rotor while you are turning the rear brake adjustment screw. Just at the
point where the pads contact the rotor, back the adjustment screw off a tad (1/3 turn
should be enough).
Repeat the above steps for the other side and you will be done with
your brake job. Congratulations! Now it's time to go for a short test ride around the
block. Don't forget to check the fluid level in the brake master cylinder (and tighten the
cap). Make sure wherever you go that you test the brakes thoroughly on level ground before
you head out in traffic. Once you are satisfied with your work you are ready to return to
the road. During the break-in period for the new pads (a good 100 miles or so) try to keep
your brakes from getting too hot. Make gentle stops and avoid long stops from high speeds.
A good break-in will result in solid (and quiet) brake performance through the life of the
pads.
 The first step with the rear brake pads is to retract the caliper
piston. On the inside of the caliper is a 14mm bolt that acts as a cover for the manual
adjustment screw. (Click on photos for larger image.) An easy way to find this bolt is to follow the brake hose to the
caliper. There you will see two 14mm bolts next to each other. The one that covers the
manual adjustment screw is the one next to the one that bolts the brake hose to
the caliper. Remove this bolt and use the 4mm hex key to back the piston into the caliper.
Don't forget to have the master cylinder cap open and keep an eye on the fluid level.
Figure 4 shows the rear brake assembly. In order to unbolt the rear
caliper, first you must pull a black plastic cap off the lower caliper pin bolt head. With
the cap off, you can now unbolt the lower caliper pin bolt and pull (and tie) the caliper
up out of the way.
The first step with the rear brake pads is to retract the caliper
piston. On the inside of the caliper is a 14mm bolt that acts as a cover for the manual
adjustment screw. (Click on photos for larger image.) An easy way to find this bolt is to follow the brake hose to the
caliper. There you will see two 14mm bolts next to each other. The one that covers the
manual adjustment screw is the one next to the one that bolts the brake hose to
the caliper. Remove this bolt and use the 4mm hex key to back the piston into the caliper.
Don't forget to have the master cylinder cap open and keep an eye on the fluid level.
Figure 4 shows the rear brake assembly. In order to unbolt the rear
caliper, first you must pull a black plastic cap off the lower caliper pin bolt head. With
the cap off, you can now unbolt the lower caliper pin bolt and pull (and tie) the caliper
up out of the way.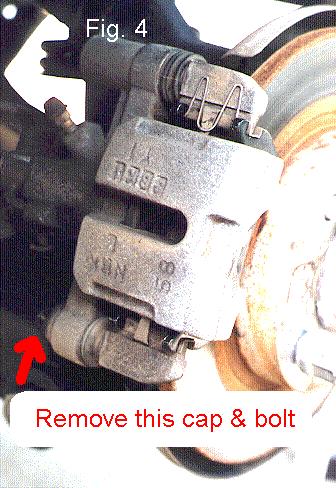