 Now attach a female quick disconnect connector
to one end of the RED wire and one end of the GREEN wire.
Now attach a female quick disconnect connector
to one end of the RED wire and one end of the GREEN wire.By Mike Greenwood (LittleDeuceCoupe)
mike.greenwood@weyerhaeuser.com
Ever since I bought my ’99, I have been trying to add what I consider to be one of the best safety features you can add to a car, Daytime Running Lights or DRL’s. After exploring what I considered to be several options to having this feature added to my Miata, I quickly realized this was not such a simple task after all. First my dealer was no help, not only do they not do the work, they didn’t have anyone they could suggest to install them either! I talked to a Canadian dealer (DRL’s are required on all cars in Canada), they informed me that the wiring harness for a Canadian Miata is quite different from the ones imported to the USA. Then I explored the garage section of Miata.net, it didn’t take me long to figure out the write-up for DRL’s for the M1 Miata was not going to work on an M2. I also posted questions in the forums requesting information on how to accomplish just such a task, with little to no luck. Most of the responses were geared toward modifying the factory fog lights to come on with the ignition and since I didn’t have the factory fog lights on my Miata, this was not even an option. I also did not want to add aftermarket lights for this purpose either. At this point, I was left to coming up with my own solution, and that’s just what I did!
While I was coming up with a solution for this modification, I had two goals in mind. First, I didn’t want to permanently modify any part of the Miata. No adding extra lamps, drilling holes in those expensive headlights, re-wiring, etc. Secondly, It had to be totally reversible (removable). Just because I like this feature, doesn’t mean the next guy will. But wait, I’m keeping the car forever so I guess that one didn’t really matter!
The solution presented here met both my goals, and with a little electrical “know how” is simple to install. This modification uses the factory headlamps with no wiring modifications and costs under $20 in parts to complete. It should only take about an hour to install.
It's important to note that I performed this modification on my base model '99, and the information presented here is based on that Miata. I have received confirmation from a couple of 2000 and 2001 Miata owners that the wiring is the same.
Overview:
This modification consists primarily of one automotive relay installed under the steering column. This relay, when connected to an ignition key power source, provides a “ground” source to the headlamp lead wire coming from the headlamp/parking lamp switch. This in affect performs the same function as turning the headlamp switch on manually. The wiring associated with the headlamp switch consists of three wires, one for the parking lights, one for the headlights and a ground. If you bypass the switch and connect a ground wire to either the parking lamp or headlamp wire the appropriate lights will turn on. When either of these wires is grounded, a relay under the hood is activated to provide power to the lamps. Grounding the headlamp wire only turns on the headlamps, leaving your tail lamps, side marker lamps and dash lights off.
2 Wire Taps - 1 red and 1 Beige (Radioshack
# 64-3053/64-3140)
4 Female quick disconnect Connectors (Radioshack # 64-3131)
1 Ring terminal (Radioshack # 64-3115)
1 Automotive relay (Radioshack # 275-226)
24" 18 - 20 gauge wire (8" green, 16" black) (Radioshack #
278-1226)
8” 12 gauge wire (Red) (Any Auto parts store)
1Shrink tubing (Radioshack # 278-1627)
Before we take the Miata apart, lets start by making up the relay assembly that will become our switch for our DRL’s
First cut 3 pieces of 18 - 20 gauge wire to 8" (2 black and 1 green).
Cut 1 piece of 12 gauge wire to 8” (Red)
Install a ring terminal to one end of both BLACK wires. On the other ends, install a female quick disconnect connector.
Now attach a female quick disconnect connector
to one end of the RED wire and one end of the GREEN wire.
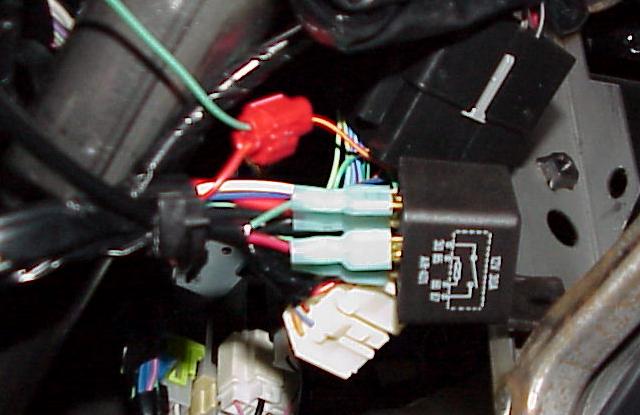
 To complete the assembly, Plug the RED wire
onto the terminal marked 85 on the relay (NOTE: this is one side of the relay
coil). Next, plug the GREEN wire onto the terminal marked 87 (NOTE: this is one
side of the switch terminal). Now plug one BLACK wire onto terminal 86 (NOTE:
this is the other side of the relay coil) and the other BLACK wire to terminal
30 (NOTE: this is the other side of the switch terminal). The numbers on the
relay are standard for a generic automotive type relay; if you chose to use a
different type of relay follow the wiring schematic.
To complete the assembly, Plug the RED wire
onto the terminal marked 85 on the relay (NOTE: this is one side of the relay
coil). Next, plug the GREEN wire onto the terminal marked 87 (NOTE: this is one
side of the switch terminal). Now plug one BLACK wire onto terminal 86 (NOTE:
this is the other side of the relay coil) and the other BLACK wire to terminal
30 (NOTE: this is the other side of the switch terminal). The numbers on the
relay are standard for a generic automotive type relay; if you chose to use a
different type of relay follow the wiring schematic.
Finally, I used a piece of shrink tubing to clean up the assembly
Start by removing the lower dash cover, located right below the steering column. There are two screws holding this cover in place, located at the bottom corners closest to the pedals, unscrew and gently pull down on the cover from the back toward the driver seat to remove.
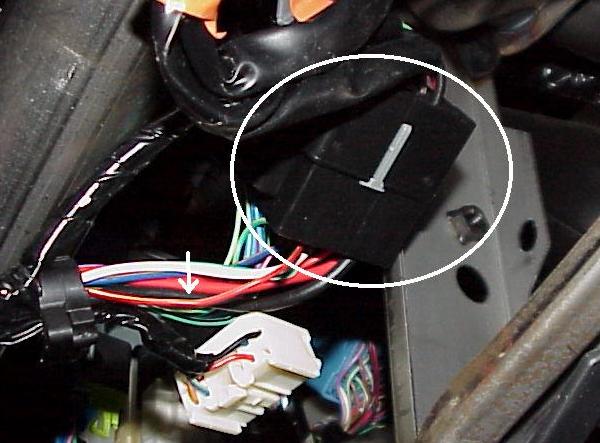 Once the cover is removed, locate the wiring harness plug for the steering column. This plug provides power for the headlamp switch, Windshield washer lever, etc. and is located on the right side of the column under the lower dash cover. This plug is black with a gray release latch.
Now find the RED wire with the YELLOW stripe next to the solid WHITE wire coming out of this plug. This is the headlamp signal wire, when this wire is grounded the headlights will come on. (Note: There are actually two wires that are red with a yellow stripe coming out of this plug, they both will turn on your headlights if grounded, however the second wire is used to turn on your headlights momentarily when you use the "flash to pass" feature. I chose to use the wire that is connected to the headlamp switch for consistency in wiring. Also, if you choose to trace the wires back to the headlamp switch to verify wiring connections you will notice that the wires coming from the switch are green-red going into the connector and red-yellow/lime green coming out the other side of the connector. I chose to connect to the red-yellow wire on the side of the plug leading to the engine compartment only because more of the individual wires are exposed and are easier to get to.)
Before we attach a red tap to the red wire with the yellow stripe previously identified, take a close look at the tap; the metal "U" contact has two slits, make sure the smallest one is on the side of the connector you can see all the way through. Slide the red tap over the RED wire with the YELLOW stripe and then slide in the GREEN wire from the relay into the tap and crimp.
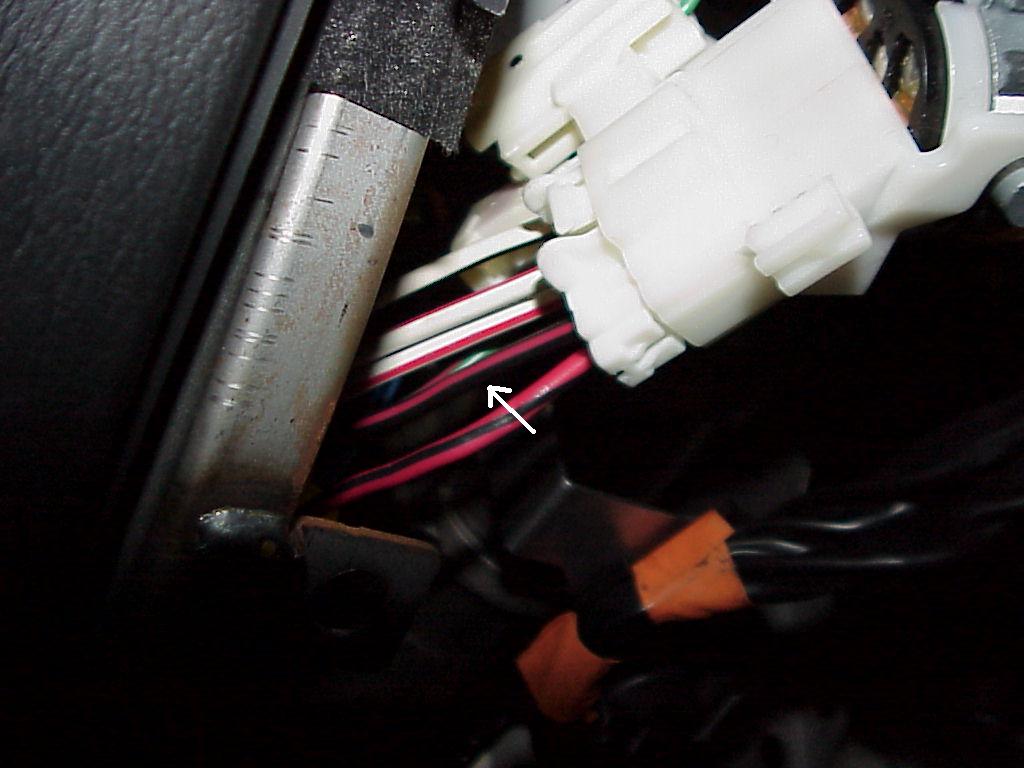 Locate the wiring harness attached to the backside
of the ignition switch, this harness has a white plug and is on the left side
of the column.
Locate the wiring harness attached to the backside
of the ignition switch, this harness has a white plug and is on the left side
of the column.
Find the BLACK wire with the RED stripe, this is the "power on" +12 volt source. Using a beige tap, connect the RED wire from the relay to this wire and crimp. (NOTE: There are two wires that are black and red, one is black with a red stripe, and the other is red with a black stripe. Both provide power only when the key is in the "ON" position, however the BLACK wire with RED stripe turns “OFF” the power when you turn the key to the “Start” position, to start your engine and prevent battery drain.)
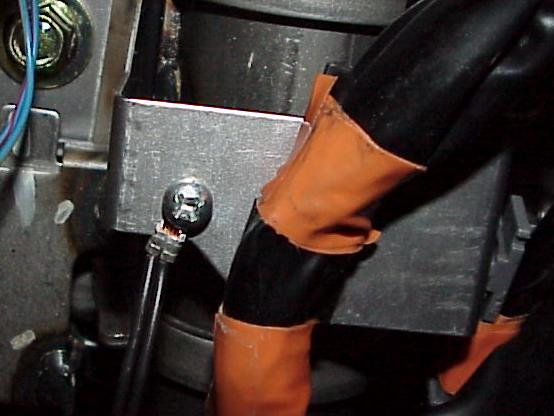 For the final connection, find a suitable
ground source and connect the two BLACK wires. I couldn’t find what I
considered a suitable ground source, so I drilled a small hole in the support
bracket underneath the steering column and fastened with a sheet metal screw.
For the final connection, find a suitable
ground source and connect the two BLACK wires. I couldn’t find what I
considered a suitable ground source, so I drilled a small hole in the support
bracket underneath the steering column and fastened with a sheet metal screw.
With all the connections made and before you put everything back together, test your work. If everything is connected properly, your lights should be OFF when the ignition is "Off" or in the "Accessory" position. Turn the key to "On", your headlights should now be ON, and only your headlights! Start the car and verify that the headlights go “Off” while starting the engine and then stay on while the engine is running. All your dash lights and parking lights should be off. If anything but the aforementioned is true, recheck your wires and verify you connected to the headlight wire coming from the wiring harness plug. Also, if your headlights did not go “Off” while you were starting your engine, you connected to the wrong Black/Red wire coming from the ignition switch. Also test the headlight switch, you should be able to turn your parking lights and headlights on when the key is “Off” or in the “Accessory” position like normal (Note: leaving the headlight switch on and then turning the car on, has no adverse effect on the wiring or lighting, all you have done is provided a second source of “ground” to the headlamp relay under the hood.).
 With everything functioning properly, secure the relay so it doesn’t rattle or short out on any metal and reinstall the lower dash cover.
I have been very pleased with how this modification turned out, it ended up not being as complicated as I initially suspected and I no longer need to remember to turn my headlights on during the day. The only shortcoming or down side of this modification that I can come up with is your headlamps are on at full power. I have been told that factory installed DRL’s have a voltage limiting relay that turn the headlamps on at a reduced brightness, in my mind this is not a shortcoming and in fact translates into better visibility. Sure your headlights bulbs will probably not last as long running them all the time, but I believe that’s a very small price to pay for safety.
One last thing, this modification only turns your headlights on, not your taillights, side marker lights or dash lights.
Don’t forget to turn your lights on at night the old fashioned way (with the switch), or no one will see you from behind!
Please feel free to forward any comments or suggestions on how to improve this article, mgreenwood@wii.com
| Back to the Garage |
08 July, 2001 |