by John Gustafson
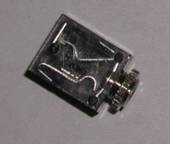
The stock CD player plugs into a 13 pin DIN plug on the back of the stock head unit. The configuration of the pins of the DIN plug (http://miata.net/garage/audio.html) is shown below.
![[audio signal connector]](external_audio_interface_files/image001.gif)
 When the CD player is off or not playing, the left and right channel signals
come out pins 1 and 3, respectively and are returned to the head unit via
pins 2 and 4, respectively. Pin 5 is
a common ground for both channels. When
the CD player is playing, the output signal from the head unit is cut off
and the left and right channel signals from the CD player go to the head unit
via pins 2 and 4, respectively. If
the CD player is not installed, a short plug simply connects pin 1 and 2 for
the left channel and pins 3 and 4 for the right channel.
The picture at the right shows a set of jumpers that do the same thing
as the short plug. Note that the jumper
connecting pins 5 and 11 is a possible solution to the common power-on problem
for the stock head unit (see below for more on this).
When the CD player is off or not playing, the left and right channel signals
come out pins 1 and 3, respectively and are returned to the head unit via
pins 2 and 4, respectively. Pin 5 is
a common ground for both channels. When
the CD player is playing, the output signal from the head unit is cut off
and the left and right channel signals from the CD player go to the head unit
via pins 2 and 4, respectively. If
the CD player is not installed, a short plug simply connects pin 1 and 2 for
the left channel and pins 3 and 4 for the right channel.
The picture at the right shows a set of jumpers that do the same thing
as the short plug. Note that the jumper
connecting pins 5 and 11 is a possible solution to the common power-on problem
for the stock head unit (see below for more on this).
Solution
 The solution is to simply replace the stock CD player with a normally closed
1/8” stereo phono jack (see photo at right and wiring
diagram below) connected to a 13 pin DIN plug.
When nothing is plugged into the phono jack,
it acts just like the short plug that is used when the CD player is not installed
(i.e., the output signals are returned to the head unit by the closed contacts
in the phono jack and the radio and cassette play
normally). Plugging a 1/8” phono plug into the jack disconnects the output signals from
the head unit and connects the signals from the phono
plug to the input to the head unit.
The solution is to simply replace the stock CD player with a normally closed
1/8” stereo phono jack (see photo at right and wiring
diagram below) connected to a 13 pin DIN plug.
When nothing is plugged into the phono jack,
it acts just like the short plug that is used when the CD player is not installed
(i.e., the output signals are returned to the head unit by the closed contacts
in the phono jack and the radio and cassette play
normally). Plugging a 1/8” phono plug into the jack disconnects the output signals from
the head unit and connects the signals from the phono
plug to the input to the head unit.
Wiring Diagram from Normally Closed 1/8” Phono Jack
Connecting the Phono Jack and DIN Plug
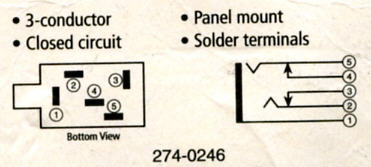
You should be able to find a 1/8” Normally Closed Stereo Phono Jack at any electronics parts store (e.g., Radio Shack part number 274-246). However, the 13 pin DIN plug is harder to find. One source is www.DigiKey.com (part number CP-1013-ND). The phono jack and DIN plug should be connected using shielded cabling. If you can’t find 5 conductor shielded cable you can cut the ends off of a 5 pin male DIN to 5 pin male DIN cable (e.g., part number 42-2151 from Radio Shack). The length of the cable needed depends on where you plan on mounting the phono jack.
The cable is constructed by connecting the left and right input and output pins of the DIN plug to the respective connections on the phono jack (e.g., diagram below).
|
Head Unit Signal |
DIN pin # |
Phono Jack Connection |
|
Left Output |
1 |
3 |
|
Left Input |
2 |
2 |
|
Right Output |
3 |
4 |
|
Right Input |
4 |
5 |
|
Signal Ground |
5 |
1 |
1/8
Phono Jack
13 Pin DIN plug
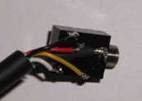
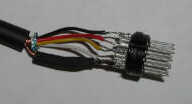
The connections on both the phono jack and DIN plug are small so you will need to be careful and use good soldering technique (e.g., tin the connections and wire ends before final soldering). You will also need to cover the ground wire to ensure that it does not short any of the connections.
If you have not already done so, you can correct the common power-on problem of the stock head unit by connecting pin numbers 5 and 11 with a resistor as suggested by David Thompson as at http://miata.net/garage/radio.html.
Step
by Step Installation:
First step is to remove the head unit from the car. If you have not done this before follow the directions at http://miata.net/garage/miata_radio_removal.html. There are several hints how to remove the eyeball vents. A length of stiff wire with a hook bent at the end can often be used to get a good grip and the eye balls vents removed by giving them a steady tug.
Second step is to remove the head unit and CD player from the mounting bracket and to move the head unit to the top of the bracket. This is a simple process of unplugging the CD player form the back of the head unit, removing the four mounting screws on either side of the head unit and 2 on either side of the CD player and remounting the head unit at the top of the brackets.
Third step is to mount a storage bin or what ever you want to do with the now open space below the head unit. You should be able to get a bin that fits at any car audio installer. You may have to fabricate supports to securely connect the bin to the mounting brackets unless you find one specifically made for the Miata.
Forth step is to plug the 13 pin DIN plug into the jack on the back of the stock head unit and reinstall the head unit by reversing Step 1.
 The final question is where to install the phono
jack. Some obvious choices include
either of the glove boxes. These are
attractive locations since the player or other input device can be left out
of sight. Also, a power connection
(using pin #7 of the DIN plug) could also be installed in either of these
locations. Another option is to install
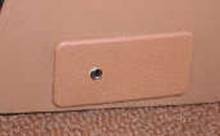
the phono jack in the little punch out on the passenger
side of the transmission tunnel that covers the mounting bolts for the center
console (see picture at right). This
is out of the way and allows the MP3 player to be mounted on the dash or in
the storage bin under the head unit.
The final question is where to install the phono
jack. Some obvious choices include
either of the glove boxes. These are
attractive locations since the player or other input device can be left out
of sight. Also, a power connection
(using pin #7 of the DIN plug) could also be installed in either of these
locations. Another option is to install
the phono jack in the little punch out on the passenger
side of the transmission tunnel that covers the mounting bolts for the center
console (see picture at right). This
is out of the way and allows the MP3 player to be mounted on the dash or in
the storage bin under the head unit.
Parts:
- 1/8” Stereo Phono Jack (RadioShack part number 274-246) = $2.99
- 13 pin DIN plug (Digi-Key part number CP-1013-ND) = $1.65 plus shipping
- 5 conductor shielded audio cable (I cut the ends off of a 5 pin male DIN to 5 pin male DIN cable from RadioShack, part number 42-2151 = $5.99
Total Cost is about $15 including shipping of DIN plug.
| Back to the Garage |
13 November, 2004 |