LOCTITE CRANK FIX - PART 2
The procedure is very similar to a timing belt change, except
that you re-use the old belt. Follow the same
steps you would need to disassemble the front of the motor
and expose the crank shaft. Here are some
photos to show the scope of the project.
DISCLAIMER
See a Mazda Shop Manual for comprehensive instructions on timing belt replacement.
This page is for information only and does not represent instructions or procedures.
Some Photo Highlights
 |
 |
|
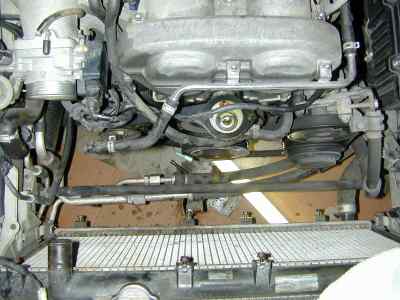
Getting ready to open timing covers. Radiator is drained. Intake plumbing
and coolant hoses removed. Accessory belts off. It's far easier to work
with the plastic pan under the motor removed.
I also removed the fans and dropped the sway bar.
|
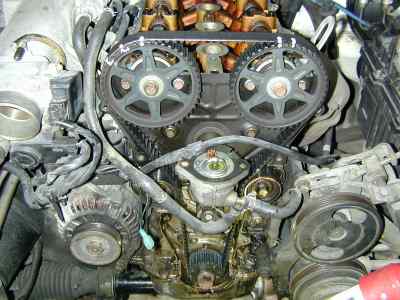
Valve cover is off. Timing covers off. I rotated the crankshaft to top
dead center and marked the belt with white paint (white-out) so I could
easily put it back the same way.
As I did not replace the belt, I left the little coolant hoses in place
and just swung the belt out of the way.
|
|
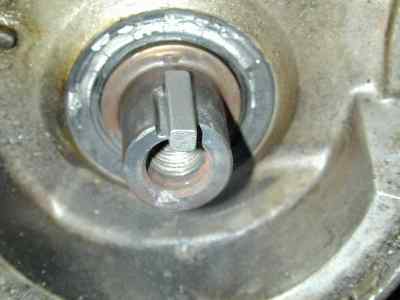 |
New woodruff key on worn crank. The keyway wear allowed the pulley to
slip about 10 degrees which would be a 20 degree retard on the valve timing.
The old key was worn and allowed the slippage.
The new key had enough contact to align the gear and crankshaft for re-assembly.
|
|
I did have one major problem doing this fix. Even though the old crank bolt
was finger tight when I first tried to remove it, a little bit of rust and a
burr on the threads caused it to seize. Instead of getting out the Liquid
Wrench and trying to rock it out, I forced it and it snapped off. I later
removed what was left of the bolt with a screw extractor, propane torch, 8 hours
of effort, and a lot of thinking. Be careful!
 |
 |
|
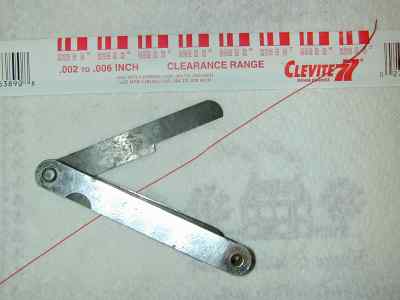
Clearance between pulley and crank should be checked to see if it exceeds
.020 mm. This is usually done using plastigage. It's a plastic string
inserted between the pulley and crank and then squashed as the two parts
mate. The width of the squashed part is checked against a chart for the
clearance. I couldn't fit the plastigage between the two surfaces without
it being cut.
I finally snipped off a small piece of .020 shim from an old feeler gauge
and used that as a go/no-go check. My tolerances were under the .020 number.
If it had been over, then Loctite 660 is recommended between the crankshaft
and pulley surface.
|
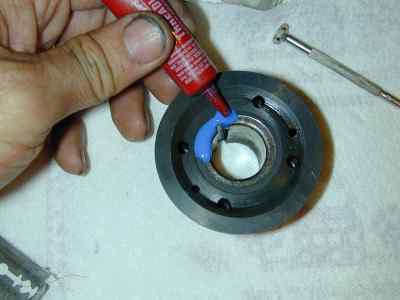
I put Loctite on the crankbolt and anywhere there was metal-to-metal
contact on the gear, even on the back as shown above. It also went on the
inner surface of the gear.. In the keyway slot, I used Loctite 660. As mentioned
on the left, the 660 product is only used in the keyway unless the pulley-crankshaft
clearance exceeds .020 mm.
|
|
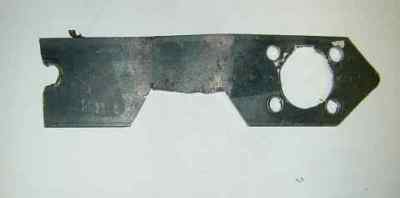
This crude tool took about two hours to make. It maintains crank/pulley
allignment while torquing the bolt. Without it, it's my opinion there
is some risk that the pulley will slip out of alignment because of the
wider keyway when the bolt is tightened.
It also locks the crank and allows easier application of torque. I highly
recommend its use.
|
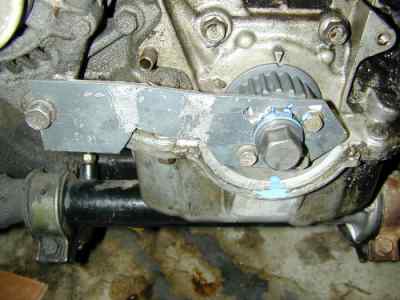
Here is the pulley locked down with the home made fixture. Note that
because I was sloppy in making it, only three of the four hold-down bolts
fit the fixture,
The bolt has been tightened to 85 foot pounds with an accurate torque
wrench. Excess loctite is dripping off the assembly.
The loctite 242 that I used has a long setup time, but the loctite 660
will start to set within minutes after assembly. I worked quickly. It
took less than 15 minutes to mount the pulley, bolt on the fixture, spin
on the crank bolt and torque the assembly.
It's very important to allow 24 hours for curing. Since I was in no rush,
I gave it 48 hours before I did any further work on the engine.
|
RESULTS
Reassembly was straight forward. The engine started after I put it back together.
Re-alignment of the crank pulley gave me the correct valve timing again. The
car's performance improved. Prior to the repair, my carwould take 15-16 seconds
to accellerate from 50 to 70 mph in 5th gear. After the repair, the typical
times were 12-13 seconds. which compares well with the 13.8 seconds reported
by Car & Driver in their initial test report on the 1990 miata.
UPDATE
I did the work in November of 2000. I now have about 2 1/2 years and close
to 21K miles on the repair. The car is a daily driver and used for autocross.
I have heard from two otherowners who have more mileage than I on their repairs.
Your results may not be the same. Some owners have had this repair fail after
a month. I do not know why it works on some cars and not on others.
Email Me (H. Sue)
Updated
February 25, 2007
