Miata Window TLC
Aaron Smith
aaron.smith@ucdavis.edu
Have you noticed that the windows in your Miata seem to be getting
slower with old age? Has your window completely jammed and it won't move any more? Are you
jealous at how quickly your friend's '99 Miata windows go up and down? This article will
explain how to perform basic maintenance that may help to make your window regulator
assembly last longer on your M1.
The most common reason why Miata windows fail is due to a broken
cable caused by added stress. Over time, the white lithium grease that lubricates the two
tracks that guide the window looses its effectiveness. This increases the stress on the
cables due to the added friction. This added friction also slows down the electric motor
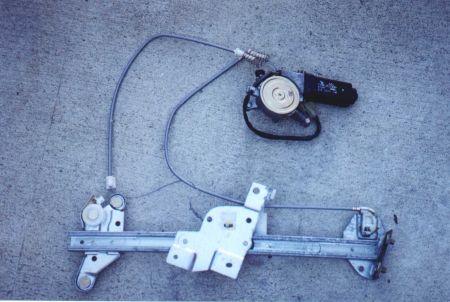
(or your arm). Illustration (a) shows the window regulator assembly when it has been
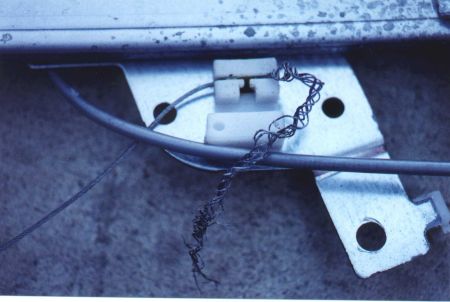
removed from the door. Illustration (b) shows a cable assembly that has failed due to
stress. If this has happened to your cable, don't run out and buy a new regulator assembly
just yet. Look at the instructions found on Miata.net at window.html.
You may be able to have the cable fixed by a motorcycle shop for as little as $10.
If your windows are still working but the whole process seems to
take a bit too long, here are some steps that you can take to lubricate the window glass
guides and hopefully prevent the cable from failing.
First, read through the whole process and decide if there is
anything that you may need to get before you begin. You will need the following tools and
supplies:
- #2 phillips screwdriver (most common size)
- Small flat blade screwdriver
- Spray can of white lithium grease
- Window cleaner
- Paper towels
- Cloth rag
The reason why white lithium grease is used is because the rollers
on the window regulator assembly are made of plastic. Petroleum based lubricants will
cause them to break down. I also recommended purchasing the spray type grease because
it’s easier to apply in this procedure.
 First, slide the door lock to the locked
position and remove the phillips screw that holds the inner handle cover in place. Remove
the cover and set it aside. The cover makes a handy container to hold the screws that
you'll be removing from the door panel. To prevent scratching the door handle or the
plastic plug, wrap the tip of the flat blade screwdriver with the cloth rag. Remove the
small plug at the top of the door pull handle that covers the top screw. Depending on the
year of your Miata, you'll either have a door pull handle and a map pocket or a door pull
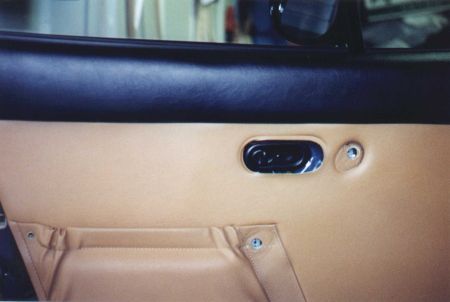
handle with an integrated armrest. Either way, you'll find three phillips screws located
as shown in illustration (c). Remove the three screws and the door pull handle. If you
have manual windows, rotate the handle so that it points upward. Hook the rag behind the
arm of the handle and pull both sides of the rag downward to remove the "C"
shaped clip that holds the handle in place. Remove the handle by pulling it straight off.
First, slide the door lock to the locked
position and remove the phillips screw that holds the inner handle cover in place. Remove
the cover and set it aside. The cover makes a handy container to hold the screws that
you'll be removing from the door panel. To prevent scratching the door handle or the
plastic plug, wrap the tip of the flat blade screwdriver with the cloth rag. Remove the
small plug at the top of the door pull handle that covers the top screw. Depending on the
year of your Miata, you'll either have a door pull handle and a map pocket or a door pull
handle with an integrated armrest. Either way, you'll find three phillips screws located
as shown in illustration (c). Remove the three screws and the door pull handle. If you
have manual windows, rotate the handle so that it points upward. Hook the rag behind the
arm of the handle and pull both sides of the rag downward to remove the "C"
shaped clip that holds the handle in place. Remove the handle by pulling it straight off.
Now you will need to remove the door panel. There are tools
available for about $5 to pop the plastic clips out that hold the panel in place, but I
have found that the clips on the Miata can easily be removed by pulling on the edge of the
panel in the area of each clip. The clip will remain attached to the door panel and it
will release from the door with a "pop." Pop out all of the clips that run along
both sides and the bottom of the panel. If your car has the separate speaker covers, you
may need to remove these too. Once all of the clips have been removed, you can pull the
panel outward a few inches and then lift the entire panel upward and off of the car. If
your car is equipped with a tweeter in the door panel, don't forget to disconnect the
wiring harness that connects to the tweeter.
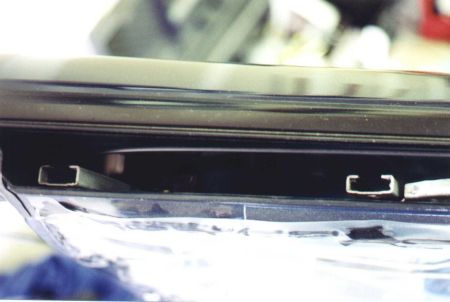 With the door panel removed, you will see the
top of the two glass guide assemblies as shown in illustration (d). Roll the window all
the way down. This will help to prevent any overspray from ending up inside your door.
When you're done, you can roll up the window and clean off the excess grease. Using the
can of spray grease with the little red tube attached (is there a proper name for those
things?), try to coat the inside of the tracks with as much grease as you can. Roll the
window up and spray some grease on the plastic rollers that slide inside the tracks. Now,
roll the window back down and spray some more grease inside of the tracks. You may want to
repeat this step a few times to get an even application of the grease.
With the door panel removed, you will see the
top of the two glass guide assemblies as shown in illustration (d). Roll the window all
the way down. This will help to prevent any overspray from ending up inside your door.
When you're done, you can roll up the window and clean off the excess grease. Using the
can of spray grease with the little red tube attached (is there a proper name for those
things?), try to coat the inside of the tracks with as much grease as you can. Roll the
window up and spray some grease on the plastic rollers that slide inside the tracks. Now,
roll the window back down and spray some more grease inside of the tracks. You may want to
repeat this step a few times to get an even application of the grease.
 Roll the window back up and clean the window
thoroughly with glass cleaner. It's important to clean off all of the grease on the window
before you replace the door panel as the grease could get on the window molding and cause
greasy smear marks whenever you roll the window up or down. Now, replace the door panel,
the speaker cover if necessary, the inner handle cover, and the door pull handle.
Roll the window back up and clean the window
thoroughly with glass cleaner. It's important to clean off all of the grease on the window
before you replace the door panel as the grease could get on the window molding and cause
greasy smear marks whenever you roll the window up or down. Now, replace the door panel,
the speaker cover if necessary, the inner handle cover, and the door pull handle.
Now you're done! Just think of how impressed that the drive through
window person will be at the speed of your windows. Ok, maybe it won't make that much of
an improvement and they'll never be as good as new, but I noticed that my windows were a
bit quicker when I finished and the electric motor seems to "complain" less as I
move the windows.
Next month I plan to go over some headlight upgrades that will help
you to better see the road ahead. Until then, happy motoring!
| Back to the Garage |
31 May, 1999 |