2002 Miata LS

Brian Sanborn, Groton, MA

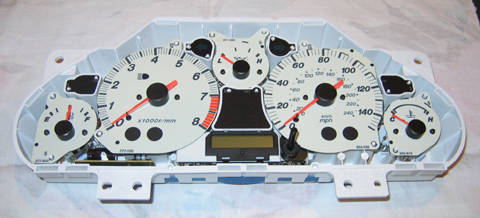
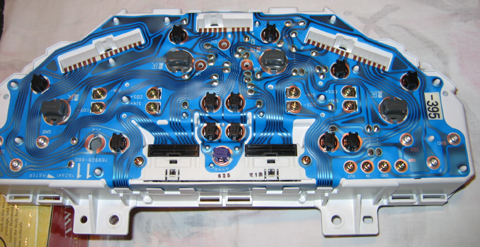
 Oil Pressure Gauge Modification

After doing the VDO Oil Pressure Sender Upgrade, I knew from reading the Miata.Net Garage pages and threads in the forum that the factory gauge was not a normal oil pressure gauge.  The factory gauge is set up to respond to the simple ON or OFF ground switch signal that the factory oil pressure sender provides and point the needle just slightly right of straight up in the ON position.  The new VDO sender provides a completely linear signal from 10 ohms at 0 PSI up to 180 ohms at 80 PSI.  The factory gauge does not respond in a linear fashion with the VDO sender inputs.  It is very sensitive in the low range of 35-40 PSI and below.  However it seems to be almost numb above 40 PSI level.  It also has a mechanical or viscous damped function that makes all needle response painfully slow.

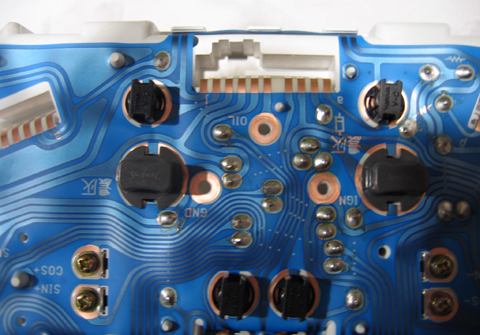
The objective is coming up with some simple changes to the factory gauge that will make it behave more like a real VDO oil pressure gauge.  I must warn you that 70% of the desired effect is gained by moving the needle on the gauge face to reset and calibrate the ZERO PSI position.  This will give some more needle swing so you can see the movement when the oil pressure changes.   And, unless you are comfortable doing the resistor removal and replacement work that I will detail below... don't try this modification.  The resistor value change makes the factory gauge have a more linear response and in particular in the higher end.  But the benefit of the redesigned gauge is not worth getting in over your head and destroying the factory gauge... and having to buy a new one.

This change will make the movement of the needle more balanced from 0 PSI through 80 PSI.  However,  even with this mod, the gauge is still biased toward low end sensitivity. This not a bad thing, but I wish I could have gone all the way.  

There has been a late breaking bit of news on the damping problem and the full linear performance.   See the last paragraph at the end of this webpage.

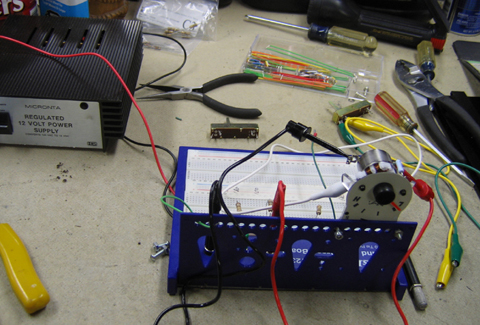
If your still with me, then here is how I modified my 2002 Oil Pressure Gauge to respond more like a standard oil pressure gauge.  The first thing I needed was a way to simulate the VDO sender inputs at the workbench.  I also needed to be able to mix and match the resistor values on the gauge assembly to see what effect the changes made.  Here is the breadboard setup I came up with.

I used a 12V power supply that I had available.  This is preferred because it is protected with a circuit breaker and will  give some protection against shorts.  But you could use a 12V battery.  The breadboard allows me to supply the 12V and GND to the board and to mount resistors in the board to simulate the VDO inputs.  I had resistor values setup for 10, 32, 95, 138 and 180 ohms.  This gives me 0, 10, 40, 60 and 80 PSI simulated inputs.  Each 1 PSI increase in pressure results in a 2.125 ohm increase in the SENDER input.  I also needed to be able to experiment with different values for the external resistors on the gauge.  Using other positions on the breadboard and patch cords, I was able to swap different resistor values in and out of the gauge to see the effect.

I did a lot of research on Miata.Net in the Garage section and in the forums. One article is by Neal Salvin which covers a  lot of the basic information.  Another by Doug Gould goes at it from the NA level.   I also must give credit to a forum entry by Tom Moenter who is an NA owner but helped me translate his success with the modification on his 97 NA into the 2002 NB gauge.

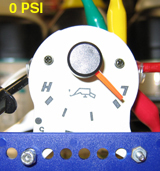
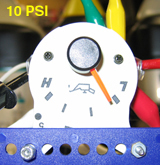
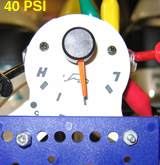
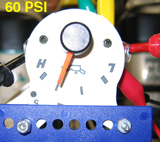
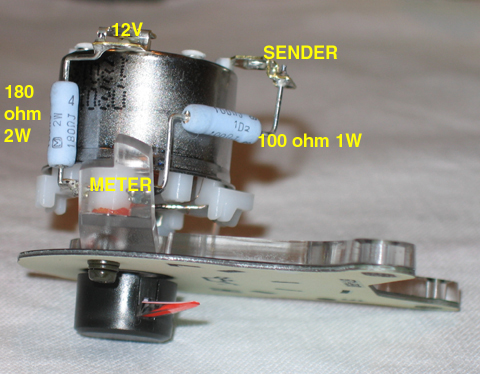
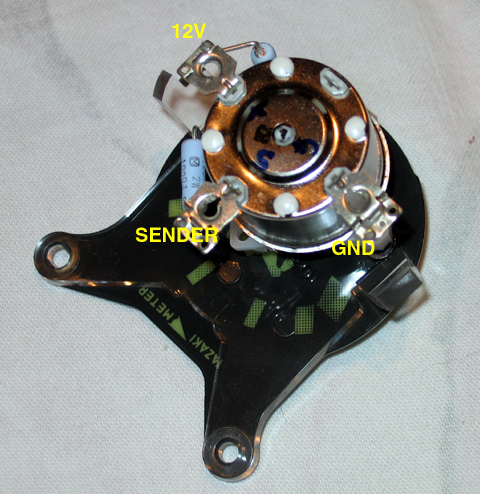
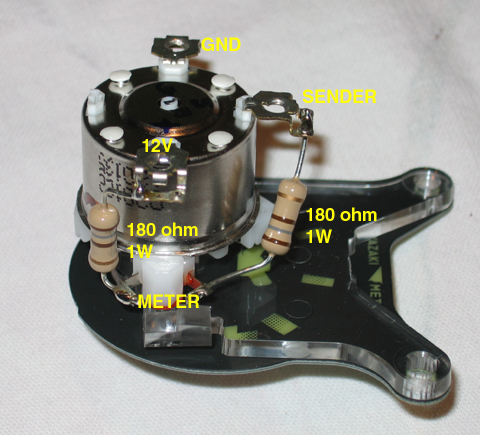
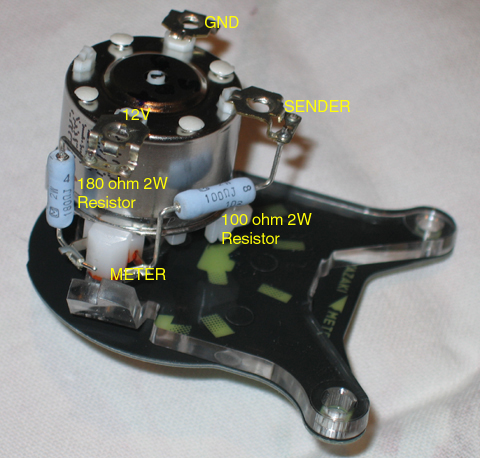
Because I am not a EE trained guy, it took many hours of experimentation to find a solution that meet most of the objectives  In the end, I found that the fix was very simple and straight forward.  The solution turned out to be to a balancing of the two external resistors by soldering in a 180 ohms resistor on the SENDER TO METER side to match the 180 Ohm resistor on the 12V to METER .  The effect seems to be in getting the two resistors the same.  A combination of 100 and 100 ohms worked almost as well.  The following is series of photos shows what the modified gauge displays for 0, 10, 40, 60, and 80 PSI.


STEP-BY-STEP Procedure

I am assuming that you have already installed the VDO sender.

The first part of the job is to get the oil pressure gauge out of the instrument cluster.  Follow the instructions in the Miata Workshop Manual to remove the Instrument Cluster Bezel (09–17–6 METER HOOD REMOVAL/INSTALLATION.) and the Gauge Cluster (09-22-3 INSTRUMENT CLUSTER DISASSEMBLY).  

Using a small screwdriver covered with a small piece of cloth in the rear corners, will help get the METER HOOD to pop forward.

The CLUSTER comes out after removing the screws and the three ribbon cable connectors. Wrap the connectors with some paper or cloth to prevent any accidental grounding.


Remove the black bezel and the clear cover  from the front of the cluster.  There are plastic fingers all around the back that hold them on.  Keep any dirt or finger prints off the inside of the clear cover

Remove the Oil Pressure gauge by removing the three screws on the back of the cluster

Here is a shot of the back of the cluster housing showing the flexible circuit board overlay. 

In the center top you can see the 3 screw holes.  The gauge as already been removed in the picture

Let's look at a side view of the 2002 factory gauge.  I am assuming that all the NB gauges are the same.  This may be a bad assumption for you and you need to verify this as you look at your gauge. 

There are two external 2W light blue resistors on the factory gauge.  There is a 180 ohm resistor running between the 12V post and the METER  input connection.  And a 100 ohm resistor running from the SENDER post to the METER input.  Both resistors attach to METER input by separate solder points but it is a common connector 

Using a braided copper de-soldering tool, remove the 100 ohm resistor and replace it with a 180 ohm resistor with at least a 1 watt rating.  You don't need a 2W resistor here because the current flow with the resistors balanced is way below the 2W level.  1 watt resistors are fine. 

Here is a top down view of the back of the gauge showing the 3 connector posts that get attached to the cluster housing.   The pictures shows the 12V, SENDER and GND posts.

This is what the gauge should look like after the resistors have been changed.  I used 180 ohm 1W ceramic resistors.  I had to reinstall both resistors after the experimentation work, so I used the same type on both sides.

If you have not already done so,  remove and reposition the needle on gauge face so that it pointing just slightly below the L tic mark when the 10 ohm resistor is connected to the sender post.  If you don't have a workbench setup with a 12V source and a 10 ohm resistor,  you will have to do this in the car with the black bezel off.  

It is the same procedure used for doing the needle move in the Oil Pressure Sender Upgrade

Be very careful when removing the needle.  You must protect the surface of the gauge from scratching or staining.  I used two small screwdrivers to pry the needle off using equal pressure on both sides of the base.  I made a round piece of heavy paper with a slit cut in it to allow the needle post to pass into the slit and the paper then protects the gauge face.


Reassemble everything by reversing the procedure.   If you must calibrate the needle in the car, install the cluster without the black bezel and turn on the ignition but don't start the car. Place the needle on the post pointing just a bit lower than the L mark.  Start the engine and watch the gauge.  It will read above the second middle tic mark when cold in summer.  It will read almost all the way to H in the winter.   When the oil warms up you will find that it idles on about the first middle tic mark.  For normal operation at idle or speed, if your below the fist middle tic mark your in trouble.

The gauge has a mechanical damping function that I could not figure out how to defeat without doing some surgery in the sealed case.  So the needle response will still be slow at all times.  But you are getting much more information than before.  If you also installed the LED Warning Indicator on the cluster face then you will also have a positive oil pressure failure function.

Great New News on a Total Fix!!!!!

In June of 2006, Miata Forum member NIKKIDANJO contributed a great step-by-step article on how to completely rebuild the windings in the gauge to make it function like a real OPG with full linear response.  And he has also solved the problem of the terrible needle dampening effect.  There is a discussion thread on the Miata Forum on the new modification.  His gauge rebuild it not for the faint of heart but the elimination of the needle dampening is straightforward.  I will make both of these changes on my OPG and report back here.


Back to the Garage

4 September, 2006