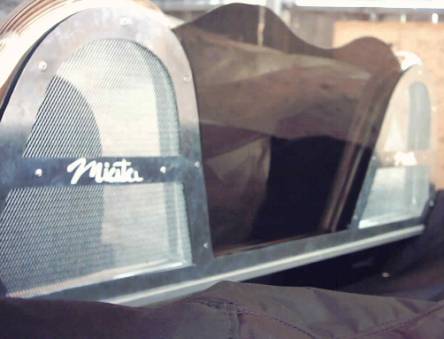
Here is the complete wind blocker.
This is a wind blocker I made for
my particular chrome double hoop style bar. I don't know where the style bar
was made as I bought it used. I placed a large piece of cardboard behind my
style bar making sure the cardboard went below the bottom bar of the style bar.
I traced the entire style bar onto the cardboard. Trace every detail especially
where the style bar mounts to the seat belt towers.
After the bar was traced onto the cardboard, I went with a 1-inch width for
the style bar. You can go more if you like, I wouldn't recommend less than 1
inch. I took the outermost line of the tracing and went 1" inside, all
the way around. I choose to put in a center support on the pieces that fit behind
the seats.
I made sure the cardboard template fit exactly before I cut anything. I traced the cardboard template onto another piece of cardboard, so I could make templates for the plexiglass and steel mesh inserts. The mesh inserts are about ¼" from the outer edges of the wind blocker frame. You don't want anything sticking out of the sides of your wind blocker. The plexiglass center shape is something I just designed. You can choose a single hump, or straight across, that is up to you.
Next, I traced the cardboard template onto a piece of sheet metal. I used a permanent marker for this. You'll want to trace it twice, because you'll need two pieces of metal. You're going to "sandwich" all the pieces together when you get them made.
I used my Dremmel tool and went through
a lot of cutting discs before I figured out the correct pressure. Once I got
the hang of it, it went quickly. When I had both steel pieces cut, I placed
them on top of each other. I used the sanding bit for the Dremmel tool and sanded
down all the rough edges and evened out any sections that were off. I wanted
to make sure both steel pieces are identical.
I then used the template for the mesh and cut out two pieces of that with the
Tin Snips. If you don't have Tin Snips, you can use your Dremmel tool. You'll
have lots of extra mesh, so you can make a matching grill for the front of the
car.
Next, was the plexiglass. I chose to take my template to a glass shop so they could cut it. You'll want to use 1/8" thick plexiglass. The ¼" will be too thick. If you are able to cut plexiglass yourself, I would recommend it. This was the most expensive part of the project. It cost about $32 because they charged $15 template fee.
Now that you have all the pieces, you'll want to assemble the wind blocker. Place the mesh and plexiglass between the two steel frames. I used JB Weld in several places to hold all the pieces together. Let this dry overnight.
I chose to rivet the pieces together
in addition to the JB Weld. I wanted to make sure everything would stay together,
plus I liked the look. You'll need rivets large enough to go through all the
layers of your wind blocker. I drilled a small hole first, then inserted my
rivets and used my rivet gun. The scariest part is drilling and riveting through
the plexiglass, but everything went smoothly.
After everything is riveted, this is where the U-channel comes in. Mine was
37" long. The U channel was long enough so the wind blocker would sit on
top of the flat surface of the style bar (where it mounts to the seat belt towers).
The U-channel serves two purposes. It strengthens the wind blocker and it allows
a stable mounting. Put a bead of clear silicone in the U channel the entire
length. Place the wind blocker in the U channel and wipe off any excess silicone.
Let this dry overnight.
That's it. You're done. All that's left to do is mount it. I chose to use clear double-sided foam tape. It's about 1 inch wide. I didn't want a permanent attachment so I'll be able to take the wind blocker off when I want. I put the tape in several places where the wind blocker meets the style bar. The U channel sits on the flat surface of the style bar, and the tape holds the wind blocker to the style bar. If you think the tape is not strong enough to hold, you'd be wrong. It holds a little too well. After the tape warms up and softens, it creates an exceptional bond.
I love this wind blocker. It's similar to one they make in England that I fell in love with, but could not afford the $300 price tag. This cost me around $50 to make. The most expensive part was the plexiglass.
If you have any questions, please feel free to email me at mx5mama@yahoo.com I didn't take pictures of a lot of the 'in progress' procedures. I've had so many emails requesting the instructions for this that I've had to recreate the process. I hope I don't leave anything out.
Good luck.
Christine
Here is the complete wind blocker.
I painted the "Miata"
logos on, but you could use stickers or leave it plain.
| Back to the Garage |
26 August, 2002 |