|
Woodworker's Laminated Oak or Mahogany Windblocker Doug
Thomson This project isn't for the faint of heart, but if you like a challenge, have some woodworking skills, a welder (or somebody willing to do a few spot welds for the price of a case of beer), and lots of patience, the product is very attractive (my humble opinion), works extremely well, and leaves the back shelf of your Miata open (our dog loves it up there - secured with a harness). Depending on how much of this stuff you can scrounge (much of it is scroungeable), the cost can be very small. I had scraps of oak hanging around, the tools, finishes, etc., and found all of the metal, so the project cost me less $50.00 Canadian - (but many hours of work). This design places the windblocker as far back from the seats as possible (remember the dog), so it has to be somewhat higher than it might otherwise need be. That said, it works extremely well. If you want it closer to the seats, simply adjust the mounting rods. As with all windblockers it works best with the side windows up, however, it also works well with them down as well. I think the primary reason for this is because it uses screen rather than solid materials like Plexiglas or Lexan. The screen doesn't really block the wind, rather, diffuses it. Therefore, it controls the wind hitting it from all directions: around the "A" pillars when the windows are down, from side winds, from the front, as well as the turbulence that circulates from the rear. You still get a nice breeze through the screen, but it will not deflect wind toward you. Also, stresses on the mounting brackets are much less ... ergo they can be lighter. Tip: Is your windblocker too high? If you are getting bugs, flying debris, whatever stuck in it, yes! All that stuff should be going over or around your windblocker! I will apologise ahead of time for the limited directions about laminating and bending wood. If you don't know how, teaching that lesson is a whole different tutorial. For those of you who might be heading into this project, the method I used for bending and laminating the frame is a little unorthodox. Usually, one would use a two part clamping system. However, as this is a one off project for me, I chose to make a form by routing a channel in mdf board and using shims and wedges to clamp the project ... it worked very well ... just make sure to soak the strips very well. Finally, I won't write much for description. The pictures are fairly well captioned. Have fun! |
| Materials: |
|
|
Tools |
|
Click
on the thumbnails to see full sized image.
The link opens a new window. Close it to return here
|
Images
1 & 2
This is the finished product. The wings help to control the wind coming around the "A" pillars. At least that's my best guess. Second view shows Sydney (our dog) in her place of honour. She doesn't have her seat belt on in this image, but she does have one. Spoiled, big time! |
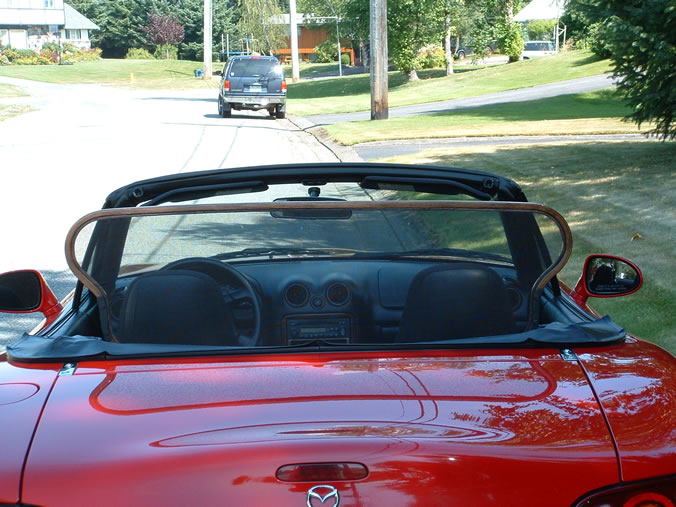 Image 1 |
 Image 2 |
|
Images
3 & 4
First quarter view isn't the most attractive, but shows how that the windblocker mounts as far back from the seats as possible. The base of the windblocker makes a snug fit with the tonneau cover (you don't want to have a hurricane blowing under the frame). Second quarter view is a little better. |
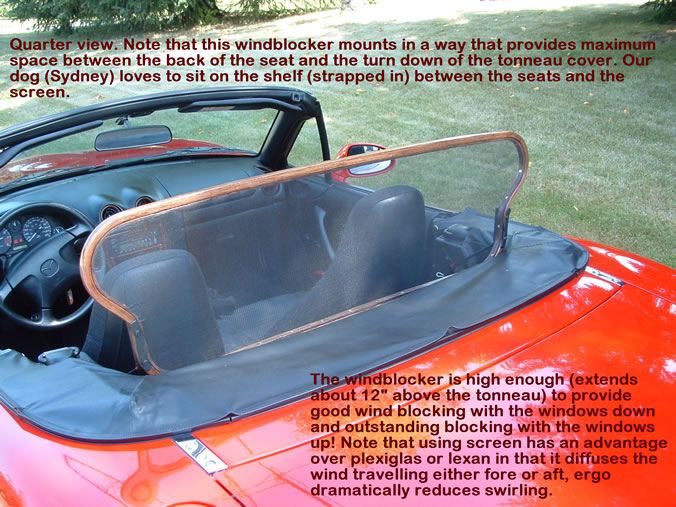 Image 3 |
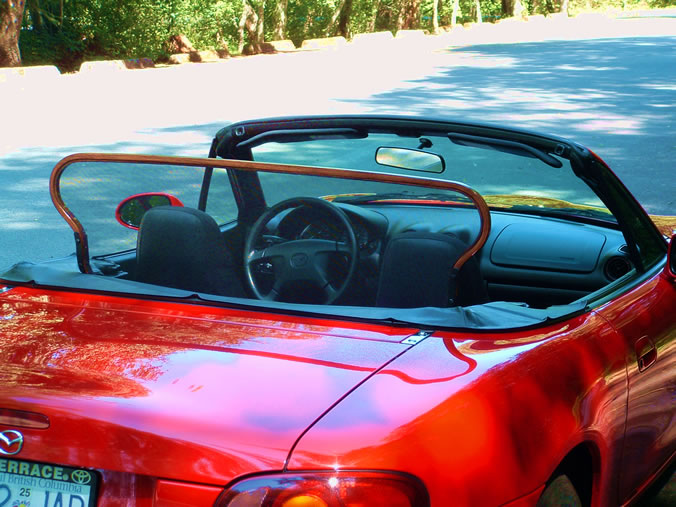 Image 4 |
|
Image
5
The dimensions of the finished frame. I haven't provided any radius measurements for the curves 'cause I didn't use any. Create a full sized template before you start so you can work out smooth curves. Create curves on one side of the template and then fold the it in half to duplicate the other side. |
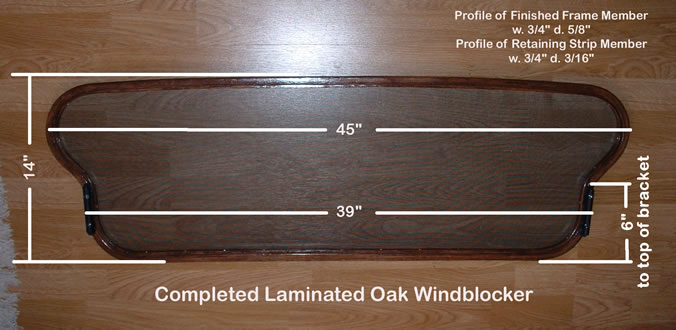 Image 5 |
|
| Image
6 A look at the form I used for laminating the frame and the retaining ring. The notes on the image should provide sufficient detail for you woodworker types. To make the router guide for the form, measure the distance from the near side of your router base to the far side of the bit. Remember that you want the outside of your router bit to cut the outside edge of the form. Use that number to measure in from the edge of your template ... see Image 6 to get an idea of what it should look like when finished. You need enough room for 9 plys ... 7 for the frame and 2 for the retaining ring. |
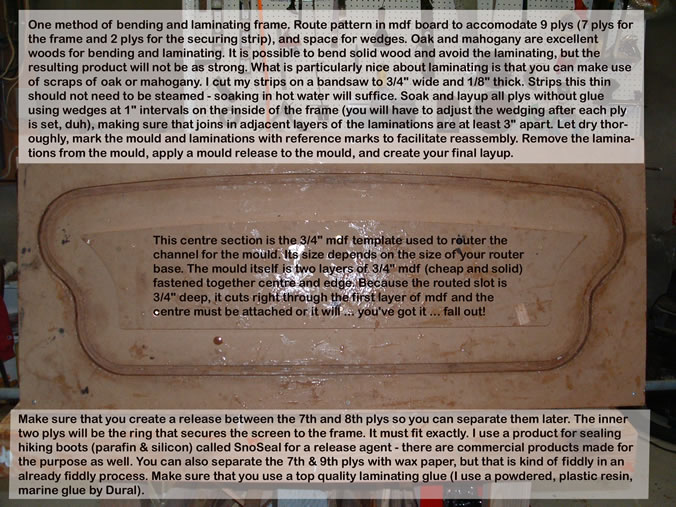 Image 6 |
|
| When
laminating the frame, make sure that you lay up and fit one ply at a time.
Wedge the wet strips in place, and cut to an exact fit. When you have
an exact fit, remove the wedges section by section and insert the strips
for the next ply. The tension on each layer will hold it in place while
you remove the shims and wedges to set the next layer. Make sure that
you do not place joints on the apex of any corner, and that all adjacent
joints are at least 3" apart. Let the laminations dry thoroughly.
When dry, mark the strips and form with reference lines to help you put
the whole thing together again, and then remove the strips from the form. |
||
|
Glue
and layup the strips the same way you did when they were wet ... except
now they are dry and have the approximate shape of the final product.
Make sure that you separate the 7th & 8th layers with form release
and don't glue them together. Remember that the inner two plys form
the retaining ring that holds the screen in place. You can use form
release, wax paper, plastic kitchen wrap, whatever, just make sure they
aren't glued together, and that they fit exactly. I won't talk about
final sanding and finishing ... that's a no brainer ... just make sure
you eliminate all sharp edges.
|
|
|
|
Image
7
This image shows the retaining ring separated from the frame. It also shows the backing plate for the mount. Note that the backing plate is aluminium and is cut to the shape of the frame. The 3/16" bolts have been cut flush with the nuts. The nuts have, in turn, been epoxied and painted. The mating faces of the frame and the retaining ring have been coated with liquid rubber compound so they will hold the screen securely. |
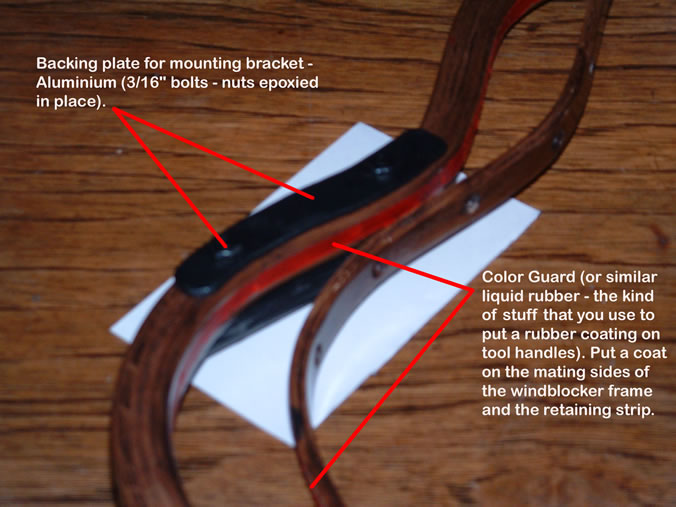 Image 7 |
|
|
Image
8
This image shows the retaining ring attached to the frame. I used screws at approx. 1 - 1/2" spacing. You probably don't need that many, but it looks good and certainly holds the screen well. Don't try to countersink the holes in the retaining ring with it attached to the frame. First, mark out the spacing, and carefully countersink the holes, then insert the ring in the frame and carefully drill all of the pilot holes. You have to have pilot holes for the screws ... believe me. |
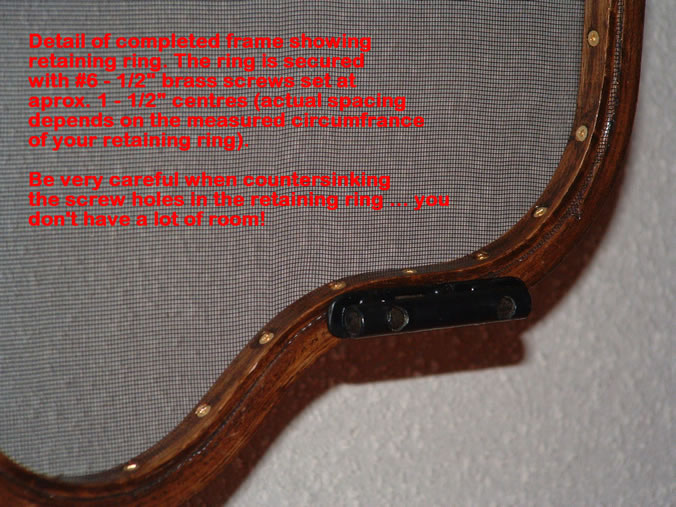 Image 8 |
|
|
Images
9 & 10
Details of the bracket on the frame showing the tubing spot welded to the flat stock. It attaches to the frame using 3/16" flathead bolts. First drill 3/16" holes through the whole assembly (for the bolts). Now drill a 3/8" hole through the top of the tube to allow the bolt head to pass through. Use the 3/8" bit to create a countersink in the bottom of the tube so that the head of the bolt does not intrude into the tube. Clamp the bracket and aluminium backing plate to the frame and, using the bracket as a guide, drill the 3/16" holes through the frame and backing plates. Clean all burrs from the drilling ... if you don't they will snag on the rubber coating of the mounting rods. |
 Image 9 |
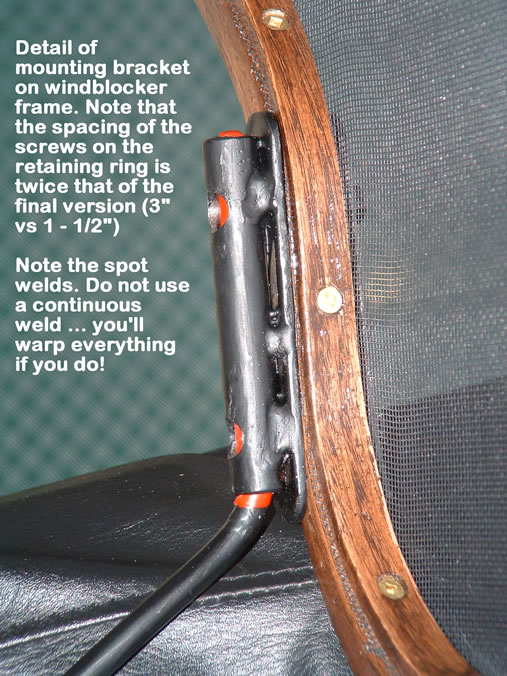 Image 10 |
|
Image
11
Details of the mounting bracket on the Miata (passenger side in this instance). |
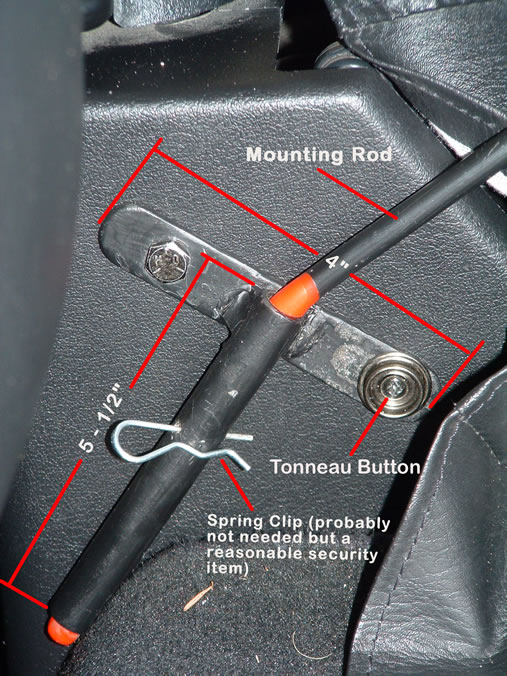 Image 11 |
|
|
Image
12
Detail of mounting rod. The bends are approximate and fit my placement of the windblocker. You may adjust as needed for your application. |
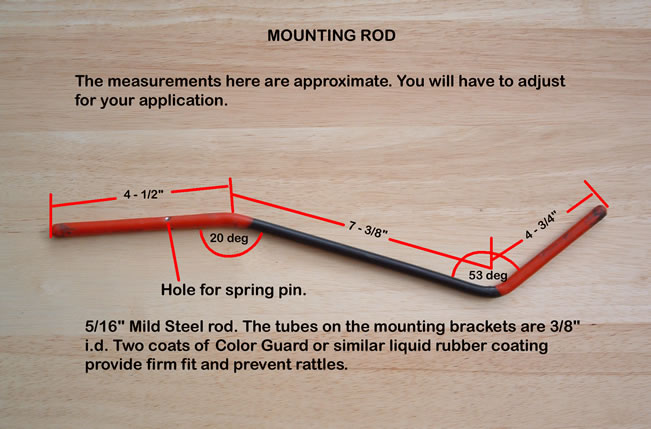 Image 12 |
|
|
You will need two people to stretch the screen onto the frame - one to pull the mesh and the other to insert the screws. Starting in the middle of the top of the frame stretch the fabric across the frame and attach screws alternating either side of centre line. Then do one side of the frame and then the other. Because of the reverse curves on the sides, it will seem like you will never get all of the puckers out of screen ... you can, just keep at it. Finally, complete the bottom of the frame working from outside to centre. It is possible to get the screen almost drum tight. Trim and you're done. |
||
|
Image
13
Want to remove the windblocker ... just lift it off of the mounting rod. No pins, simple. In my application I can put the top up (99 glass window) and down with the rods in place. However, they can be removed in a second or two anyhow. The mounting system does not rattle, and has survived a brief blip to 160 kph (99.5 mph), while passing a recalcitrant 4X4, without any signs of stress. |
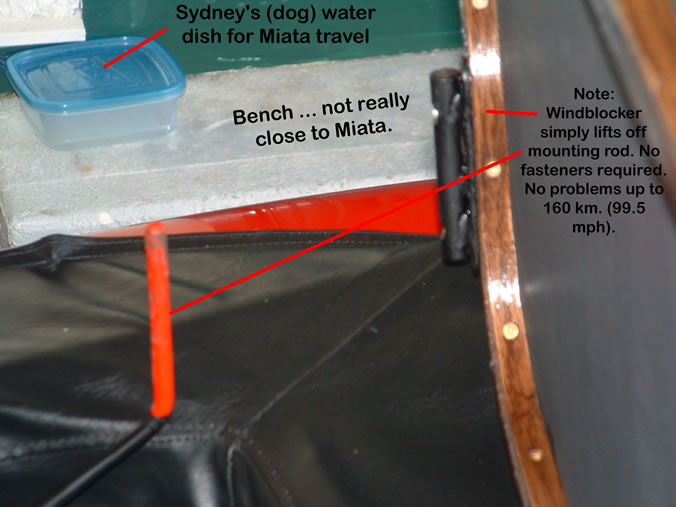 Image 13 |
|
|
|
|
|
|
|
|
|
| Back to the Garage |
8 April, 2006 |