2000 Mazda Miata Car Stereo Installation
Disclaimer: Use this information
at your own risk. Author assumes no responsibility for misinformation or anything
else.
By Seth Everton - everton@usc.edu
Preface
Not satisfied with the stock stereo, I wanted to put an aftermarket system in
my Miata. I looked on the web and found lots of helpful information at Miata.net.
So, I decided to include some of my findings for my install on this site for anyone
interested.
First off, I didn't want to spend a ton of money on a killer system with a g'zillion
watts of power and the same spl as a 747 (there's nothing wrong with this, and
given the time and money, I'd do it). My goal was to have the music loud and clear.
Also, I don't usually listen to lots of rap or other music with "thumpin" bass.
I like clear, powerful, tight bass. In all I spent about $400. I consider this
the "bare miminum" that I'd spend on an install (I purchased the least expensive
components that I believed were acceptable). My last install had a lot more flexibility
and it ran about $1500. I realize that lots of people will spend that much on
a head unit alone (or amp etc). Regardless, if you want to spend thousands of
dollars on an install, I hope you can still find useful information in the following.
Second, I didn't want to modify my miata (body, interior or wiring), for obvious
reasons. This install/upgrade will leave your Miata looking (but not sounding)
the same. Also, if you sell your Miata and don't want to part with your expensive
audio equipment, its easy to remove it. Also, major modifications can take time
and special tools. A scroll saw was the most extravagant tool I used. If I was
to do a similar install, start to finish, it would probably take me about 3 hours.
I'm an Electrical Engineer (RF analog circuit design) by trade, so I am familiar
with electronics, electricity etc. I have also done several custom installations.
The Miata
The 2000 (non-LS) model that I own has 4 speakers. A 6x8 inch paper cone in each
door (behind the large grilles) and a 1 inch tweeter on the top part of the door.
The 6x8 is mounted on a plastic riser/baffle that sticks out about an inch. The
Tweeter is mounted in the plastic (removable) part of the door panel. Both speakers
are wired in parallel. The tweeter has an electrolytic cap for a filter. The wire
colors were yellow. Red stripe for + and black for -.
My Miata came with an unimpressive Panasonic single CD player and radio.
Head Unit
Pioneer DEH1400 (Crutchfield $149)
I ordered the Head Unit from Crutchfield. I found it for much cheaper elsewhere
on the web, but Crutchfield throws in all the connectors/harnesses etc and they
give you instructions. I figured that the cost of the additional items would just
about add up to the difference in price. Its convenient.
I checked the connectors that Crutchfield sent me to make sure they were the right
ones (before I soldered them to the radio connector). Pulling the stereo out was
really easy using the Ford Car Stereo removal tools (see Miata.net). It took no
more than three minutes. After its out, it just slides back in and clicks.
Prior to installing the unit I soldered the connecting wires and wrapped them
with heat-shrink tubing. I almost never listen to the radio (something about the
radio stations in LA) so I just grounded the antenna lead with a 10k resistor.
Also, the factory radio has an additional harness connection that is not used
for the rear speaker output (there aren't any rear speakers).
I connected the Crutchfield harness to the car harness and carefully tucked the
wires out of the way. I attached the antenna (even though I won't be using it),
the control wire (with female "quick connect"), and the RCA jacks. I fed the wires
behind the head unit (into the console), down and to the right. Eventually they
come out where the passenger's feet would be. If you shine a flashlight up with
the stereo removed you can see the path for the wires. The rest of the wiring
is found in the amplifier section.
Finally, I put in the sleeve for the new head unit and bent the tabs to hold it
in (as per the HU install manual). It took me a few tries to get the rubber plug
into the hole in the back of the console. I attached the trim plate and that was
it for the head unit.
According to Miata.net, the Panasonic unit that comes with the car has a security
feature that disables the stereo if it loses its 12V source. This was the case
with my car (as I learned from my car dealer).
Speakers
Rockford Fosgate HCP1205 (sounddomain.com $89)
For door panel removal see the Miata.net site. Its very simple and takes a few
minutes.
I looked on the web and found a great deal on Rockford Fosgate 5.25" speakers.
I have a friend that got 6.5" speakers in his Miata, but only after modifying
the adapter kits. I opted for the smaller speakers knowing that they'd fit in
the holes, but also knowing I'd take a hit on the bass.
I cut my own adapters out of plexiglass purchased from a hardware store ($4 a
sheet). I used the speakers/risers from the original speakers as templates. The
only difficulty I experienced was that the speaker adapters are recessed about
1/8" into the door. I had to sand down the edges of my adapters to get them to
fit in to the impression. Other than that, it went very smoothly. If you'd like
to print out and use my templates, click here.
Note: You can purchase adapters for the miata.
The speaker wiring harnesses in the door were a simple work-around. For obvious
reasons I didn't want to cut any of the original wiring. It turns out that the
harness is simply 2 female "quick connect" connectors (the same size you'd buy
at a hardware store, about 1/4"). I purchased 2 male "quick connect" connectors
and simply plugged them in and wrapped some electrical tape around the connection
to seal it. Of course, you can use shrink wrap or any other means to seal it.
One drawback to using the cars existing wiring is that the wires are about 24
AWG (pretty small). Trying to feed more wires (large gauge) through the factory
door wiring etc is probably an exercise in futility (without modifying the car).
After putting everything in I tried them out with the existing head unit and it
worked, and sounded great. I didn't use the grilles that came with the speakers,
but instead just used the grilles on the existing door panels. The beauty of this
is that it is virtually impossible to see that any modifications have been made.
Amplifier
Rockford Fosgate Punch 100.2 (sounddomain.com $109)
Knowing that I'd be driving small speakers, I opted for a small amp. I'll be the
first to say that the bigger the amp the better. But also the bigger amps mean
more money. I have only bought RF amps and I doubt I'd ever buy a different brand.
I've never had a problem with an RF amp and their performace is incredible. Even
RF's smallest amp has plenty of juice to drive several speakers at extremely high
volume levels. The 50W/channel is perfectly suited for this install. Any more
would probably destroy the speakers. My only advice on choosing an amplifier is
this: buy a reputible name brand (like RF). You really can't go wrong from there,
regardless of power. If you buy a $49 no-namer, you're getting what you pay for.
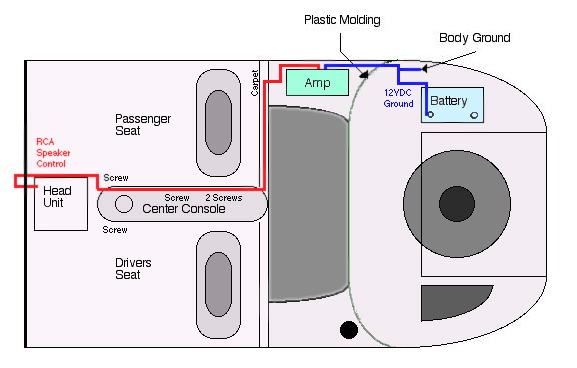
In the trunk there are two cubby holes. They are located forward, near the cabin
on either side. You can't see them without removing the plastic molding in the
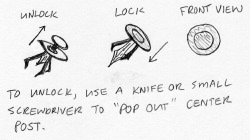
corners. To remove the moldings, just pop out the plastic connectors that hold
the molding to the metal part of the body.
This is easily done with a small screw driver or knife. On my car, it looks like
a plastic screw with a washer on it, but without any kind of screw head. Use the
knife or screwdriver to pop out the center section and release the "screw".
If you look at the molding, you can see exactly where it is connected. The cubby
hole extends to the cabin. I opted to use the passenger side. There is a clear
path for the wires on the lower right hand side of the hole at its most forward
point. There are actually wires from the car already there. The amp fits snug
in the hole. The hole is about 7" wide, so a big amp won't fit. I had to remove
the decorative end caps that came with my amp.
For the wiring from the Head Unit, I had the wires coming out of the back of the
center console, laying on the passenger floor. These wires are: the RCA cable,
the control cable (I used 20AWG), and the speaker wires. From here I removed the
5 screws holding the center console (between the seats). There are 2 screws in
the little compartment, one beneath the ash tray and two on the forward sides
(with plastic caps on them). I did not remove the console, but just loosened it
enough so that I could lift it about 1/2". I then tucked the wires up and underneath
the bottom of the plastic center console. I pulled them a bit to remove any slack.
I did this from the front all the way to the carpet on the back wall.
I then removed the connectors that hold the carpet to the back wall (5 of them).
They are about 3/4" in diameter. All I did was pull on them and wiggle them until
they popped out. I pulled the wires through the fold at the back of the center
console, and behind the carpet on the rear cabin wall. From there they went directly
to the hole to the trunk. When feeding the wires into the trunk, push them to
the right, otherwise they can get stuck in between a couple of pieces of metal
and some other wires. I opened the trunk and pulled the wires through. I put the
spade connectors on the speaker wires, power and ground cables. I also put the
female "quick connect" on the control. I attached the V+ cable directly to the
battery post using a ring connector. The ground I connected to the side of the
trunk, near the battery, where the battery cable is grounded to the car.
Finally, I hooked everything up to the amp and tested it. It worked. I then went
back an put the carpet back in place and put the screws back in the console.
Finished Product
My initial reaction was surprise. I had underestimated to capabilities of the
Fosgate 5.25" speakers. They provided ample bass to keep up with the high end.
The tweeters were crisp and detailed. Overall volume levels were satisfactory.
The Pioneer Head Unit offers several EQ options, making it easy to tune in the
right sound. Overall, I'd say the amp made the biggest difference. Having listened
to the Fosgate speakers with the original head unit, the difference was striking.
The amp provides plenty of headroom, much more than a little $7 IC with a 12V
rail can't possibly match (hey, its physics). At high volume levels the amp overdrives
the speakers at the lowest frquencies. Of course, at this level my ears ring afterwards,
so I'm not planning to use it at this level on a regular basis. Tuning the bass
down slightly corrected the overdrive.
The sound is crystal clear, with no audible noise or distortion in the system.
Another satisfied customer? Yes. Finally I can enjoy my Miata's stereo at 65mph
with the top down.
Whats Next
Eventually I plan to put a bass tube or box in the trunk to fill out the lower
end. I'll connect it to the bridged output of the amp. Also, I plan to look for
a good deal on some high end 1" tweeters to replace those in the door. Finally,
If I'm feeling really ambitious, and I can find a good deal, I would put in 6.5"
speakers in the doors. However, with a sub in the trunk, I'm not sure I'd bother.
I'll just put some caps on the inputs of the Fosgates to roll off the frequencies
that the sub can handle, thus turning the Fosgates into more of a midrange speaker
(for which they are probably better suited anyway). For the time being, I'm definitely
satisfied with the current upgrades.
I hope to post more drawings or pictures in the future.
Last Modified: 1/25/02