This setup makes the center brake light flash when the brakes are applied. I used a common replacement three-pronged flasher unit that can be found at your local auto parts store. It begins flashing instantly and it flashes about twice as fast as your turn signals. If you are behind it, it really gets your attention! We have these on over 30 Miatas in our club, and in over a year of use I know of no flasher failures.
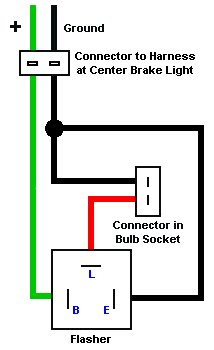
Here is a simple diagram of how to hook up a center brake light flasher on a Miata and the parts I used. With all the needed parts on hand you should be able to install this in less than an hour. Special thanks to fellow Central Alabama Miata Society member Mark Hinton for the idea and his efforts towards the same goal.
|
IMPORTANT! There are three connector blades on the flasher. Make sure you know which blade on the flasher is ground. The flashers above have the blades labeled "B", "E", and "L." On EP34-C the "E" blade is the ground(Earth!). On EP35-C and EP36-C, "B" is ground. See the blue letters in the diagram. If you get them mixed up, it will not flash. If you are not sure which one is ground, you can check it using a normal multi-tester on the DC Ohms setting. The two blades that have no resistance (zero Ohms) between them are NOT the ground! There should be some resistance between the ground blade and the other two blades. If the wires are connected as specified above, the flasher should work. If it does not flash or does not light at all then you have something connected wrong. |
|||||||||||||||||||||
I managed to hook this up without cutting the factory wires. I used crimp-on terminal connectors and some spare 20 gauge wire to create the wires between the factory connectors and the flasher. If you use different colors for the wire it will help prevent confusion when you plug it up. Check your car before buying connectors, the blades in the Miata's factory connectors are extremely narrow (1/8 inch wide) and I had a hard time finding connectors that small. I found some at a local electronics repair & hobby store, but I had to buy them in quantity(100!). The flashers use a standard 1/4 inch wide blade. You can find the 1/4 inch female connectors almost anywhere, even Wal-mart.
The wiring diagram should apply to any car with a center brake light. The connectors required may be different but the wiring diagram should be the same. I have put them on Accords, Civics, and Camrys also. NOTE: Certain newer cars have a dash light that tells you when a brake bulb goes out. This flasher will work on these cars, but be warned it may make the brake warning light come on.
I have a LED 3rd brakelight from Brainstorm installed in my '99 Miata. With that light, the flasher did not work. I had to put a resistor between ground and the light connector. That worked perfectly.
I use a Tridon EP35 flasher, and I soldered the resistor (22k Ohm) to the B blade (ground) and the L blade on the flasher.
We have made every effort to ensure accuracy and quality of the information provided here. This information is not factory approved by Mazda. No representation is made regarding the accuracy or reliability of this information. Neither the Miata.net nor the contributor accept any liability for the consequences of using the information presented here.
| Back to the Garage |
23 June, 2011 |