The following question was asked on MiataNet:
"After some discussion with some fellow netters at our monthly meeting last night, a question came up: Is it possible to turn the instrument panel lights completely off? The rheostat that controls them stops turning just before they turn off completely and I am reluctant to take mine apart and see if there is some detent that I can bypass unless I know that is the case. Anybody tried this? The idea of a completely dark cockpit (dash and radio lights all the way off) is very appealing."
Actually it is not a "rheostat" or any other sort of wire-wound variable resistor. The Miata is so snazzy that the instrument lighting control is actually an electronic dimmer.
I'm sure Mazda had a very good reason for making it impossible to turn the lighting all the way off. The reason probably involved Mazda lawyers sitting around the table saying "But what if people turn their instrument lighting all the way off and they can't see their speedometers and they get going really fast and they crash into something and sue us?" To which someone way across the table responds "Yeah, or even worse, they can't see the gauges so they can't tell the car is moving and they get out!" To which another guy with his tie too tight sitting 35 feet away at the other end of the table sez "Not only that, our records show that 38 people brought their 626's into dealers with dead dash lights only to find out they were just turned all the way down. What if they had brought a class action suit?" This conversation goes on the rest of the morning, followed by another discussion on how safe it would make the car if only the key-in-ignition buzzer could be activated by EITHER door but to do that they would have to save some money somewhere else unimportant like in the nose of the crankshaft, then it gets so warm out that they adjourn to crawl back under their rocks...
Must we live with the result?
There are two options:
A) Add a toggle switch to disconnect the feed to the dash lighting. Advantage is that when you flick the switch back on, you go directly to your favorite preset level on the dimmer. Disadvantage is that you have to figure out someplace to put the switch.
B) The limitation of not being able to dim to 0% is not a mechanical stop in the control knob. It is part of the design in the electronics. The good news is that it can be defeated with a soldering iron, a 1/4" long bit of wire, and a little dab of soldering skill.
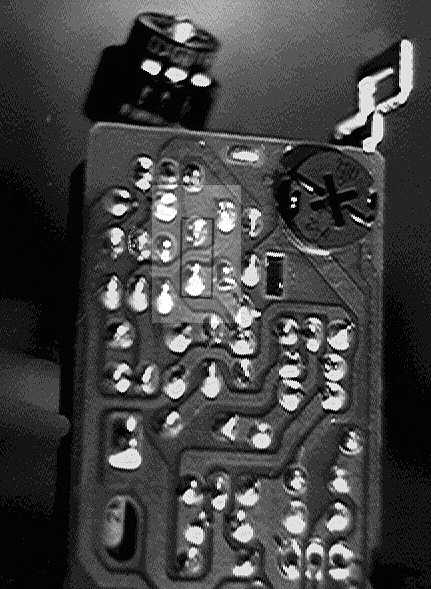
Follow along with the "before" and "after" pictures to make some sense of the following procedure:
WARNING: I've only performed this surgery on Guppy, who is a '90. I am assuming that the modification holds true for later models as well. Dash light controls are not something frequently updated in response to consumer demands for new and improved instrument lighting control features. But if your dimmer is different then mine, and your car is reduced to a VooDoo-equipped briquette, please remove the modification.
1) Remove the dimmer from the dash by reaching up from underneath, locating the dimmer, and pushing it out the front of the dash. Mine came out quit easily with just a shove. When it is part way out, hanging by the wires, you can disconnect it by pressing the latch on the connector and pulling the connector out.
2) Remove the bezel that makes it fit into the dash. Just unlatch and slide off.
3) Remove the front faceplate piece from the dimmer module you are now holding. I mean the part that has the lightbulb graphic on it. By sticking a little screwdriver in the small slot on each side, you can unlatch the faceplate.
4) Remove the circuit board from the module case. By gently pushing on the connector contacts on the back of the module, you can push the circuit board, knob and all, out the front of the case. Note that the dimmer knob itself is now loose, held only by its three conductor ribbon cable. The knob itself is just sitting on the potentiometer, so you can now remove it from the module. Watch out, as there is a small insert inside the knob that will fall out. Try to note the orientation of the insert as you catch it.
Note the tiny green lamp that lights up the legend on the faceplate. How cute!
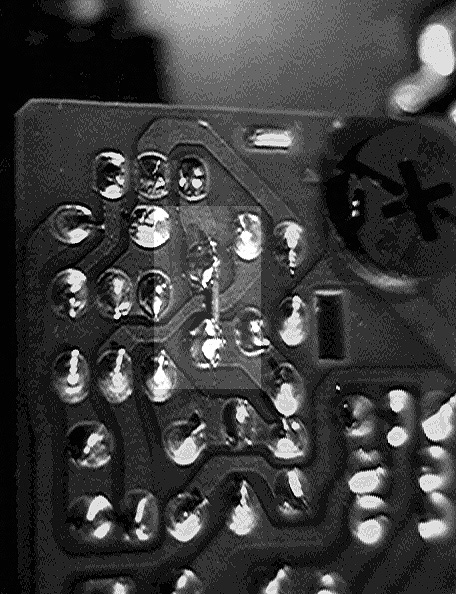
5) Follow along on the "before" picture as I try to describe this: Position the circuit board with the solder side facing you, and the potentiometer is oriented to be at what I'll now call the top of the board. The orientation is such that the socket of the tiny cute green lamp is now in the upper right corner of the board.
Note the ribbon cable coming from the potentiometer. It connects to three pads at the top left of the board, going left to right.
6) With the board still solder-side-up, find the rightmost of the three pads. If you study it, you will notice that its circuit trace goes immediately to another pad, which is one end of a resistor. This resistor goes towards you, to another pad directly below the first pad.
These two pads are outlined in the "before" picture.
7) Take an itty-bitty piece of wire, and solder it between the two pads, which effectively shorts out that resistor on the right-most potentiometer conductor. There is an unrelated circuit trace that goes between the two pads. Don't accidentally make a connection to it as well. I was able to use an uninsulated jumper, and just kept it above that trace. The trace is coated anyway, so you probably won't make a connection, even if you touch it with your jumper. But let's not touch it, okay?
The "after" picture shows the desired results.
8) This should complete the job. Now reassemble the module. Note that the insert for the knob fits only one direction, and that there is only one way for it to fit back into the face plate. Test the operation of the knob before you put it all back into the car.
Reinstall in your car, then wait until dark and see if it works!
Don't forget, if you have the factory radio, you can turn its lamps off by pressing the bass/treble knob. If you forget to turn the radio lights back on, they will come on again next time you turn the instrument lights on.
Enjoy the dark!
Joseph Haefeli & Guppy Peak to Peak