Eyeball Vents
Removal
By Al Roethlisberger (aroethli@cisco.com)
Photos by Dennis Wong
After struggling with the removal of the outboard pair of eyeball
vents on my '94, I thought I would offer everyone some advice for future removals: I had
solicited advice on removing the vents, and received the standard cord/pull method. And I
had noted this method in the service manual. This actually works well on the center
console pair of vents since they are held in with metal spring clips, but on the outer
pair you can count on potential damage to the vent assembly itself.
 After
many replies from other owners such as, 'just pull really really hard, very quickly' for
getting these guys out, I gave it a try. I nearly removed the dash in the process, started
to split the back of the eyeball, and started to actually move the car. I felt that this
could surely not be the right way to do this. I couldn't imagine that Mazda designed the
vents to come out this way. There was obviously just too much chance for damage to the
vents and/or the surrounding parts.
After
many replies from other owners such as, 'just pull really really hard, very quickly' for
getting these guys out, I gave it a try. I nearly removed the dash in the process, started
to split the back of the eyeball, and started to actually move the car. I felt that this
could surely not be the right way to do this. I couldn't imagine that Mazda designed the
vents to come out this way. There was obviously just too much chance for damage to the
vents and/or the surrounding parts.
But unfortunately, before I could further test my theory of a better
solution, I was actually able to yank the passenger side out. BUT in the process it broke
off one of the tabs that clip the vent in. As suggested by many of my initial replies, I
am sure that once this method works, the vents will be much easier to remove....sure,
because the clips(integral to the dash BTW, not replaceable) will either be bent out of
shape or broken off. This is not my idea of an acceptable solution. Mazda certainly
designed the vents to fit tightly for a reason.
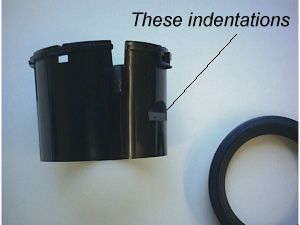
So, after a little detective work after yanking the one vent, I
found that there are only two plastic clips holding the vent in that are part of the dash.
These clips are at 3 and 9 o'clock and snap into indentations on the collar of the vent
when inserted. There are now obviously two ways to remove the vent in a
nonviolent/destructive manner. The first method would be to rotate the vent either
clockwise or counter about 20 degrees and the vent would just slide out(the clips would no
longer be resting in indentations). I didn't test this method, as I had no way to grip the
vent structure to turn it, but I am sure someone could. (Editor's note: we don't
think this method will work and will most likely result in damage to the vent and/or
dash.)
The second, and easiest, method works very well. All you
need to do is insert a VERY THIN object like a tiny screwdriver, gapping tool,
or blade beside the vent at 3 or 9 o'clock (both sides are not necessary at
the same time) to a depth of about an inch. This will push the clip away from
the collar/depression, and the vent will slide right out(you still need to have
a cord or hook to pull the vent). All of this without any shock to your dash,
or damage to the vent itself, and no compression of the felt surrounding the
ball. The latter, BTW contributes to the the 'lazy-eye' syndrome these vents
sometimes exhibit. ( Also, once removed, the spring tabs can be pressed in a
little bit in order to make the next removal easier. )
I appreciated the advice that was offered, and realize that the yank
method does work in many cases. i.e. my center vents. But I think that the gentler method
described above is safer and preserves the tight fit of the factory vents without risk of
damage.
I hope this helps anyone trying to pull these sometimes difficult
guys out.
Al Roethlisberger
Another method of vent Removal
I have had to remove my eyeball vents several times as my high
mileage '90 has required service to the cassette player, heater controls, etc. The first
time I did it, I cracked the fascia!
Since then I've evaluated other techniques, and think I've devised a
vent removal method that works.
This requires a THIN piece of postage stamp sized rag (I used a
fragment of an old sheet) and a small straight bladed screwdriver. Mine was my trusty
Craftsman with the blade about 1/8" wide at the tip. Pay close attention....this is
highly technical: fold the scrap of cloth in half, and slide the screwdriver tip in
between the folded halves. This shields the tip and prevents damage to the fascia and
vent. Insert this into the gap between the vent and the fascia at the 6 O'CLOCK position.
NOT at the 3 or 9 o'clock positions as recommended elsewhere. Slowly, gently push the
screwrdiver handle downward. The vent will pop out at the bottom as the tabs in the dash
partially disengage from the slots in the sides of the vents at the 3 and 6 o'clock
positions.Now, move the screwdriver to either the 3 or 9 o'clock position and complete
disengagement on that side, using the same technique. Once one side is disengaged, the
vent will practically fall out. It's that easy. If you use the rag correctly, there will
be no damage to the fascia or the vent. See the VERY IMPORTANT NOTE ON TEMPERATURE below!
Make sure that the fascia and vent are WARM...90F or higher is above
the glass transition temperature for the Miata fascia and vent plastics. Below the glass
transition temperature, the plastic is glass-like (brittle), and will break easily. If the
weather's sunny and above about 90F, park the car outside with the top down for an hour or
so before removing the vents. If it's not...or if it's below about 90F, run the car with
the heater on, directing air through the vents, for about 30 minutes.
This ought to make eyeball vent removal a very simple task...free
from damaged parts and emotional stress. It has worked for me and others many times. I
have not had to remove the vents at either end of the dash...on my car, so I cannot claim
this method works for these vents. But, I suspect it will...and anything's better than the
brute force methods that others recommend.
I hope this method works as well for you as it has for me!
Here's another tip that evolved from the method I posted last year.
And if you're using either Will's or Tony's (both good) methods, this will help with
stubborn vents that require some extra persuasion. Most important, it essentially
eliminates scratching or gouging the vents and surrounding parts. Inside or outside the
vent.
See the note on temperature in my earlier method...warmer is always
better! Regardless of how you remove your vents.
Don't use a screwdriver or anything metal to pry on a vent...use a
credit card...or some similar plastic item. Flex the card and insert one of the short
sides into the recess around the vent. Pry, wiggle, and work around the entire
circumference. I can remove a vent with just the credit card...including those at the ends
of the dash.
Not all credit cards are up to the task. Some bend/break. Amex' Gold
Card is pretty stout..most oil company cards aren't. Hotel room card-keys that frequently
walk away are beefy, as are card-keys issued by gated communities. All of these cards are
generally made from plasticized PVC and are stiff, but not so hard as to scratch the dash
or vents. Many household plastic items are made from styrenics and acrylics that can
scratch the Miata vents/dash...like plastic picnic cutlery. So...chose your tool
carefully!
Instead of placing the screw driver in the gap between the balls
fascia and the main vent it is in, I placed the screw driver through one of the outer
vents in the ball. Moving this to 12 o'clock (or was that 3 o'clock? try both), pressing
the end of the screwdriver to the main vent wall then pulling back on it (keeping the
pressure on). My balls just fell out :-)
Notes from Will Hallatt:
This method worked flawlessly and removal of both center
eyeball vents was accomplished in less than 10 seconds on my first attempt without
any damage to the dash, vents or retaining clips.
You will need two small flathead screwdrivers. (blade
1/8 at tip) Also get an old t-shirt. The first step is to position the first
screwdriver against the inner vent wall at the 9 o'clock position. You
will have to swing the eyeball inward and out of the way so you can get the
screwdriver in there. Put pressure on this spot in a left lateral direction
and you will notice the whole vent assembly will move to the left. Now you can
take your other small screwdriver and push the tip into the t-shirt to protect
the dash. Insert the second screwdriver into the slight gap you have now created
at the 3 o'clock position. Pry gently outward. Remember you are still exerting
pressure with your first screwdriver. It is going to pop right out like magic.
The reason this works is because you have taken tension
off the retaining clip at 3 o'clock and it loses its lock on the eyeball vent.
Note from Steve Hearn
Eyeball vents are easily removed
using two coat hangers. Two coat hanger ‘hooks’ ensure there is even
pressure. Even pressure is the key. If one hook is used, the plastic tube that
houses the vent will jam in its ‘housing’ giving rise to the many
stories about removal being difficult.
Use two coat hanger hooks (one
for each hand). A modest tug and the vent easily comes out.
Repair
Droopy Eyeball Vents
by Phivos Hadjigeorgiou
My 1997 Miata has recently caught
the "lazy eyeball vents syndrome" that plagues almost all M1 Miatas.
the two eyeball vents (located in the center dash fascia -on either side of
the emergency lights switch) would not stay where I set them, especially when
the aircon was on. So I decided to do something about it, as the price for a
new set form the dealership was astronomical.
I thus removed the center console
of the car by removing the leather shift knob (turn anticlockwise till it comes
off) two screws found at the bottom of the center console compartment, one screw
found under the ashtray and the two screws on either side of the forward part
of the console. Do not forget to disconnect the electric window controller from
its wiring harness as well as the ashtray lamp, so that the console can be removed
completely out of the way.
Next I removed the radio (mine is
a single DIN unit, with a clip on either side which unlatches by inserting a
flat key in either slot (my aftermarket radio came with both keys, but in case
yours doesn´t, usually a flat piece of thin metal - in my case the long
end of a teaspoon was sufficient to unlatch the clips) and removed all the wiring
from it, setting it aside so I could remove the center fascia.
I removed the fascia by unscrewing
the single screw located on the lower left of the fascia and then pulling it
out. Beware not to pull too hard, as doing so will sever the wires connecting
the emergency lights to the dashboard (these can be disconnected by pulling
out the connector located directly behind the emergency lights switch.
Looking at the back of the center
facia there are 4 metal clips ( 2 for each eyeball vent assembly) holding each
eyeball vent in place. I pulled them away from the eyeball vent and at the same
time pushed the vent out, thus removing it from the centre fascia. Each eyeball
vent assembly consists of a cylinder containing the eyeball vent and the upper
rim which comprises the ring around the eyeball vent. On the side of the vent
cylinder, there are around 4 rectangular holes into which the upper rim of the
eyeball vent fastens with small notches.
Using a small flat headed screwdriver,
push each plastic notch back, whilst pulling the rim away from the cylinder.
This takes a bit of effort to achieve as there are about 4 of these, and are
quite tightly attached to the cylinder. After at least 2 of these are out of
the rectangular holes, it is now easier to pull the rim clean off. Once the
rim is out, the eyeball vent can be pulled out of the cylinder.
On the inside of the cylinder, you
will see three to four strips of velvety material, which in my case was worn
out and shiny. This is the stuff that holds that prevents the eyeball vent from
moving from the direction you set it to direct airflow. Replace these with new
strips of black self-adhesive velvet (this is sold in most hardware stores in
Cyprus) or use self-adhesive furniture pads which you can "shave"
to the desired thickness. The eyeball is then reinserted into the cylinder and
reassembled, but just before the rim is pushed back onto the cylinder hard enough
to lock, it is best to check whether the eyeball vent moves around without considerable
effort. If it is too tight, remove the material and "shave" it a bit
more with a razor before reinserting.
After both vents are fixed, replace
them into the center dash fascia and reassemble everything in reverse order
to disassembley. Please remember to reconnect all wiring, so as to avoid having
to disassemble everything all over again (the most frequently forgotten item
being the radio antenna)
Phivos Hadjigeorgiou
NIcosia, CYPRUS