
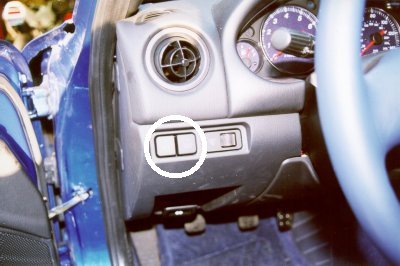
Included here are two different methods for getting the Mazda factory foglights to work independently of the headlights. Both of these mods were performed on 10th Anniversary Editions that have the combo fog light/cruise control switch to the left of the steering column (see picture below).
My version of the modification only requires a modification under the hood at the relay. This version will allow the fog lights to operate anytime the parking lights are on, but they will shut off when the brights are used. Also, the indicator on the switch will not work unless the headlights are on.
The second version of the modification was supplied by Don Luczkowski. His version is much more complete but requires altering the wiring at the switch as well. Don's version will allow the fog lights to be completely independent of the headlights (high or low beam), and the indicator always lights when the fog lights are on. As far as I know, this version will only work with those with the combo switch.
Anyway, try these out and send me any comments that you may have. Oh, and you do this modification at your own risk. I, nor anyone else represented on these pages claims to be a mechanic or otherwise. So please don't call me if you decide to run your 800gigawatt foglights with either of these methods (aka non-factory).
First, this is a picture of the combo switch that keeps being mentioned.
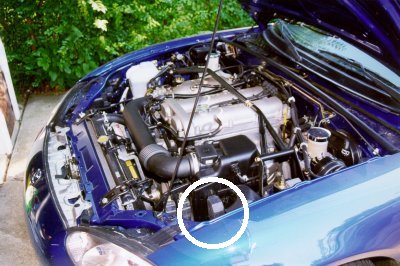
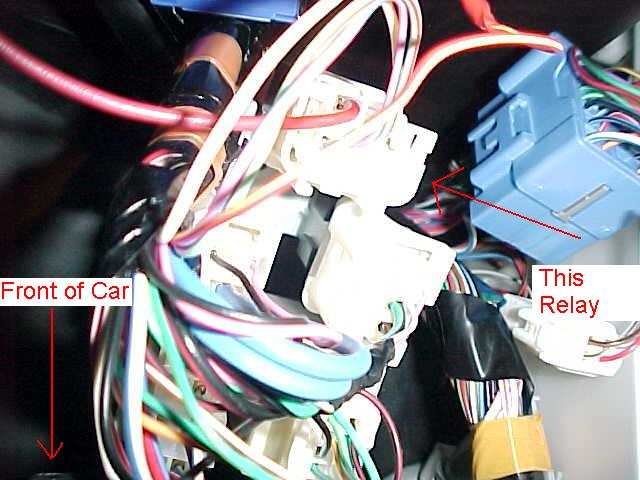
Find the fog light relay under the hood. It is located right behind the left headlight.
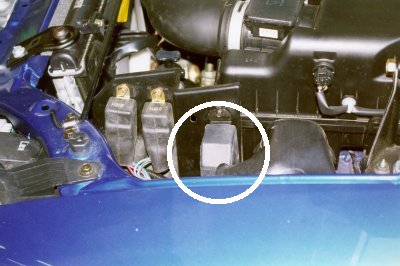
Here is a closer view. Remove the relay from the support to make things easier.
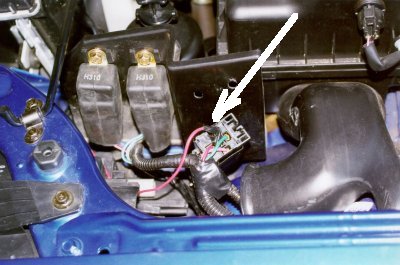
Now that you have the relay accessible. Remove the connector. Find the red/yellow wire. You need to disconnect this wire from the connector. You can either cut it a couple of inches from the connector, or remove the terminal from within the connector. Once the red/yellow wire is disconnected (and taped up/put away) you need to connect a new wire to where the red/yellow wire used to be in the connector.
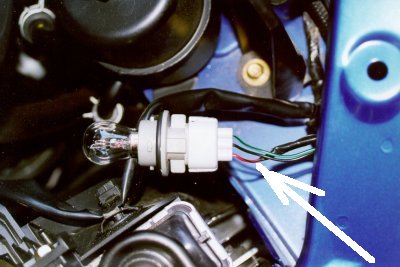
Once the new wire is connected to the relay, run the other end of it to the left front parking light bulb. Find the wire that supplies +12V when the parking lights are on (mine was red). You will splice the new wire into this wire (leaving it still connected to the parking light). Once this is done, tape both ends of the new wire and try out the lights.
This version is for those with the combo switch. Performing this mod will allow the fog lites to come on w/ the parking lites. Also, they will not shut off when the high beams are turned on.
1. Remove steering column lower trim cover.
2. Remove dimmer switch for dash lites, squeeze tabs on either side of switch.
3. Remove cruise/fog lite switch, same procedure, squeeze tabs, if you have small hands
you can actually get at it.
4. Disconnect connector at fog switch. You need to remove 2 wires from the connector, you
can either cut them, or what I did was removed them from the connector and taped them back
into the harness, making the mod reversible.
5. With a small screwdriver (jewelers' screwdriver) I was able to release the tab and pull
out the red/green wire and the red wire. Tape up the wire and terminal to prvent
inadvertant arc welding behind the dash.
6. I found some connectors that fit into the connector shell at an electronic surplus
store.
7. The location where the red/green wire was needs to go to ground.
8. The location where the red wire was is connected to the red/black wire of the dash
dimmer switch connector. I used about a foot of wire so that either switch could be pulled
out int the future for servicing.
9. This completes the dash switch mod. I would not put the switch back yet until I finish
with the next step and check the operation.
10. Moving to under the hood, locate the fog lite relay (see picture above). It is right
next to the air intake. I unbolted it from the support to make it easier to change the
wire.
11. Unplug the connector from the relay and locate the red/yellow wire and disconnect
either by cutting the wire a couple of inches from the connector, or the connector
terminal itself can be removed with patience and a jewelers' screwdriver. The wire and
terminal, once again, should be taped up.
12. The spot where the red/yellow wire was removed from needs to go to ground. I found a
"tongue" terminal that fit into the connector and ran a couple of feet of wire
to a ground screw by the ECM diagnostic connector. The factory already had one wire there,
I just added another wire with a ring lug.
13. This completes the modification. To check operation, turn on the parking lites and
activate the fog lite switch. Verify "green" indicator lites as well as the fog
lites work themselves.
-Don Luczkowski
I used some information from the wonderful writeup by Kevin R. Christenson and Don Luczkowski, and made a few changes to make my fog lights into DRL’s. At first I just did the wire at the relay (per Kevin’s writeup), but this disables the switch. I liked to be able to turn off the fog lamps if I wanted to. So I looked over Don's instructions, and decided I would attempt to make the switch active again. I wanted the switch to both turn on and off the lights, and the LED (green light) to shine when the fog lamps are on. Here is what I did.
I want to point out that this mod was done on a 2001 LS model. This article assumes you have a basic electrical understanding and that you can perform simple wiring and modifications. Wiring may be different on other years/models/cars. Perform this mod at your own risk, I take no responsibility for your actions. If you are unsure about the wiring, STOP. Don’t take the risk. Now that that is over with:
Using Kevin’s instructions as a starting point, I decided to make my fog lamps into DRL’s.
First, disconnect the battery for safety reasons. Remove the lower dash cover, it is held on by two Philips screws. I will point out that on my 2001 (should be the same for other 2001’s, I don’t know about other years) the fog lamp relay is NOT located under the hood (like the 99 model). I spent a long, long time looking for it. It was moved to inside the cabin, under the dash, grouped with the flasher and some other relays. It is the relay farthest to the rear of the car in the group (I will try to get a good picture of it sometime). To remove it from the bracket, pull it straight down. It will come lose eventually. With the relay removed, you want to locate the red/yellow stripe wire. You need to either remove this wire from the connector with a jeweler’s screwdriver (what I did) or cut it. If you remove it, take your time, it will come out. If you cut it, leave enough room to attach a new wire (3 or 4 inches). Also, tape up the loose end of the wire and tuck it out of the way. With the wire removed/cut, you need to run a new wire to something +12v when the ignition is on. I chose the radio power wire, for convenience. It also turns off when the car is starting, to give you a little extra juice while you crank up the engine. If you removed the wire, you need to find a wire terminal similar to the one you removed. I happened to have one. It is a small female blade type terminal, they sell them at most auto parts stores or Radio Shack. Crimp/solder the terminal to your +12v IGN wire, and stuff it in the connector where the old red/yellow wire was. If you cut the wire, simply solder/crimp connect your +12v IGN wire to the wire going to the relay that you cut. With this done, time to check your progress. Reconnect the battery, and turn the key until your radio turns on (if you used the radio wire). Your fog lights should be on. So far so good, but the fog lamp switch doesn’t do anything now. On to part two! Don’t forget to disconnect your battery after testing.
Now, using Don’s instructions as a guide, remove the dimmer switch, then the fog lamp/cruise control switch. It’s very hard to get to, but with long arms or small hands it is possible. Disconnect both switches. On the wires going to the fog lamp/cruise switch, find the red/yellow stripe wire. You need to do the same thing with the relay on this one. You CAN leave this wire out and not connect the +12v wire, but the LED won’t work when the lights are on. Either way you choose, the red/yellow wire needs to be disconnected from the connector. You can remove it from the connector (with a small jeweler’s screwdriver) or cut it. It has a strange wire terminal on the end, it might be hard to find something similar. Don said he found one at an electronics surplus store, you could try there. Where this wire was needs to go to the same +12v IGN power wire that you ran to the relay. What I did for the time being was put the end of the wire (with about ¼” insulation stripped off) into the connector where the old wire was. It is snug enough so that it doesn’t slip out. I am going to try to find a wire terminal to fit into the connector sometime. Now for testing. Turn off your switch to start. Reconnect your battery, and turn the key to the radio on position. Your fog lamps should be OFF. Now, turn on the switch. If everything is connected right, you should have light! If you ran the +12v wire to the switch, the green light should also go on and off corresponding to the fog lamp switch. If everything works, tuck the wires away, reconnect your switches, push them back into their spots, put on the lower dash cover, and reconnect your battery (if you haven’t already). Don’t forget to push the relay back onto its metal bracket. Now, go for a drive, and enjoy your new fog lamp DRL’s!
A few things about the lamps: They come on with the lights off, with the parking lamps on, and with the low beams on. They do still turn off when the high beams are on, but this is not a major setback, because on 2001 models, the low beams stay on with the high beams. Also, with the lamps running all the time, they may need more frequent replacement, especially if they are old when you first perform the mod. This isn’t a big deal, considering you will be seen more while driving (safety).
If you have any questions/comments, I will try my best to help out. Thanks for reading, I hope you find this article useful.
I recently installed the Mazda Fog Light Kit. Following the provided instructions, I realized that the fog lights only work when the headlights are on. I wasn't happy with that, and started trying to figure out how to change that. Here is the result:
Besides the wires for the switch, there are also two more wires (a red and
a green one) that are routed from the engine compartment to the passenger compartment.
As it turned out, these wires are the key to the modification. A look at the
wiring diagram shows that these two wires are needed to trigger the foglight
relay. The instructions have the red wire connected to the headlight
wire from the connector for the headlight switch, and the green wire to the
wire coming from the headlight fuse.
After checking the wiring diagrams in the Workshop manual, I realized that the red wire essentially is connected to ground, and the green wire to 12V. So, the easiest modification, resulting in independent operation of the fog lights, would be to just connect the red wire to ground, and the green wire to 12V.
However, I prefer to have the fog lights to work in combination with the headlights,
when at least the parking lights are on. In my modification, they will shut
off when the high beam is used.
The switch is illuminated when the fog lights are on.
Step 1: Locate the connector for the headlight switch. This is also needed
for the original installation instructions.
Step 2: Connect the red wire to the light green wire on the connector, using
a tap splice.
The headlight switch connects the light green wire with ground when the parking
lights are switched on.
Step 3: Locate the X21 joint connector. On my car, it is next to the relay holder
in the driver compartment behind the fuse box. The connector has two rows, with
10 holes each (not all
are filled with wires.)
Step 4: Connect the green wire to any one of the red/black wires on the connector
(all the red/black wires are connected), again using a tap splice. There are
3 red/black wires for a car with manual transmission and 4 for an automatic.
The red/black wires are positioned in a 2x2 form. The red/black wires connect
the parking light relay with the parking lights, and the parking light relay
provides 12V when the parking lights are switched on.
That's it. Now the fog lights work whenever the parking lights are on.
garagemahal109@comcast.net
This modification will allow the fog lights to operate with:
It will also illuminate the green LED light in the fog light switch on the dash when the fog lights are on, but, your ‘lights on’ alarm when you turn the car off and your lights are on will not alert you unless you at least have your parking lights on. BEWARE OF DEAD BATTERIES!!
First, this is a picture of the combo switch that keeps being mentioned.
Fog Light Relay Connector (under dash-back view).
Fog Light Switch Connector (in dash-back view)
Location of Fog Light Relay Switch

| Back to the Garage |
30 January, 2007 |