 The parts
Although it's more challenging
to install headrest speakers in the '95M (or any other car with headrests on
sliding adjustable posts), it can be done. Fortunately, the '95M comes
with the wiring harness under the seat. Unfortunately, the process requires
a little bravery and a fair amount of care. Headrest foam, once cut, can't
be put back, and if you rip the seat or headrest leather, you'll be scouring
the recycling yards for replacements.
For best results when using
a Miata OEM radio, I cannot recommend strongly enough getting Jeff Anderson's
fixes. Without it, any headrest speaker system you install with an OEM
radio will sound washed out and muddy, almost to the point of inaudibility.
Additionally, the MAX-5 headrest
speakers sold by Performance Buyer's Club have unusually powerful speaker power,
and as such you won't have to worry about punching holes in the headrest leather.
In other words, trust me -- you'll hear them just fine, I can speak from personal
experience on this.
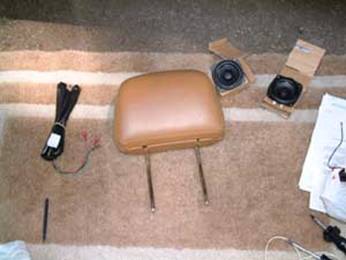
· Set of headrest speakers (MAX-5s recommended)
· Wiring harness (the ones sold by Performance Buyer's Club are recommended, as they sell them wired correctly for each Miata model year's mistakes in OEM connector wiring)
· Flat-bladed screwdriver (mainly for prying)
· Philips-head screwdriver (medium size)
· An Exacto knife, box-cutter, or similar razor-bladed cutting instrument
· Needle-nose or similar pliers
· 3 foot length of stiff wire (coathanger or vinyl-coated)
· Duct-tape
· The original connectors under the seats for the speaker connections (white connectors on a standard OEM wiring harness); you might have to fish around under there to find them.
You will probably need about 3 or 4 hours to complete this task. The second headrest will go much faster than the first, however, once you have the technique down.
· First, drop the soft-top or remove your hardtop. It'll go much easier if you do.
· Then, pull the headrests up and off the seatbacks. You might want to do this procedure on top of a ground-cloth or throw rug, because little foam bits can end up everywhere.
The parts
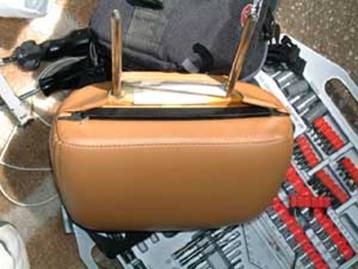
· Next, remove the headrest cover. This is most easily done by sliding the two side-ends off first. To get the middle part off is a little harder, but a flat-bladed screw driver to pry the clip apart a little bit can help.
 Undoing the clips
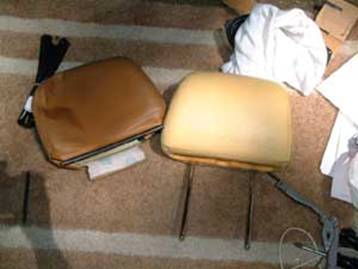
· Remove the cover from the headrest. This can take some doing, but if you squash the foam and slowly work the cover up, it'll eventually come off. Take care not to pull too hard though, or you'll risk ripping the stitching or leather. Go slowly.
 The cover removed
· You'll find that the foam is pretty stiff. The place where you'll be wanting to carve the holes for your speakers is the front edge. You can use the speakers themselves to help guide you on placement of the holes, as well as to check periodically to see whether you've cut deeply enough.
 Speaker placement
I used a Sharpie magic marker to sketch out, on the foam, approximately where I planned to do the cutting. Don't worry about making it exact.
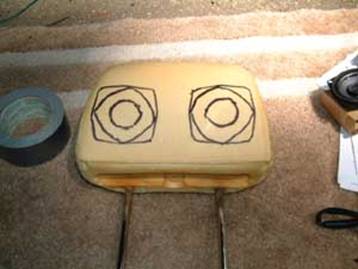 Speaker locations
drawn
Speaker locations
drawn
·
Now comes the fun part: The cutting. I basically started
near the middle, cutting out the center circles (where the speaker back magnets
go) and carved my way down and in, making roughly conical holes in the foam.
You will be going pretty deep, and in fact, the centers will likely go all the
way back to the metal plate holding those headrest posts.
After that, it's a matter of shaping the holes until they'll hold the speakers
comfortably. Be sure to cut some extra space along the bottom edge, because
you'll need it for running the wires around and behind the speakers. Don't
worry if you cut a little too much, it's really not a big deal, and the leather
headrest covers will hide any gross mistakes.
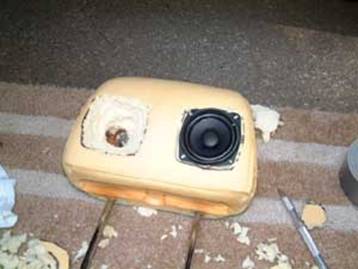 The holes cut
· Next, you will need to run the wiring harnesses, and I'll admit, this is one of the more challenging phases of the operation. This process assumes you'd like the black-covered wiring as hidden as possible, and not hanging down the back of the seat for everyone to see.
· Slide the seat as far forward as possible, and release the seatback, so that you can get at the back of it. Near the bottom, the leather upholstery cover has a flap that can be folded up, exposing the point at which the leather is fastened. There's a plastic edge strain-reliever sewn in, joined top to bottom by several simple brass loops of wire. To get easier access to the seatback for running the wiring harness, you will need to remove one or two of these loops, using the needle-nose pliers. Be sure to save the loops, so you can put them back on again later.
· Once you've done this, take your Philips-head screwdriver and wrap the end with some duct-tape. The reason for this it to keep it from snagging or tearing your leather upholstery. Similarly, bend the end (using the pliers) of the stiff wire into a small loop and put some tape on that, too.
· Using the headrest post fitting that doesn't have the adjuster on it (on both seats, it's the fitting towards the passenger side of the car), carefully pull the upholstery towards the back of the seat until you can slip your tape-covered screwdriver into the gap between the post receiver and the leather. You can then use the screwdriver to lever the upholstery a little further to insert the stiff wire and begin pushing it down the seatback. Don't pry too far, or you'll risk tearing the leather.
 Inserting the pull-wire
· When you get the wire about halfway down the seatback, you should be able to reach up from underneath, through the gap you opened previously, and pull it down until you can get at the loop at the end.
· Straighten out the speaker wiring harness, and use some more duct-tape to fasten the speaker leads to the loop of your pull-wire. At this point, you may also want to reach under the seat and connect to the harness to the speaker connector. It is a white connector and not hard to find.
· Pull the wire up slowly, using your other hand to free up kinks in the wiring harness, if necessary. You may also need to use your screwdriver lever to help get the loop and speaker leads out through the hole. Pull an additional length of about 5 or 6 inches of the wiring harness up through the hole.
· Unwrap the duct tape and free the speaker wires. Remove the screwdriver from the hole. You can also reattach the one or two brass upholstery wires at the bottom of the seatback.
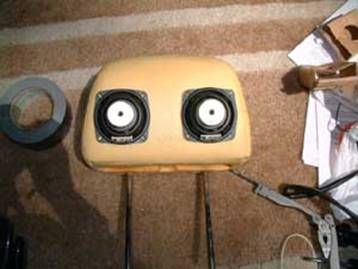
· At this point, I'd recommend getting your speakers out and connecting them to the lugs on wiring harness. Be sure to get the polarity correct. If you haven't already done so, connect the new wiring harness to the connector under the seat. Turn on your radio and use the balance control to make sure you get good sound from both speakers. The reason for performing this check is because, after many years of sitting unused under the seats, the wires can get caught on things, bent, and broken. For my car, I actually had to strip and reattach the right side positive wire, because it had pulled loose entirely from the connector.
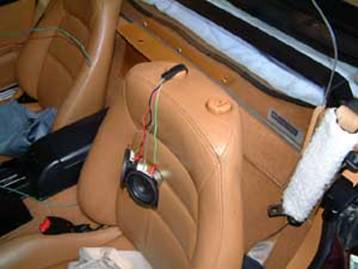 Testing the speakers
· Once you're certain the speakers are working, turn off your radio and shut off the ignition.
· Get your freshly carved headrest , and put the speakers into the holes you made. You may find that, with the wires in place, you'll have to remove the headrests again and carve a little more space -- I know I did, on my first try. I also found that bending the speaker lugs back towards the rear of the speaker aided the fit.
· Slide the headrest cover back on, being careful not to snag the wires or to rip the upholstery stitching. The wires should run right down next to the headrest post, with about a half inch of the black harness covering going up into the headrest (mainly for protection of the wires, but also cosmetic appearance).
· Reattach the middle part of the plastic clip on the bottom of the headrest cover first, then the sides.
· Insert the headrest into the seatback and adjust to your usual height. If too much of the wiring harness is showing, you can pull down carefully on the harness from the bottom of the seatback to take out some of the slack.
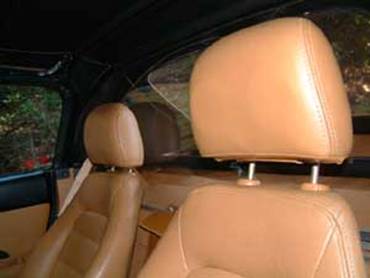 All done!!!
· To do the other headrest speaker, just lather-rinse-repeat. That's it -- you're done!
Now, go for a ride and enjoy your new headrest speaker system!
Cheers and good luck!
| Back to the Garage |
11 November, 2002 |