Installing
an aftermarket Head Unit
and retaining the original Stuff bin
by Alessandro Di Sciascio
Applies
To: M1
Difficulty: EASY
Time: about 20 minutes more than installing the Head Unit without this mod
The Problem
When installing an aftermarket head unit one usually buys an aftermarket mounting kit to install the radio in their Miata. Unfortunatelly those who designed said mounting kit thought it would be acceptable to replace the original stuff-under-the-radio bin with their own design. This would be ok if their bin weren't incredibly small, ugly looking, and a spacewaster to boot with their idiotic spacer they expect you to install between the head unit and the micro-stuff-bin they give you.
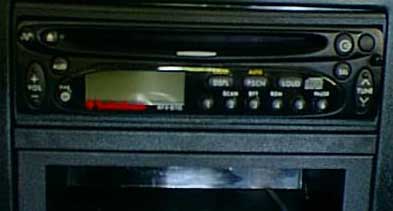
Above is an example of what the headunit with the mounting kit would look like (taken from Ed's wonderful audio install pages)
The problem isn't over
You would hope that you could just not install the provided bin and just put the oem back in, but this is not possible without modifications (that's why you're here, right?). The problem is that the mounting kit is essentially a frame that creates a cage around your radio and hooks on with 4 screws (A,A,B,B), as shown below:
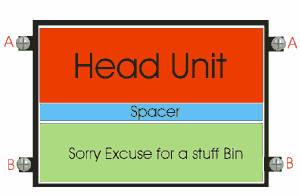
This cage makes the original stuff bin not fit.
The Solution
If the cage only reached the bottom of the head unit, installation of the original stuff bin would be a no brainer. Hence that is what needs to be accomplished.
Looking back at our 4 screws we can examine what they do.
Screws A set the vertical location of the front of the head unit.
Screws B do the real work, they prevent the head unit from falling down in the back.
And right there lies the key to this mod, holding the back of the radio some way other than using screws B (and the bottom half of the cage, for that matter.
Step by Step
1. Install your head unit using the cage, exactly as it was meant to be installed. Leave out the spacer and the silly stuff bin. Go as far as reinstalling (temporarily the front console (or whatever the thing you removed to install the radio is called... you know 3 screws, eyeball vents... that!). This is imperative because you will want to make sure your radio is installed EXACTLY as you want it in the end. No need to make the electrical connections at this point. Oh yeah, you'll need to remove the stock stuff bin to install the front console... if you could without doing this step this writeup would be useless :-)
2. Remove the front console.
3. Bend a 4" (roughly) piece of metal to form an L (or buy an L bracket, whatever floats your boat.) Using a marker mark one side VERTICAL ("V" or "Joe" whatever makes you happy) You prolly want it to be roughly 1" wide ... not much less.
4. Drill a hole in this L shaped bracket so that a sheetmetal screw will go through it.
5. Behind the radio you will see a metal bar running vertically, pretty much in the center of the radio. Place your L bracket so it's making contact with the bottom of your radio and this bar. And so that the Vertical side is indeed vertical.
6. Mark the bottom of the L on the metal bar using your marker.
7. Break! Have a beer, listen to some tunes, chill
8. remove the radio and cage
9. Apply some double sided tape to your L bracket and place it back on that metal bar exactly where you had it before.
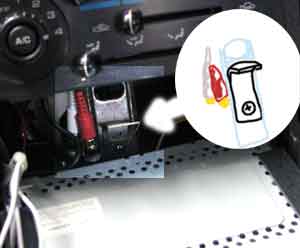
10. Screw your sheetmetal screw through the metal bar securing your bracket to it (I think I used a self tapping screw... I doubt you can get a drill in there to make a pilot hole). The result should look something like this (note I took the photo a year after installing this while changing some of my electrical connections... so in the photo you can tell I made the connections already... but I hadn't at the time of install).
11. Another Beer! You have just completed the key operation in this install.
12. Using a cutter cut the heck out of that cage. The whole bottom part is going into the trash. Cut it while it's on the radio, because you don't want to risk changing how it holds the radio. The end result will look something like this (same on both sides):
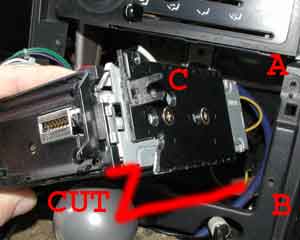
in the photo above notice: A - hole where screw A goes. B- Hole where screw B would have gone. C - the C shaped things that screw A go through. Don't cut those off!!!! ... below I drew the shape of the cut I made in case it's not easy to see from the compressed photo.
13. Do your wiring connections, test that everything sounds great, then install the head unit taking care to rest the back of your head unit on your L shaped bracket. Put screws A in place and tighten them, then reinstall all your trim and that's it.
14. Here is the end result in my car:
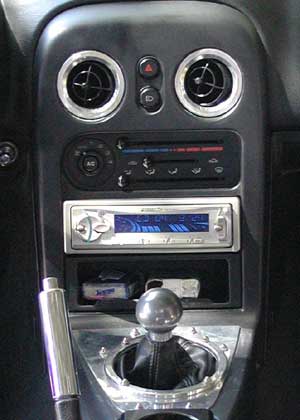
As you can see, the original bin is there, no spacer no nothing. Yes my radio "looks" like it's not mounted right... as if the right side is out further than the left. That's simply an optical illusion caused by the lighting at the time, the radio is nice and straight.
I've had this installed for over a year now with zero complaints. Today I took the radio out to hook up to my sub output and the bracket is as firm as ever, I highly reccomend this mod to anyone with an extra 15 minutes to spare.
Alessandro
| Back to the Garage |
27 October, 2002 |