10
Steps to Remove Miata Front Springs and Shocks
by Charles Broadfoot
This 10 step process can be completed by one person with basic mechanical skils.
This 10 step process is for removal of the Front Springs and Shocks only. There
is other documentation on Miata.net that provides information for the rear springs
and shocks that works very well. So, lets begin.....
Note: This process will require a Aligment if you are not replacing
the springs.
What you will need at least.....
- Spring compressors
- Ratchet
- Full set of Metric Sockets includeing 10mm, 12mm, 14mm, 17mm and 21mm
- Deepwell 14mm and 17mm Socket
- Full set of Metric Wrenches including 10mm, 12mm, 14mm, 17mm and 21mm
- Jack Stands
- Good solid Jack (dont use the one from your spare tire kit)
- Braker bar
- Tire Iron
- Gloves (a good set of leather work gloves worked well for me)
- Wrench and Socket that will fit your spring compressors
- Rubber Mallet
- Jack the front of the car up, place on jack stands and remove both front
tires (Dont try doing one wheel at a time, this will only frustrate you later)
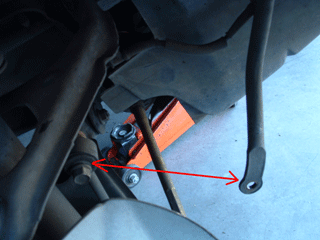
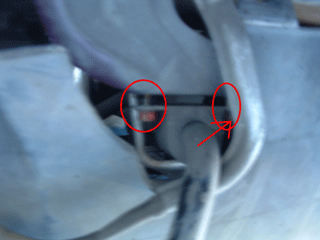
- Remove the bolts from both sides that hold the sway bar to the sway bar
links. (see picture below)
From this point forward, you can work one side at a time or complete each
step for both sides. The sway bar should be pushed out of the way at this
time.
- Remove 2 10mm bolts holding a plastic shroud from each side
- Remove hose clam that is bolted to the back side of the shock.
- Loosen the bolt at the bottom of the shock. This could probably be removed,
but I chose to loosen it until the very last minute.

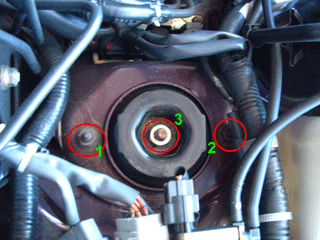
- . Loosen the number 1 & 2 bolts (14mm socket) from the top part of the
shock mount. You could probably remove these, but I opted again to wait. Loosen
the number 3 bolt (17mm) from the center of the shock, but DO NOT REMOVE it.
You can loosen it all the way to the top of the threads, but if you remove
it, your going to have a big mess on your hands, and it might hurt too.
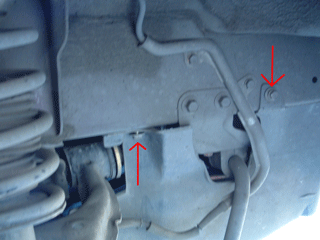
- Back out the 2 sway bar bolts that hold the sway bar to the frame of the
car. These can some times be a bit tricky to get to if they are hiding a bit
behind the plastic shroud. You don't have to remove these, but you will need
to back the bolts out to complete step number 8. Try to back them out as far
as you can with out removing them.
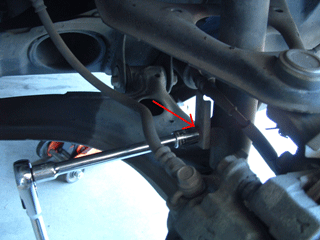
- Remove the upper control arm bolt. This is a really long bolt that connects
your upper control arm to the frame. You will need a 21 mm socket and a 21
mm wrench to complete this task. Once you have the nut off, you can push the
LONG bolt out of the upper control arm and frame. If the LONG bolt appears
to be stuck and does not want to come out, refer back to step 6. Many times,
the sway bar bolts just need to be backed out a little farther
Damn,,,,forgot to grab a picture of that!!!! (Picture Coming soon)
- Once the bolt from step 8 is out. (it needs to be all the way out), you
can remove the 2 bolts (1 & 2 only) from the top shock mount (step 6) and
the bolt from the bottom of the shock.(step 5) (that is if you haven't done
this already.)
- Remove the whole shock and spring assembly. You should at this point be
able to simply lift the shock and spring assemble out of the wheel well
At this point, you will need to prepare your new shocks and springs and work
towards re-assembly. The task of removing the shocks should not take much
longer than an hour per corner on the first time. Putting
things back together is the same process in reverse. If you are replacing
factory shocks and not replacing your springs, you should not need an aligment.
Note from David Deweerd:
I work for a Mazda dealer and
have had many opportunities to do this. I discovered a much easier way to do
this operation. With the sway bar disconnected from the lower control arms,
disconnect the upper ball joint from the spindle. Unbolt the strut at the top
and bottom. Pry down on the lower control arm, as well as the upper control
arm, and it is quite easy to remove the strut assembly.