Power Antenna Repair
by Mark Booth
The correct procedure for installing the new power antenna mast is:
- The antenna motor must first be removed and disassembled to be sure
that no broken pieces of the old "cable" remain in the motor housing. Then
reinstall the motor housing unit into the car but do NOT install the exterior trim pieces
and lock nut.
- Two people required. Person A gets in the car and turns ignition to
ACC and then turns on the radio. (Person B listens to the antenna motor to make sure it is
spinning to "raise" the antenna.)
- Person B now feeds the end of toothed nylon "cable" down
into the motor housing opening. Care must be taken to get the end all the way down as far
as it will go (there is a little ledge a few inches down inside the opening, you have to
get PAST that little ledge by a inch or so).
- Once the end of the nylon "cable" is positioned correctly,
person A turns OFF the radio and the antenna motor will start pulling the rest of the
power antenna "cable" (and, eventually, the collapsed mast sections) down into
the motor housing. Person B carefully guides the cable and mast down into the housing
opening. (Watch those fingers!)
- Replace the trim pieces and lock nut and VOILA. All finished.
Believe it or not.... that's how it is supposed to be done!
I've done about 6 of them for club members (I can now replace one, including
the disassembly of the motor to remove broken pieces, in about 15 minutes.)
Addendum by Bryan A Jacoby - baj@astro.caltech.edu
 After
removing my old antenna mast, I determined that the toothed nylon cable had
not broken, so I thought that I would not need to remove and disassemble the
power antenna unit. I followed the directions for installing the new mast, but
I was unable to get the new cable to retract more than an inch or so. Upon disassembling
the power antenna unit, I discovered the problem: the new antenna cable was
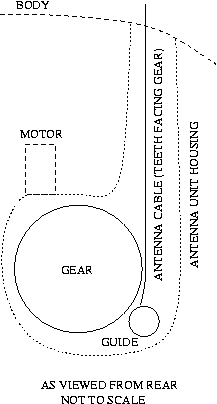
too straight -- it was just running into the guide wheel that is supposed to
hold the cable against the gear teeth (see crude drawing).
After
removing my old antenna mast, I determined that the toothed nylon cable had
not broken, so I thought that I would not need to remove and disassemble the
power antenna unit. I followed the directions for installing the new mast, but
I was unable to get the new cable to retract more than an inch or so. Upon disassembling
the power antenna unit, I discovered the problem: the new antenna cable was
too straight -- it was just running into the guide wheel that is supposed to
hold the cable against the gear teeth (see crude drawing).
The trick is to bend the end of the
nylon cable into an arc with a radius of 3 inches or so (comparable to the round
antenna unit casing) and keep it that way for a minute or so. Do not bend the
cable sharply or cause it to kink! The cable will retain this curvature enough
to allow it to feed past the guide wheel and engage the main gear, with no need
to remove and disassemble the antenna unit. Be sure to curl the cable with the
teeth on the inside of the curve, and feed the cable into the unit with the
teeth facing the left side of the car.
From the Miata Mailing List: August
95, Message #1045
From: PitstopOnTheInfobahn
Subject: Power Antenna Mast Repair!!!
Date: Fri, 18 Aug 1995 10:54:47 -0400
--------------------------------------------------------------------------------
Great news for those of us who have been waiting 2-3 years for a replacement
power antenna mast from Mazda, the replacement part I got works!!! The part
number is 0000-81-835A and lists for $20.50 (in MD) and my dealer sold it to
me for $16.40. Replacement according to the shop manual is straight forward:
Remove the trim nut from the top of the mast (use a snap ring pliers).
Turn Radio on and remove mast.
*here's the tricky part*
The shop manual says if the plastic cable is broken to replace the entire motor
assembly - this is not necessary if you feel like taking apart the motor! In
my case the plastic cable was broken (in two places it turns out). Once I removed
the mast from outside the trunk I saved the seal assembly
that slides over the mast (has a white seal and a small o-ring mounted (attached)
to a tube that has two prongs to make a good contact with the motor shaft).
This piece does _not_ come with the replacement mast!
Go inside the trunk and remove the spare tire and antenna fuse.
Remove the bolt holding the motor to the body.
Disconnect the antenna lead and as much wiring as possible.
Remove the large relay ass'y and the lower metal bracket.
In the center of the motor is a small brass nut (about 4mm), remove this nut.
Carefully take the cover off (if there is any plastic cable still in the motor
this cover will "jump" apart. *Be careful not to lose any of the small
spacers inside the housing.
Remove any remaining parts of the cable.
*after completing this part I opted to reassemble the motor and install the
new antenna following the shop manual, but I had a problem and had to reopen
the motor to install the mast.
Inside the housing is a small bearing/sheave that holds the plastic cable against
the toothed gear. With the assembly together I was not able to feed the new
mast past this point (although I could feel the teeth trying to engage).
I had to take the housing apart,
remove the bearing, feed the cable past the bearing and slide both the cabel
and the bearing back into place at the same time.
Once I fed the cable past the bearing about 2-3 inches I reassembled the housing.
I was then able to feed the mast back into the housing manually (though I recommend
using the motor to assist this part).
Note: when you reconnect power the antenna automatically _retracts_ . You can
use this feature to reset the mast into the motor before reattaching the whole
thing to the body.
Anyway, make sure the cable is greased and works properly and enjoy the new
antenna!!
If anyone has anymore questions I'll be happy to answer them (as if I didn't
say enough already!)!!!