
by Peter Wu (Wuey) - Dec 2004
You need these minimal hand tools and other wrenches to do a clutch job. If you have air tools, excellent! All socket drive extensions and a universal drive pictured are needed. Do not proceed if any one of these tools or a good substitute is not in your tool box, you would only be greatly frustrated. Be warned! Use only 6-point sockets for 14mm, 17mm and 19mm bolts on the bellhousing, flywheel, exhaust downpipe and any other tough bolts and nuts to minimize rounding them. 6-point sockets are readily available from the air tool section of auto parts store. This task can be undertaken by one person in the home garage.
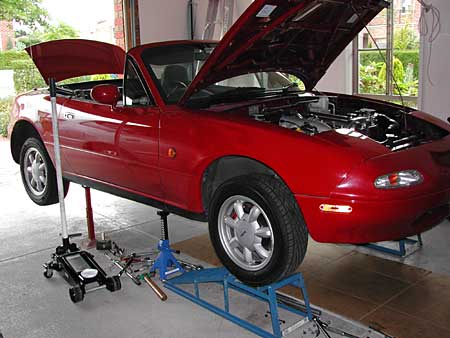
Remove the centre console and the gear stick. If you want to refresh the turret oil later, suck out the old oil with a length of clear plastic tube or a turkey baster. Clean the turret opening and cover with duct tape. Raise the car up to 45cm(18") high to have enough room for tool leverage and to provide room to remove the transmission from under the car. Now is also a good time to drain the transmission oil. Spray all bellhousing and exhaust downpipe bolts with liquid wrench and wait for a few hours preferably overnight. I used WD40. The exhaust downpipe is held by three 14mm nuts plus a long 12mm bolt fastened to a capture nut on a bracket attached to the bellhousing. See pics below for more details. These bolts can be accessed from below near the lefthand side. The exhaust downpine can be removed once you have the two 14mm nuts immediately after the catalytic converter removed.
 For
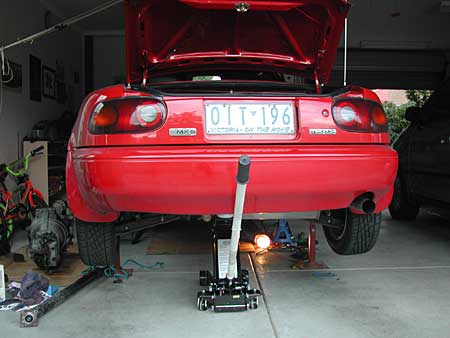
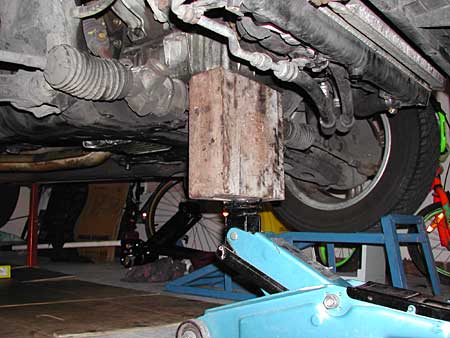
added safety , I placed the bigger jack under the differential while working
under the car. Make sure you jack your car up on a flat surface. I usually give
the car a vigorous shake here and there. If the car tilts or falls, you only
hurt your ego with perhaps a slightly bruised car. At least You have saved your
skin or even your life. With a 1-tonne car squashing you like a runover lizard,
your family members wouldn't be able to hear your muffled scream, if you do get
a chance to scream at all. Please work safe.
For
added safety , I placed the bigger jack under the differential while working
under the car. Make sure you jack your car up on a flat surface. I usually give
the car a vigorous shake here and there. If the car tilts or falls, you only
hurt your ego with perhaps a slightly bruised car. At least You have saved your
skin or even your life. With a 1-tonne car squashing you like a runover lizard,
your family members wouldn't be able to hear your muffled scream, if you do get
a chance to scream at all. Please work safe.
Before removing the gearbox, disconnect all wirings at the top. The wirings are held on the top by bent clips. Also remove the speedo cable and tie it away with a piece of wire. Remove the centre differential drive shaft.
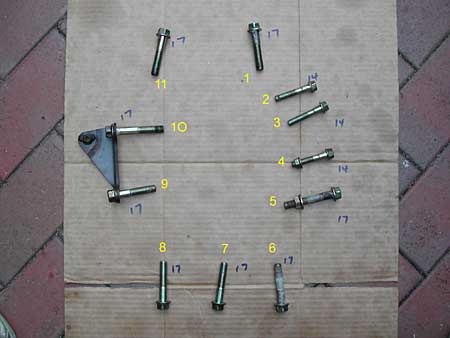 There
are altogether 11 bolts on the transmission bellhousing. Eight of them are 17mm
and three of them are 14mm. Bolts no. 4 and 5 are nutted at the other end. They
were very tight on mine. You may need a wrench to hold the nut at the other end
to loosen and to tighten. If you chose not to disturb your CAS, the coil and
the heater hoses, bolts no. 1 and no. 11 are reachable from below with long
extension and universal socket drives. Bolt No. 11 is only accessibled when you
have the exhaust downpipe removed. I loosened both bolts from the top after
removing the CAS, the heater hoses and the coil unit. Bolt no. 10 goes through
the exhaust holding bracket and is the longest and the toughest to remove. You
may need to use a cheater pipe and a fair bit of grunt.
There
are altogether 11 bolts on the transmission bellhousing. Eight of them are 17mm
and three of them are 14mm. Bolts no. 4 and 5 are nutted at the other end. They
were very tight on mine. You may need a wrench to hold the nut at the other end
to loosen and to tighten. If you chose not to disturb your CAS, the coil and
the heater hoses, bolts no. 1 and no. 11 are reachable from below with long
extension and universal socket drives. Bolt No. 11 is only accessibled when you
have the exhaust downpipe removed. I loosened both bolts from the top after
removing the CAS, the heater hoses and the coil unit. Bolt no. 10 goes through
the exhaust holding bracket and is the longest and the toughest to remove. You
may need to use a cheater pipe and a fair bit of grunt.
My heater hoses were hardened and in need of replacement. In my RHD car, I removed them and the coil unit to access bolt no. 11 near the top left corner. To remove old and hardened heater hoses, it is best to slice them off with a sharp utility knife to minimize bending the soft heater copper tubes. Make a slice along the copper tube and just twist the hose off. Be careful not to slice or twist too hard as the copper is very soft. Again, you may prefer to work on bolt no. 11 from below. Make sure you have your six-point socket nice and square on this bolt before you swing your long socket driver. Wearing a pair of gloves might also save you skinning your knuckles.

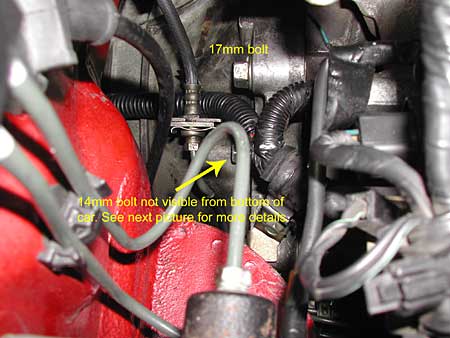
If you prefer, you can also remove the CAS to loosen bolt no. 1(17mm) from the top. In my RHD car, with the clutch hydraulic line bracket in the way, I could only remove bolt no. 2(14mm) from the bottom by feel and using long extension and universal socket drive. This is also the hardest bolt to reinstall as I needed to attach the clutch hydraulic bracket with this bolt by feel. See next pic for details. A LHD car may have slightly different setup.
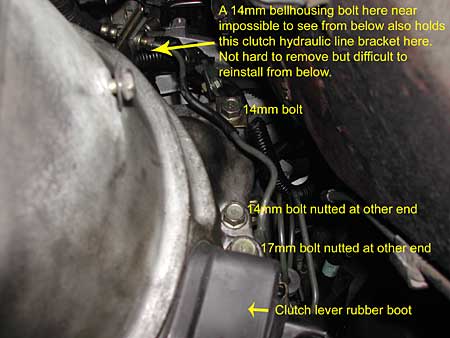 Bolts
no. 4(14mm) and no. 5(17mm) above the clutch lever are nutted at the other end.
They are very tough and you might need a wrench to hold the other end to stop
them moving while removing.
Bolts
no. 4(14mm) and no. 5(17mm) above the clutch lever are nutted at the other end.
They are very tough and you might need a wrench to hold the other end to stop
them moving while removing.
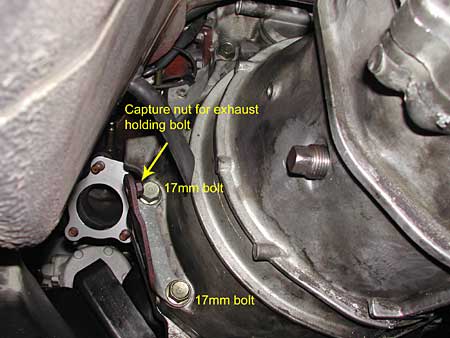
Bolts no. 9 and 10 go through a bracket that holds the exhaust downpipe. Bolt no. 10 is the longest bolt and can be really tough to remove. I ended up bracing my right leg on the transmission tunnel and my upper body extended out from the left of the car to get extra swinging room and leverage using a cheater pipe on the socket drive. It was a vigorous workout! Also there is a capture nut on top of that bracket for the extra 12mm downpipe holding bolt. Don't try to remove this nut as it's welded onto the bracket!
 Bolt
no. 5(17mm)under the clutch lever and bolts no. 6 and 7 at the bottom are the
easiest to remove. You have heaps of room to swing your socket drive or cheater
pipe here.
Bolt
no. 5(17mm)under the clutch lever and bolts no. 6 and 7 at the bottom are the
easiest to remove. You have heaps of room to swing your socket drive or cheater
pipe here.
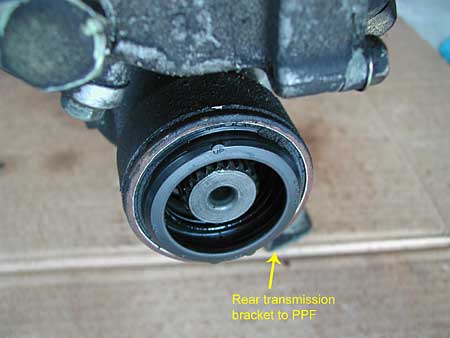
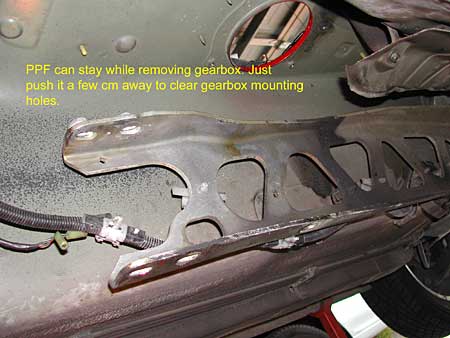 Loop
a piece of rope around the end of the gearbox and tie its ends loosely on a
block of wood in the cabin. Remove the two very long 19mm bolts and one short
19mm bolts at the rear gearbox bracket from the PPF. The two long bolts are
tight. You need the cheater pipe here. Once you have these three bolts removed,
tighten the ends of the rope in the cabin to hold the gearbox weight before
attemping to disengage the gearbox at the bellhousing. Put the jack under the
front of the gearbox to hold its weight while you attempt to lower it.
Loop
a piece of rope around the end of the gearbox and tie its ends loosely on a
block of wood in the cabin. Remove the two very long 19mm bolts and one short
19mm bolts at the rear gearbox bracket from the PPF. The two long bolts are
tight. You need the cheater pipe here. Once you have these three bolts removed,
tighten the ends of the rope in the cabin to hold the gearbox weight before
attemping to disengage the gearbox at the bellhousing. Put the jack under the
front of the gearbox to hold its weight while you attempt to lower it.
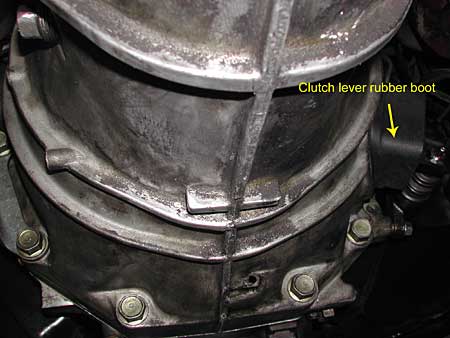
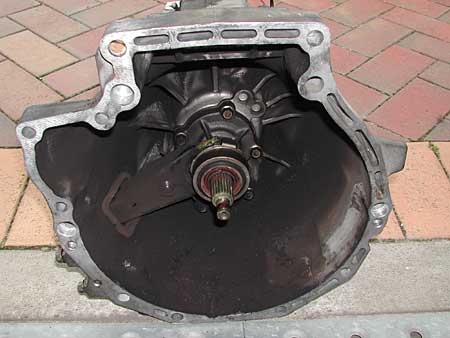 It
looks dirty but I guess most of the dirt is clutch dust. My gearbox and the
rear main crank were actually leak free. While I had the gearbox removed, I
replaced the front and rear oil seals.
It
looks dirty but I guess most of the dirt is clutch dust. My gearbox and the
rear main crank were actually leak free. While I had the gearbox removed, I
replaced the front and rear oil seals.
 With
the gearbox cleaned, remove the 6 bolts to reveal the front transmission oil
seal. On installation, lightly apply a coat of high temperature bearing grease
on the shaft spline, the shiny non-moving shaft area behind the shaft spline
where the throwout bearing glides, the two pivots supporting the throwout
bearing and the clutch lever spring pivot shown just to the left under the 11
o'clock cover bolt.
With
the gearbox cleaned, remove the 6 bolts to reveal the front transmission oil
seal. On installation, lightly apply a coat of high temperature bearing grease
on the shaft spline, the shiny non-moving shaft area behind the shaft spline
where the throwout bearing glides, the two pivots supporting the throwout
bearing and the clutch lever spring pivot shown just to the left under the 11
o'clock cover bolt.
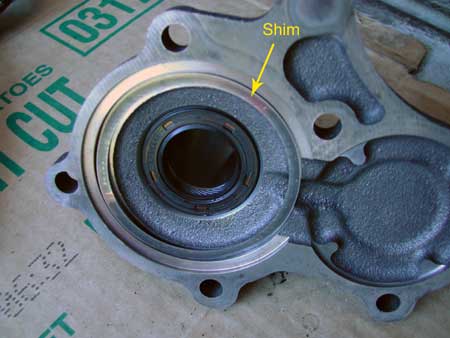 Note: It has been mentioned in several
NA Forum posts that I installed this seal BACKWARD. Check the orientation of
your old seal before removal. Pic on the left shows the gearbox
front cover removed and a new oil sealed installed. You should get an oil seal
removing tool to remove oil seals. Prying with a screwdriver risks damaging the
sleeve. Whatever you use, try to start prying at the 12 o'clock, 11 o'clock or
the 1 o'clock position. If you did end up nicking the sleeve, chances of oil
leaking from those areas are very much lessened. Use the other end of a punch
to tap in the new seal evenly. Note the large thin and shiny metal shim around
the oil seal. Measure its tolerance and order a new one if needed. Mine was
within spec. The front cover gasket should be replaced too. Make sure you apply
gasket sealant before installing the new gasket.
Note: It has been mentioned in several
NA Forum posts that I installed this seal BACKWARD. Check the orientation of
your old seal before removal. Pic on the left shows the gearbox
front cover removed and a new oil sealed installed. You should get an oil seal
removing tool to remove oil seals. Prying with a screwdriver risks damaging the
sleeve. Whatever you use, try to start prying at the 12 o'clock, 11 o'clock or
the 1 o'clock position. If you did end up nicking the sleeve, chances of oil
leaking from those areas are very much lessened. Use the other end of a punch
to tap in the new seal evenly. Note the large thin and shiny metal shim around
the oil seal. Measure its tolerance and order a new one if needed. Mine was
within spec. The front cover gasket should be replaced too. Make sure you apply
gasket sealant before installing the new gasket.
 Note
the "UP" mark on the old seal before removing. The new seal I ordered
did not have this mark but has the same single notch at the top and 2 notches
at the bottom.
Note
the "UP" mark on the old seal before removing. The new seal I ordered
did not have this mark but has the same single notch at the top and 2 notches
at the bottom.
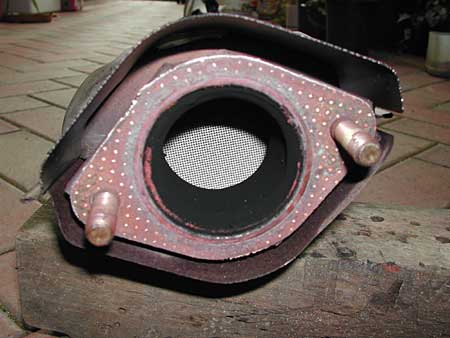 Part
of the honeycomb structure of the catalytic converter exposed. You would want
to replace its gasket too.
Part
of the honeycomb structure of the catalytic converter exposed. You would want
to replace its gasket too.
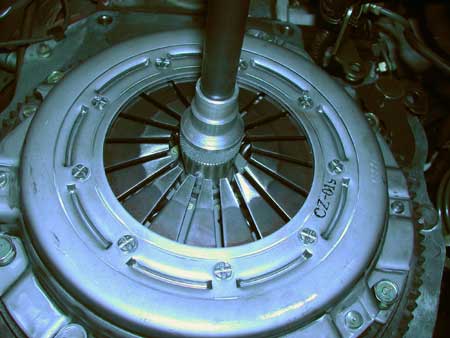
 This
is a good time to replace the end rubber cap on the unused water outlet.
Picture here shows the old clutch is yet to be removed. Release the pressure
plate bolts evenly to release tension. Before you have removed all the bolts,
hold the bottom of the assembly with one hand while you lift it off with the
other hand. I had my clutch friction plate dropping off suddenly for not
holding the bottom while taking off the pressure plate. Be prepared for heaps
of clutch particles falling off when you remove the clutch assembly from the
flywheel mating surface.
This
is a good time to replace the end rubber cap on the unused water outlet.
Picture here shows the old clutch is yet to be removed. Release the pressure
plate bolts evenly to release tension. Before you have removed all the bolts,
hold the bottom of the assembly with one hand while you lift it off with the
other hand. I had my clutch friction plate dropping off suddenly for not
holding the bottom while taking off the pressure plate. Be prepared for heaps
of clutch particles falling off when you remove the clutch assembly from the
flywheel mating surface.
The flywheel exposed after removal of the clutch assembly. Use the cheater pipe to wedge it onto the flywheel teeth with the other end resting on the ground to stop the flywheel turning while you remove or install the six 19mm flywheel bolts. Remove all traces of old threadlocker from the bolt thread. Reapply Loctite blue threadlocker on reinstallation. Torque to 71-75 ft pound.
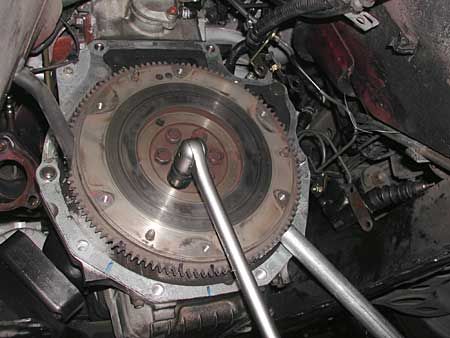 It
is always prudent to have the flywheel resurfaced and its pilot bearing
replaced when you have easy access to it. The pilot bearing is known to
premature wear. The bearing my machinist replaced happened to be of identical
make to the OEM unit. You can use a suitable socket or bench press to drive out
and to install this bearing.
It
is always prudent to have the flywheel resurfaced and its pilot bearing
replaced when you have easy access to it. The pilot bearing is known to
premature wear. The bearing my machinist replaced happened to be of identical
make to the OEM unit. You can use a suitable socket or bench press to drive out
and to install this bearing.
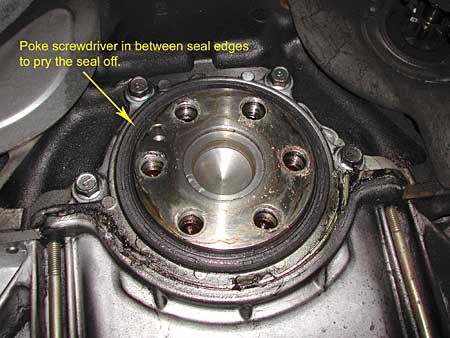 You
absolutely don't need to remove the rear main crank seal cover plate to remove
the crank seal. It can be a nightmare to reinstall this cover and to reapply
high temp silicone sealant later. Simply use a taped screwdriver or an oil seal
removal tool for this job. Having cleaned the seal area thoroughly, oil the new
seal and used the opposite end of a punch to tap it in. The seal groove is
deeper than the height of the seal which should sit flush with the groove
opening. The seal fits very tightly and can be difficult to tap in evenly. If
you tap in one side, the other side would pop out. To overcome this, cover both
sides with a small block of wood and tap gently with a mallet. Use the end of
the wood as a guide to drive the whole seal in evenly. It will not go in any
further than necessary once the wood comes in contact with the groove.
You
absolutely don't need to remove the rear main crank seal cover plate to remove
the crank seal. It can be a nightmare to reinstall this cover and to reapply
high temp silicone sealant later. Simply use a taped screwdriver or an oil seal
removal tool for this job. Having cleaned the seal area thoroughly, oil the new
seal and used the opposite end of a punch to tap it in. The seal groove is
deeper than the height of the seal which should sit flush with the groove
opening. The seal fits very tightly and can be difficult to tap in evenly. If
you tap in one side, the other side would pop out. To overcome this, cover both
sides with a small block of wood and tap gently with a mallet. Use the end of
the wood as a guide to drive the whole seal in evenly. It will not go in any
further than necessary once the wood comes in contact with the groove.
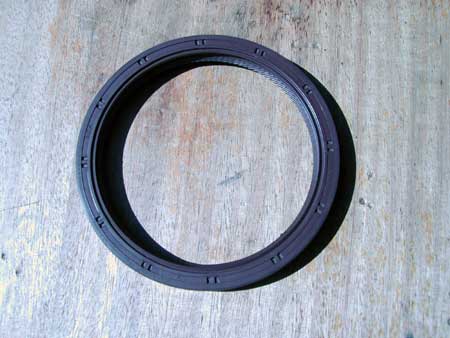
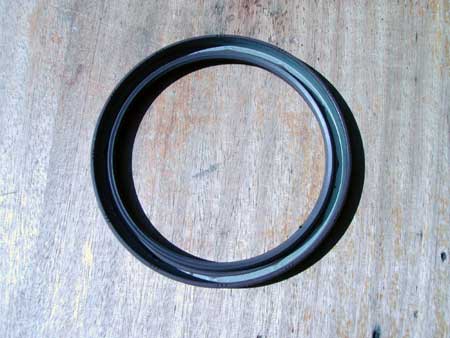
Front of rear main crank oil seal on the left and its back on the right. I show you these two pictures so you would know where to poke your screwdriver to remove it.
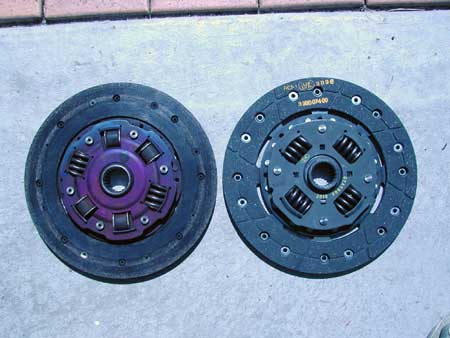
Old friction plate on the left, new plate on the right. Make sure the side with higher profile is installed on the gearbox side. Mine is marked on the plate as shown in the upside down label. I used an Australian made PBR pressure and friction plates.
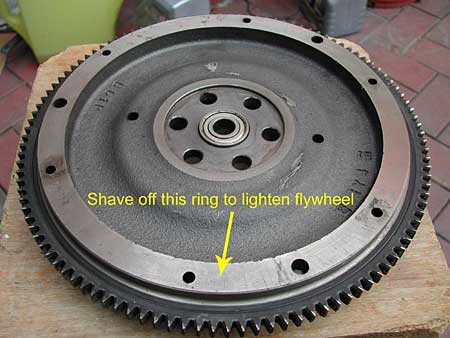 Some
people choose to shave this hefty ring off by a machine shop to lighten the
flywheel for a racier engine. The pros and cons of doing so are 50-50. I choose
to keep mine for street use. It is important that you have it rebalanced if you
opt to shave off this ring. You want it to be perfectly balanced to avoid
unwanted vibration that could damage the crank at high RPM.
Some
people choose to shave this hefty ring off by a machine shop to lighten the
flywheel for a racier engine. The pros and cons of doing so are 50-50. I choose
to keep mine for street use. It is important that you have it rebalanced if you
opt to shave off this ring. You want it to be perfectly balanced to avoid
unwanted vibration that could damage the crank at high RPM.
 Apply
a thin coat of high temperature grease on the clutch pressure plate spline
thread. Be careful here as too much grease will cause the grease to fling off
onto the friction plate. Just a VERY THIN smear of gease will do. Less is more
here. A grease contaminated friction plate might cause clutch shudder. Use a centering
tool to align the clutch before tightening the bolts down evenly. Apply Loctite
Blue on all bolts. Lift the centering tool slightly to prevent the assembly
sagging downward while you tighten the bolts. Alternate the tightening
sequences in a crisscross pattern. Torque to 14-19 ft pounds.
Apply
a thin coat of high temperature grease on the clutch pressure plate spline
thread. Be careful here as too much grease will cause the grease to fling off
onto the friction plate. Just a VERY THIN smear of gease will do. Less is more
here. A grease contaminated friction plate might cause clutch shudder. Use a centering
tool to align the clutch before tightening the bolts down evenly. Apply Loctite
Blue on all bolts. Lift the centering tool slightly to prevent the assembly
sagging downward while you tighten the bolts. Alternate the tightening
sequences in a crisscross pattern. Torque to 14-19 ft pounds.
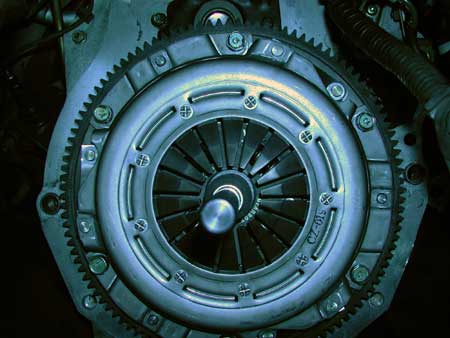 If
you have the car raised high enough, you can do a semi sit-up to eyeball the
alignment before final tightening.
If
you have the car raised high enough, you can do a semi sit-up to eyeball the
alignment before final tightening.
With the gearbox removed, the engine pivots to the front on its mountings. To make mating the gearbox easier, I used a smaller jack and a block of wood under the front of the oil pan to tilt the engine rearward. If you have an assistant, he can just place his hand on the cam cover to tilt the engine downward at the rear while you maneuver the gearbox to mate with it. Very little force is needed to push the engine downward as it is free of the gearbox at this stage. If you don't have a spare jack, use the car's scissor jack on some cinder blocks.
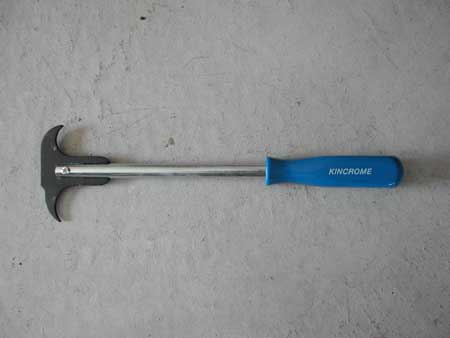 This
is a very useful and low cost seal removal tool I used it on the transmission
seals. Angle the hook very carefully before you pry the seal off. You don't
want to scratch the seal hub with the very sharp end.
This
is a very useful and low cost seal removal tool I used it on the transmission
seals. Angle the hook very carefully before you pry the seal off. You don't
want to scratch the seal hub with the very sharp end.
Loop a piece of rope around the rear end of the gearbox with its ends looped through the turret hole into the cabin. Lift the rear of the gearbox up with the rope as high as possible and tie the rope ends to a block of wood. Using a jack under the front of the gearbox, maneuver it as close to the engine as possible. As you jack the gearbox higher, you may have to retie the rope in the cabin several times. When the gearbox is almost mated to the engine, bolt it loosely in a couple of places to the bellhousing. Jiggle it a bit to match the gearbox drive shaft with the clutch spline thread. Reinstall the centre differential driveshaft temporarily using two of its four bolts and nuts. Apply threadlocker on the bolts. Don't tighten the bolts just yet. Temporarily install the gear shift lever into the gearbox turret and shift in 2nd or 3rd gear. Turn the front crank bolt clockwise with a socket. If the gearbox input shaft is mated to the clutch spline thread, the rear wheels will turn, the gearbox and the engine would almost home onto each other. Once the gearbox is fully mated to the engine, apply some threadblocker on the PPF bolts and bolt the rear end of the gearbox to the PPF frame. Now reinstall the rest of the bellhousing bolts. Torque these bolts to 77-91 ft pound. Torque the larger 17mm bolts to 60 ft pounds and the smaller 14mm bolts to 30 ft pounds.
Reinstall the exhaust downpipe after applying anti-seize on the studs. Do a final check for bolt tightness. Reconnect all wirings and the speedo cable and the clutch slave cylinder. Refill the transmission and coolant if necessary. Finally refill the turret with oil and reinstall the gear stick..
With all jack stands removed, start the engine and test out the new clutch. You may have to readjust the clutch pedal freeplay. I accomplished this by removing the driver seat and assumed a feet on parcel shelf with head under the dash position. Use a 12mm wrench to loosen the locknut and a 10mm wrench to turn the adjustment rod. To increase freeplay, turn rod towards the rear of car and the other way to decrease freeplay.
PARTS LIST - Listed below are some of the parts you might need for this project. I replaced all items listed below except the turret upper and lower boots as mine were still in good condition.
|
DESCRIPTION |
PART NUMBER |
|
Clutch kit including pressure plate, friction plate & throwout bearing |
I used an Australian made PBR kit, check Mazda dealer for OEM kit |
|
Heater Hoses |
NA0161211 and NA0161212A |
|
Hose Grommets |
887161219A |
|
Rear Main Crank Oil Seal |
BP0511312 |
|
Transmission Front Oil Seal |
H50117103 |
|
Transmission Rear Oil Seal |
M50717335A |
|
Transmission Cover Gasket |
FE5016225A |
|
Clutch Lever Dust Boot |
FE8616214 |
|
Cap Plug for unused water outlet at rear of engine |
FEA713104 |
|
Exhaust Downpipe Gasket |
B69040450 |
|
Exhaust Gasket after catalytic converter |
B69040305 |
|
Turret Lower Boot |
NA0164481B |
|
Turret Upper Boot |
M51417480A |
| Back to the Garage |
8 October, 2008 |
| [Home] - [FAQ] - [Search] - [Sponsors] - [Forums] |
| [Garage] - [Clubs] - [Contact Us] - [Disclosures] - [More...] |
Copyright
©1994-2024, Eunos Communications LLC
|