
by Tom Howlin
This started out as a post to the forum trying to relieve the increasing anxiety on behalf of owners of 90-94 cars with the real oil pressure gauges. The number of issues being discussed was growing rapidly, plus I had a few of my own.
I'm in a unique position to own four cars with the real OPG and was getting different readings out of all of them. My 90 would show almost zero at idle and then jump back and forth between 30 and 45PSI at 3K rpms. My 92 shows very high oil pressure, pegging the needle when cold and consistently reading 60PSI or more at 3K rpms. The 93 showed normal pressure when running but wouldn't drop back at idle. The 91 was the only one acting "normal".
This project started out of concern over the high oil pressure in the 92. I originally took it to a shop to hook up a mechanical gauge and they then verified the oil pressure was actually 45PSI, and not 60 as indicated, at 3K rpms. They charged me a half hour labor.
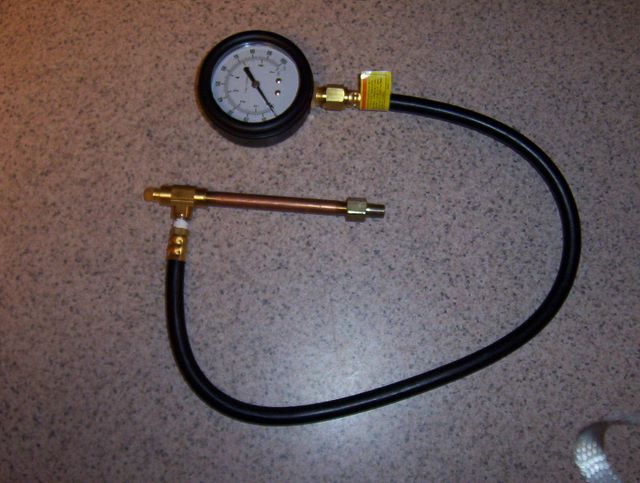
I purchased a mechanical oil pressure gauge from Harbor Freight for $8.00 on sale. It did not include the adapter to fit the Miata engine block – it takes a 1/8 28 thread British Pipe Thread fitting. You will need a 1/8NPT Female to 1/8 28BSP Male adapter. You can order them online here: http://www.egauges.com/vdo_acce.asp?Subgroup=BSP_Adapter_Bushings&Manf=All but by time you pay shipping, it gets expensive. My local plumbing supply house (not Lowes or HD) ordered one in for $2.00. Please do not skip the adapter. The 1/8 NPT will seem like it’s threading into the block fine – it is NOT.
I purchased a 4” 1/8NPT Male x 1/8NPT Male nipple along with a 1/8NPT T fitting (all available at your big box home improvement store). I used the T fitting because I wasn’t sure whether it would be easier to come straight out or straight down from the top and it gave me both options. I also purchase a 1/8NPT block off plug. An added advantage of the T fitting is that it has flats on the side, making it easier to screw into the block and could even be tightened with a wrench if you thought it necessary (it’s not – you may leak a drop or two of oil but it’s not on there that long). This sub-assembly looks like this:
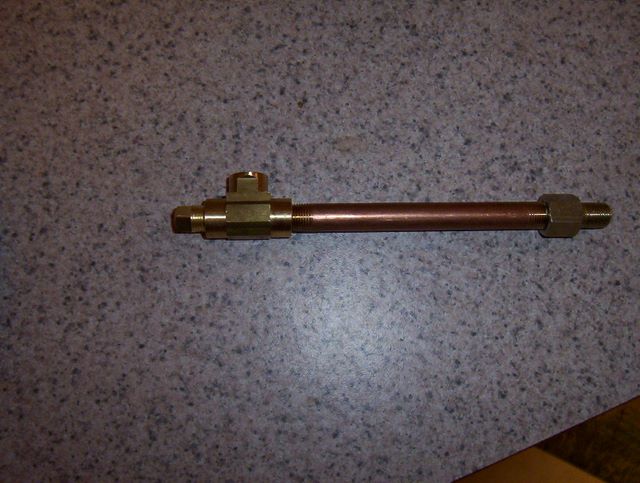
This setup (pictured below) allow you to screw the apparatus into the block very easily without having to get halfway under the intake manifold. After it’s screwed in, you can come down with the hose with it’s 1/8NPT fitting attached and screw it directly into the T fitting. The stock oil pressure sender has a molded nut on it that takes a 30mm (a 1-3/16 will also work) socket to unscrew. Like an oil filter, it does not need to be put on gorilla tight and remember, you’re dealing with soft brass fittings.
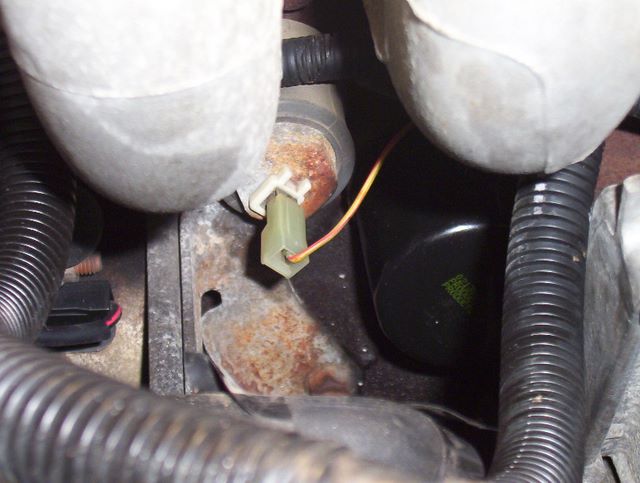
The oil sender sits to the left of the oil filter, with one wire attached, and is tucked up under there pretty good. Although it’s fairly easy to remove, trying to thread a hose with a fitting on the end in there takes some real contortions and you run the risk of cross-threading the fitting, hence the tool fabricated above.
Now it’s a matter of thoroughly warming up the car to normal operating temperatures – this takes a very long time sitting at idle in your garage. By the time I did the second car, I bought another 1/8NPT plug so I can plug both of the openings on the T, drive the car around for thirty minutes and then easily remove the plug and add the hose and then take my readings in the garage, using idle and 3K rpms as my baselines.
The good news is that all four of my cars read within a couple of pounds of each other. I also tested the sending units per the Mazda shop manual. It is just taking an OHM meter and measure the changing resistance coming from the single metal tab on the sending unit at various rpms. My 90 tested bad – 52 ohms at idle and it would keep rapidly jumping back and forth between other readings (30 and 43ohms) under load. The other cars tested good and so I’ve made the assumption it’s in the gauge. The range of ohms is 52 (zero PSI) to 16 (90+ PSI) with what appears to be an infinite number between those ranges.
The manual has a procedure for testing the gauge but you need a multi-meter that has the capability to provide different resistances to a current being passed through it. Mine doesn’t but it’s an older Fluke 71 so perhaps the newer ones are capable of this. Mazda shows two procedures for this, one is pinning the meter to the yellow/red wire going to the sender and varying the resistance, the other involves removing the instrument cluster and using the meter on the printed circuit board for the oil pressure gauge.
While you’ve got the sender out and the wire disconnected, thoroughly clean the blade contact on the sender and spray some contact cleaner down into the female plug. This has been known to help some owners as the corrosion develops its own resistance and distorts the output of the sender.
Mine are now calibrated in my mind and I can quickly do another pressure check if they start behaving differently. I suspect as the cars age, so does this system and the result is widely varying readings. This is not meant to say you shouldn’t have yours checked out if it is indicating problems. If you don’t wish to invest the $13.00 in this system, pay a shop to put your mind at ease.
I suspect this is one of the reasons Mazda discontinued the real oil pressure gauge. Owners would complain over varying oil pressure readings and obviously now that the cars are getting some substantial age on them, the problem is being exacerbated by time and use.
For more technical information, pages of T-32 and T-37 of the 1990 Miata shop manual contain the full test procedures for narrowing down the sender versus the gauge. They also recommend on page D-4 the exact same test procedures being outlined here.
| Back to the Garage |
10 December, 2006 |
| [Home] - [FAQ] - [Search] - [Sponsors] - [Forums] |
| [Garage] - [Clubs] - [Contact Us] - [Disclosures] - [More...] |
Copyright
©1994-2024, Eunos Communications LLC
|