by Gary Fischman
The Miata timing belt must be changed every 60,000 miles. Although the California Owner's Manual says 105,000 miles, this is just to satisfy a state requirement that says timing belts should last 100,000 miles or more. Still, it should be done at 60,000 miles. The Miata engine is a non-interference engine, meaning that the pistons will not crash into the valves. However, if you neglect this major service, you risk being stranded due to a belt break.
WARNING: Changing your own timing belt is not for the faint of heart!
If you screw it up, your engine may not run! However, if you are confident in your abilities and generally do your own work, you should be able to handle it.
Changing the timing belt requires no special tools. You will probably want to have a 14mm deep well socket, a 3" extension for your 1/2" drive, and you may want a steering wheel puller to remove the crankshaft pulley. (It shouldn't be necessary) Also, you may want a second pair of hands to hold the camshaft pulleys steady while you install the new belt. You will also need something to drive the new crankshaft and camshaft seals in. An appropriate piece of pipe, covered with electrical tape to prevent cutting the seal worked well for me. A long breaker-bar will be needed to remove the crankshaft bolt.
 Alternatively,
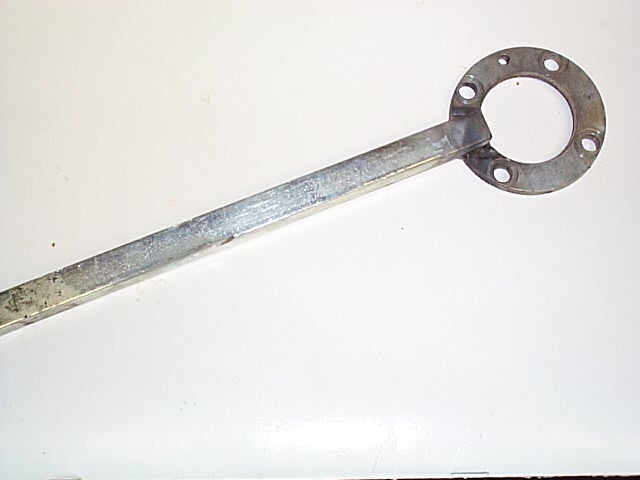
you can do what Bill Snyder did and make your own tool to help remove the crankshaft
bolt:
Alternatively,
you can do what Bill Snyder did and make your own tool to help remove the crankshaft
bolt:
It is basically a large washer (I think it was a 1 1/2" washer) that fits over the crank bolt and then there are holes drilled in it for the 10mm bolts. I then welded a piece of 1/2" keystock as a handle. The handle can be blocked any number of ways.
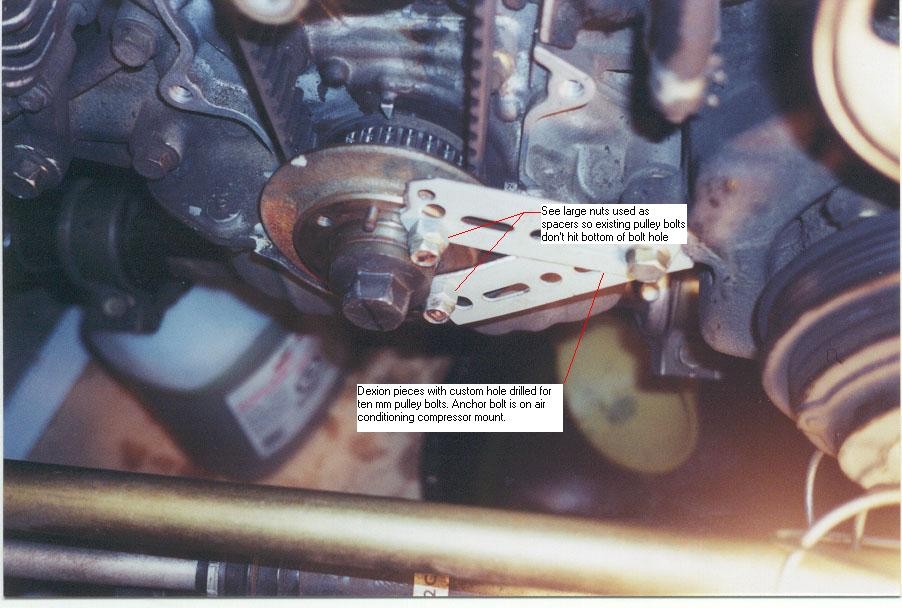
Archie Glasgow sent in this photo of a homemade tool that keeps the engine from turning while removing the bolt. We haven't tried it, but we see no reason why it wouldn't work.
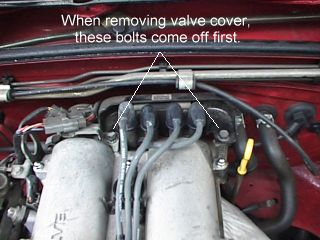
Before you begin - LABEL EVERYTHING!!!! Label each part as it is taken out and also label its bolt sizes and what the part was connected to/in/between. This aids in any confusion to the novice engine worker.
|
 |
|
 |
 1990
- 1991: Remove the accessory belt pulley from
the crankshaft pulley.
1990
- 1991: Remove the accessory belt pulley from
the crankshaft pulley. This is easier if you put the car in gear to keep the engine from turning. Loosen the bolts holding the pulley in place. As you remove the outside plate, pulley, and timing belt guides, make a note of the order in which they came off and the direction they face. This is important.
1992 and later: Remove the 21mm crankshaft bolt. This will be difficult. Put the car in 5th gear and engage the parking brake. Using a long breaker bar, crack the bolt loose.
 |
 |
By far the best marker I've found for the job is a white Sanford Uni Paint Marker which you can find at ACE hardware stores and probably most others. Chalk, grease pencils and the like can be rubbed off too easily. The paint marker is very precise, dries almost instantly, and won't rub off. Just be sparing with it--small marks will do since they will stay put.
TIP: Sean Archer and Vic Harder from the Canadian Rockies Chapter of MCA offered this great tip. We haven't tried it, so we're not sure what kind of caveats might be attached to it, but its sure worth a try! If you're replacing the camshaft seals or water pump as well, you won't be able to do this.
When you are ready to remove the old timing belt and apply the new one, cut the old belt in half for its entire length. That leaves lots of room to push on the new belt. Push the old belt back as far as it will go on the crank and cam sprockets, leaving approximately a 1/4" to slide the new belt over. Once the new belt is on and lined up correctly, simply cut the old one off and push the new one into place.
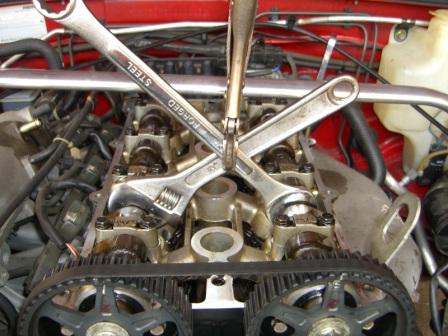
TIP: Kim Burgess suggests: Clamping the cams in positions aids the solitary mechanic in reinstalling the belt by 'locking' the cam wheels into position.
Place Cresent wrench on each cam at the bolt-shaped section of the cam between the #1 and #2 lobes. Position wrenchs such that they overlap and C-clamp them together to hold camshafs in position.
This step is optional. If the seal is leaking, definitely replace it. If not, you may want to let it go until next time. Especially if you have an early model with a "questionable" crankshaft.
These tips regarding the seals were sent in by Joe Heagney ( jheagney@micromatter.com ):
Belt had obviously been changed recently, almost no gaskets on belt covers, got the seal out and discovered that the crank nose was ok, but the sealing surface had been gouged in several places by some cretin trying to remove the seal, probably at timing belt change time. After much soul searching and not a little deliberation on the familial heritage of the cretin, I cleaned up the sealing surface by filing and grinding with a Craytex rubber/abrasive wheel on a cordless Dremel tool, and changed the seal. Then I thought, what about the camshaft seals? By this time I had realized that removing these seals was a real pain in the posterior and had discussed the problem with a friend who had taught motorcycle repair in a former life. He suggested (here's tip number one) that you can drill the seal with a small drill and screw in a sheet metal screw and pull on the screw to remove the seal. He had a minerature slide hammer puller for this, but vise grips and a hammer work since they aren't very tight. Next he said that he had had cretin gouged motorcycle cranks to repair and had smoothed the crank and then cleaned the gouge and filled it with epoxy (tip number two). When I pulled the seals from the camshafts it was obvious that the same cretin had been there as well. To make it easy to work on the camshafts I pulled the bearing caps and filed the sealing surface smooth and then cleaned and filled the gouges. I used J.B. Weld, which has a long cure time, but it made a very smooth surface when sanded with 600 wet or dry.
Richard Ohnstad sent this tip on reseating the seals:
What I finally found that seemed to be a real good fit was a 1 1/4" coupling ($1.99 at ACE Hardware). This piece has a 1 7/8" o.d., and a 1 1/2" i.d. In addition the ends are finished off and very smooth, so there was no real need to wrap the end with tape. I also used this coupling to set the camshaft seals.
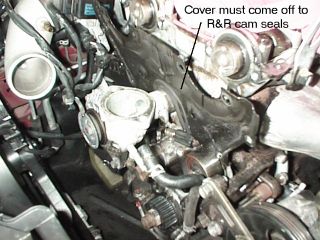 Inspect
and replace the camshaft seals if required
Inspect
and replace the camshaft seals if requiredNote from Chris Roberts on camshaft seals:
The only GOOD way to remove the cam seals is to pull the #5 camshaft cap. Remove the two bolts, place a rag over the cap, and grab gently with a large pair of slipjoint pliers at each edge of the cap. Alternating sides, you can rock back and forth slightly and the cap will come free, and then removal of the seals is a piece of cake with no risk of damage to the cams themselves. One important detail that must not be overlooked is cleaning up the surface where the cap sits on both the cap and the head, and then applying a THIN coat of flange sealant(hylomar is what I use) before reinstalling the cap. Then install the new seals after oiling the inner lip and drive them in until they are flush with the cap. The service manual does not advise bottoming the seals out.
If you plan to replace the water pump, now is the time. When you're done, come back here.
Mike Stollov sent this
suggestion: |
 |
|
 |
|
 |
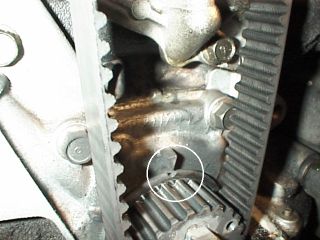
 Turn
the crankshaft 1 5/6 turns clockwise
Turn
the crankshaft 1 5/6 turns clockwise 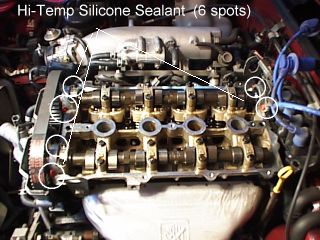 '90-'91:
Install the timing belt outer guide plate.
'90-'91:
Install the timing belt outer guide plate. At this point its a good idea to check the ignition timing and idle speed. If everything was done correctly, it should not have changed, but it can't hurt to check.
I recently changed the timing belt on my 94 Miata. However, despite reading all the articles I could find, and referring to the enthusiast manual by Veloce Publishing I still managed to get the timing 1 tooth off on the exhaust CAM...
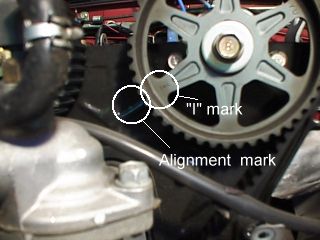
I did not scribe the lines on the cam sprockets, as suggested, which with hindsight was probably the wrong thing to do, but I learnt a couple of things that may be worth passing on or adding to the description on your web site.
Firstly, although obvious give yourself plenty of time, get some help if possible, and don't be put off... Follow the instruction for setting the timing prior to removing the old belt, and when you do take the timing belt off try to pay attention to how much, if any, the CAMS and crank move. Use a wrench as suggested to realign the CAMs and crank. You might like to add a couple of additional white-out marks to the CAM sprockets where they line up with the top of the cam cover backing plate. Although I made a mistake the first time I ultimately used the factory timing marks and found them to be satisfactory.
I failed the first time because I introduced an error when reinstalling the belt. In my efforts to keep the belt tight on the exhaust side of the engine I failed to notice the exhaust CAM sprocket moving slightly as I pushed on the belt. I was so preoccupied with the inlet, which moves slightly when the belt tension is removed, and worried about the crank that I simply didn't notice.
I followed the tensioning procedure and thought I checked the timing but obviously I didn't check it closely enough which brings us on to my first point. Once you have reinstalled the belt, checked the timing, tensioned it and rechecked the timing, take a break and get a coke or something. When you come back refreshed you can recheck everything again. It might seem obvious or unnecessary but it's certainly quicker than doing the job twice! I was adamant that everything was right the first time even though the car ran like crap. I didn't drive it all weekend and was resigned to taking it to the dealer, but my wife suggested I have one more look - it only I'd taken more time checking...
Needless to say when I removed the cover and turned the engine over to TDC the error was clear to see, one tooth off on the exhaust side. I removed the belt, aligned everything and reinstalled, but the same thing happened, the exhaust CAM moved slightly. The only way I could get the belt on correctly was to hold the CAM position with a wrench and get a friend to install the belt. This time I was watching everything very closely... Once the belt was on and tensioned correctly I rechecked everything and life was good, no errors! And one last thing, when I redid the timing a second time I managed to do it with the radiator, hoses and bottom shroud still in place. It tight but you can manage...
I had one issue that I thought might deserve attention in the article. As a newb to this particular project on this car, I was unaware of the importance of the crank trigger wheel - I thought it was just some sort of dust plate. I put it on concave face towards the front of the car...and the car would not run at all. There was not mention of the importance of the orientation of this plate in the article, but a quick search in the forums turned up the issue. I removed the two drive belts and the drive belt pulley on the crank, flipped the crank trigger wheel so that it was facing convex face-forward, put everything back together, and the car started right up and runs perfectly.
| Back to the Garage |
21 June, 2014 |
| [Home] - [FAQ] - [Search] - [Sponsors] - [Forums] |
| [Garage] - [Clubs] - [Contact Us] - [Disclosures] - [More...] |
Copyright
©1994-2024, Eunos Communications LLC
|