
The definitive 100K mile Miata HLA cleaning story
Richard Schnorenberg
Engineer at large
So you think there’s nothing that can be done for your Lifter noise in your NA Miata?
You say you’ve tried every variation of oil viscosity, every brand of oil filter, Every flush system from SeaFoam to Twisty flush, and yet you still get lifter noise? Surely after all of this time, energy, and money your lifters must be sparkly clean on the inside right? I doubt it.
I’ll give credit where it’s due. I looked all over Miata.net hoping to find pictures and directions for a good method of cleaning the lifters once removed from the car. I found none. So I asked the forum, and low and behold someone posted the following link to some Ausies that provided me with a starting point…
My thread on Miata.net:
http://forum.miata.net/vb/showthread.php?t=219841&highlight=soak
The link to the Ausies:
http://www.aus-cartalk.com./viewtop...lifter&start=30
So I was doing my first timing belt and water pump on my 95 Miata. I have a little over 100K miles on it, but have owned it for only 6K of those miles. This is the Miata’s second timing belt. While in deep enough to change out the cam seals, I figured why not go the extra step of removing the cam shafts, pulling out all of the lifters, disassembling them, cleaning them, and put them back in?
Being completely anal, I hated that the lifter noise never fully went away. Even with every variation of the above treatments applied the best I could do is have it almost inaudible during the first week after a flush. But soon enough after a while that old familiar “tick tick tick” would be back. And sometimes it was loud enough to resemble a rod knock during a hot engine startup. Not the sounds I want to hear.
So I bit the bullet and removed the cam shafts (Hey its only 10 more bolts each side when you’re that far in..) I pulled out the lifters one by one, disassembled them, soaked them in the nasty caustic gallon of carb cleaner for about 5 minutes each lifter, then rinsed the carb cleaner off with BrakeKleen, then wiped each part dry with a lint free towel. I lubed the parts up with new clean 5-30 oil, reassembled, inserted it back in the head, and grabbed the next one… 4 hours later all 16 were sparkly clean inside and out..
Whew that took a lot longer than I wanted it, but I had to take pictures and measure stuff, and make absolutely sure I got each back in the hole it came out of. You want to know more? Ok, here’s more.
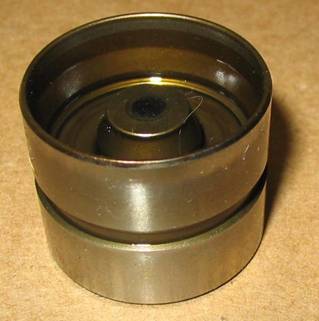
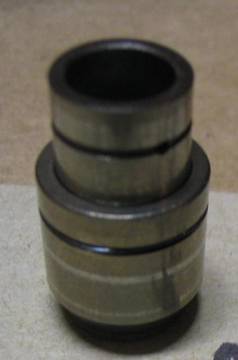
Here’s a picture of a nice clean lifter. They come out of the car looking like this, and you think: Hey this thing looks pretty clean, the oil is nice and maple syrup colored, not black, so maybe I shouldn’t go to all of this trouble. Yeah., there was a little darker oil up under the edge, but how bad can it be on the inside?”
So then ya take a pair of needle nose Vicegrips, and you grab the inner plunger lip and gently pull the lifter apart…. OH MY GOD!!! It’s something straight out of the exorcist!! Where the hell is all of this crap coming from? It’s pouring out from everywhere!!!
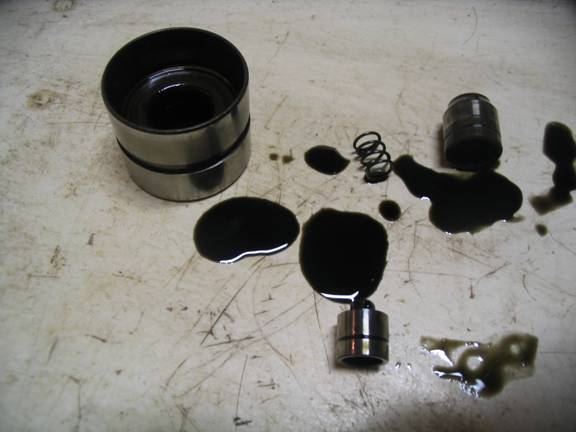
Every one of the 16 lifters had significantly grungy oil inside. Each had at least a capful of oil trapped inside, and none of it was pretty. The above shot shows the main four pieces of the lifter. Yes the inner plunger (Lower center) is really four pieces in one (we’ll get to that later) But treat it as one part and save yourself a lot of trouble searching for invisible springs and tiny balls.
Ok, you’re over the shock of the Black Gold pictured above and are questioning my car as atypical, and poorly maintained. After all I have only owned My 95 for 6 of it’s 102K miles, how could I know the history?
Well I’m the second owner, and have every oil change receipt from the first owner. He stuck pretty close to the 3K rule. I Changed the oil at 96K when I got it, using Rislone oil treatment to try and silence the “Tick Tick Tick”. Then again at 99K to a 5-30 viscosity and the Twisty flush (better), and now again at 102K with the removed and cleaned lifters.
I’d suggest changing the oil right before doing the lifter surgery. That way when you first fire it up, and fill the voids of the lifters, the oil that gets in there is as clean as possible. The lifters are designed intentionally with super tight tolerances, and once the oil gets in, it doesn’t get out. These lifters are like the roach motel for oil. Oil flows in, but it doesn’t flow out. More Theory of operation later…
So You wanna try this?
Here’s how I did it.
I first started by checking each lifter for springy-ness while still on top of the valve, but with the cam off. Most felt similar, had a little bit of give under firm thumb pressure and sprung back with the release of the pressure. Three of them felt “Notchy” where they would stick momentarily before coming back up, or snagged on some bit of grime during the stroke. Four more had no give whatsoever, and felt collapsed. I couldn’t move them down and they wouldn’t spring up. Note: These four were under the cam lobes that were holding a valve open, so the lifter was under pressure for a couple days. But even given the chance for those lifters to squeeze all of the oil out of the plunger over those few day, it should have sprung back from the plunger spring and check valve immediately upon release of the valve spring pressure.
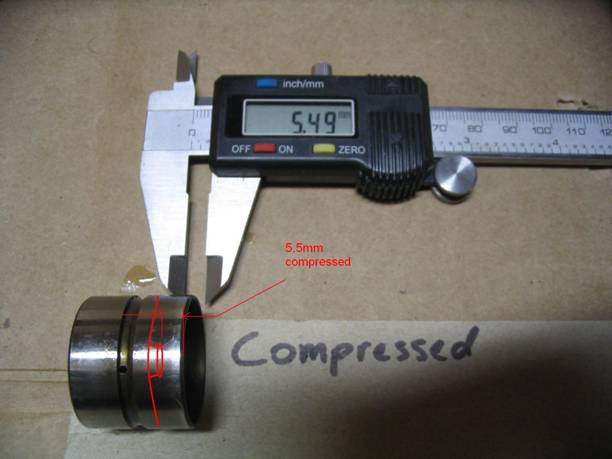
I then measured the depth of the plunger inside the lifter both extended normally, and compressed, so that I would have a reference distance if needed when re-assembling. As it turns out this was completely unnecessary, but I was worried about what the Aussie said about the lifter holding the valve open. I think I figured out what he did wrong, he put too much oil in the plunger during assembly. Completely avoidable..
Here’s the pictures:

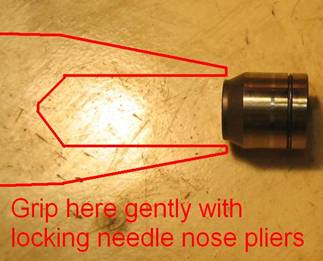
The Australian said to remove the plunger he wrapped the lifter in a towel, placed it cam surface up, and gave it multiple whacks with a hammer to dislodge the plunger. While I found that eventually this did extend the plunger, I found that it was much easier to just grab the bullet tip of the plunger with a pair of vice grip needle nose pliers, and gently pull out while rotating the plunger slightly. Do this over a rag, because here’s where the dirty oil runs out everywhere.
So the plunger came out, dirty oil is everywhere, and there’s still a bunch inside the body of the lifter. Lay the body on it’s side, with the oil fill hole down, and the dirty oil will run out onto your rag. After most of it has drained, drop all four main pieces into a small container of highly caustic carb cleaner for 5 minutes.
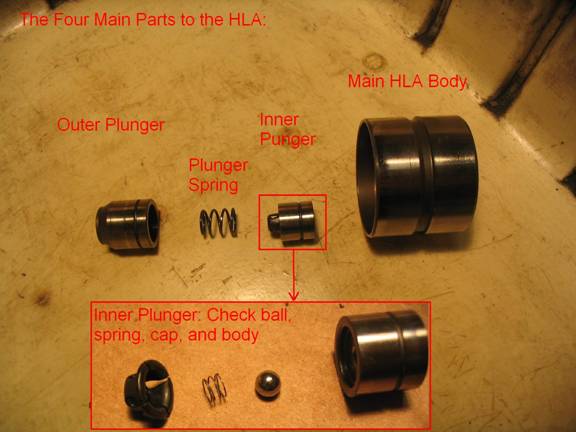
Though I show the Inner Plunger above disassembled, Don’t do it!! The inner plunger check ball assembly gets clean with the carb cleaner and BrakeKleen fully secure on top of the inner plunger. The likelihood of loosing the check ball or spring is quite high. They are REALLY SMALL. The check ball is only 3.5mm diameter (or the size of a pin head), and the little spring is so thin that it’s almost invisible.
DING, 5 minutes are up. Time to take the parts out of the Carb cleaner. But I don’t want to fish them out with my fingers, so I used a magnet on a stick. I then rinsed the carb cleaner off using BrakeKleen. But rather than spray each individual part, I instead used a plastic spray can lid as a makeshift itty bitty parts washer, and dunked each part into the BrakeKleen bath.
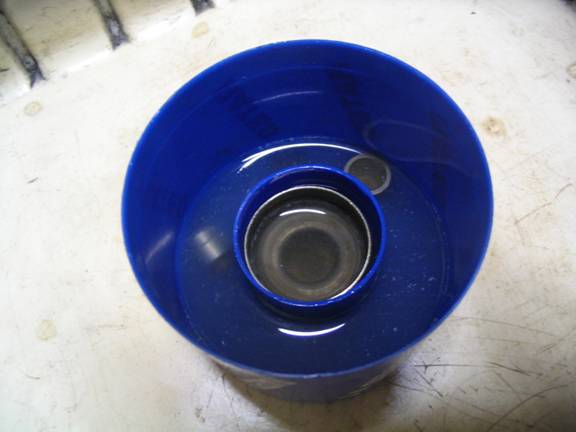
This proved to be extremely proficient way of re-using the brake clean, and not losing the parts.
So I dried each part off with a clean section of a lint free towel. The body of the lifter has nooks that you can’t get a towel into, so I placed each HLA body near the shop light so the heat from the bulb would evaporate the remaining BrakeKleen from within.
To reassemble, start with the outer plunger.
- Place a couple drops of oil inside the outer plunger
- put the plunger spring in the outer plunger
- coat the inner plunger body with oil
- place the inner plunger inside the outer plunger, top hat side in first (Just like the pictures above)
You should be able to compress the inner plunger and outer plunger together with a couple fingers, and it should spring right back, almost to the point of having the inner plunger pop out. IF you cannot compress the inner plunger, then you got too much oil in the outer plunger body. Take it apart and pour most of that oil out of the outer plunger body.
This picture illustrates the correct orientation of inner plunger and outer plunger (Just as a side note, in this picture, the inner plunger is not being held up by the metal spring. The gap between the plungers is so small that the air is trapped inside preventing the inner plunger from falling down. Now THAT is perfect tolerances.)
- Next, pour a cap full of oil into the inner chamber of the Main Lifter body
- tip the lifter body on the side, and inset the plunger assembly back into the lifter body
- Press the plunger assembly down until it seats into the body, trapping most of the capful of oil inside.
You should be able to push the outer plunger down and have it pop back up from the spring pressure, and from compression of the air between the inner and outer plunger.
- submerge the whole lifter assembly in oil, with the main body oil hole pointing upwards.
- compress and release the plunger multiple times to suck oil into through the main body oil hole, and let air bubbles escape.
- When you don’t get any more bubbles, you’ve got enough oil in the lifters to put it back in the head and progress onto the next one.
- press down on each one and you should feel the spring and plunger working.
- No Notchiness, no getting stuck at the bottom,
- Only 15 more to go!!!
So does this work? Does it cure the dreaded HLA noise? Is it worth all the time and effort? I’ll know tomorrow, once I get the timing belt and waterpump back on.