
Sitting in my car, warming the engine up, the Check Engine Light came on. Found out that one of the most common problems for this is error code P0402, which you can of course read about at Miata.net. It's supposed to happen to higher mileage cars, at about 50,000 miles. So when the CEL came on, I didn't even try reading the code, I just assumed it was P0402. The worst that could happen is that I cleaned the manifold, and it was still on, meaning it was some problem that I would've had to take to the dealer anyway. Nevertheless, it did work, so I saved myself a day without a car, and from what I've read anywhere from $75 to $700. So, with that, I think I'm entitled to an extra gift for the car, from what I saved! ;-) Credit goes to the whole Miata forum and all its wonderful posters for all the info and motivation to try this out!
Of course, I've read that the procedure was easy, but I still doubt my technical ability. Plus, it's the engine - what if I do something wrong and blow it up?! Let me tell you, as you've probably read, it is a fairly straightforward job. I completed this in two hours, with no prior engine experience (except for changing the spark plugs!), only a few hours sleep, and a bad hangover from the night before. I'm so inexperienced, I had to ask the members at MiataForum.com how to use a darn torque wrench (which you can find in the tools section, search for "tool idiot" in the subject line, LOL)! I searched for pics of this done, but couldn't find any, so I did them myself, and I did pictures of almost every single thing to make it for folks like me! It also helped me back track for reinstallation afterwards.
I just switched from glasses to contact lenses, so I never wore work goggles before (though I probably should). So I forgot that glasses gave me a sense of security for basic work. It wasn't like I was cutting wood or anything. Nevertheless, don't be stupid and neglect your eyes! Wear goggles, at least when cleaning the manifold with the throttle body cleaner. I sprayed some in a little corner of the manifold, and some shot back at my face. Wear eye protection!
Some of the pictures may seem out of order, but I took pictures as I was uninstalling stuff and some that I forgot as I was putting thing back on. As of writing this, I rearranged the pictures so that the install makes more sense. So if you see one pic where a hose or bolt has been removed, and then a following pic where it's back on, please disregard the background stuff. Just notice what I'm immediately discussing. Notice step 12, when removing bolts, I placed then in an order I could follow similar to the engine. You might want to do the same to help you put them back.
| Image |
|
|
|
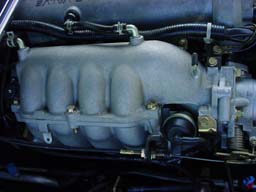
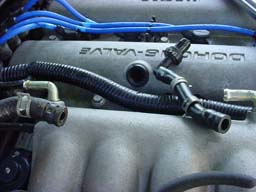
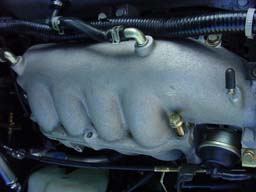
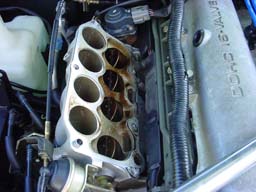
Step 1: Here's a picture of the intake manifold. I'm just going to take the top half off, which is the primary target of cleaning. |
|
|
Step 2: Being timid, I first did easy stuff. I took the flathead screwdriver, and lifted the white snap-ins that hold this bundle of wires to the engine. It was blocking the middle bolt on the driver's side of the manifold from my ratchet. |
|
|
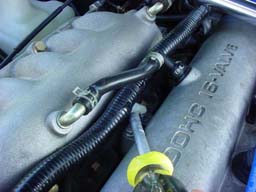
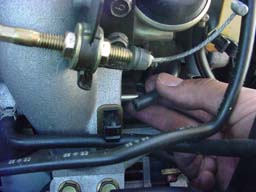
Step 3: A 10mm bolt here. Remove it to disconnect the bracket. After the bracket was removed, I put the bolt back so I wouldn't lose it! Also use it to loosen the bolt on the black air intake tubing, to remove it from the throttle body. |
|
|
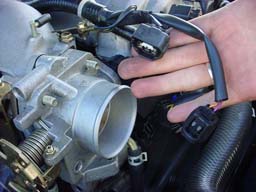
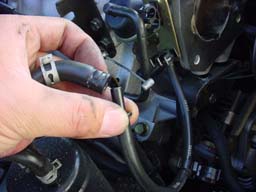
Step 4: At the front of the throttle body on the driver's side, I disconnected two black connectors. You have to pinch them a little to remove them. The smaller on is on the bottom, and IIRC, you pinch it on the sides. The larger one has a one button on it, and press that down, and you can pull it out. |
|
|
Step 5: Unplugged the vacuum lines. Nothing spilled out of them, so I didn't plug them or anything. Note, I worked on my car in the morning and it had sat all night prior. You can use pliers or your fingers to squeeze and pull back the hose clamps. After that, twist them back and forth a bit to break the "seal". After that it should slide right off. |
|
|
Step 6: There's a small rubber hose that runs from the throttle body to some sensors on the passenger side. I disconnected it midway, just because it was easier. From age, it was a little stuck, so I used a flathead screwdriver to help separate it. Got in between and twisted. |
|
|
Step 7: Under the throttle body is a small black hose. Disconnect this, again I used a flathead screwdriver to help me out. There's another hose similar to this on on the back side of the manifold. Take this one off too! |
|
|
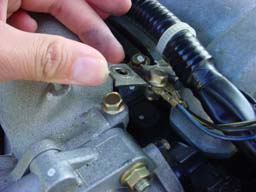
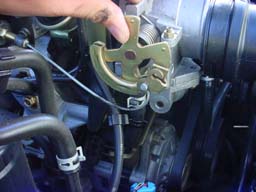
Step 8: This cable connects to the throttle. Take the lever and push it forward to loosen the cable (clockwise, standing on the passenger side). There should then be enough slack to fully remove it, by moving the cable out of it's feed, and pulling out the small anchor (that little cylindrical thing). |
|
|
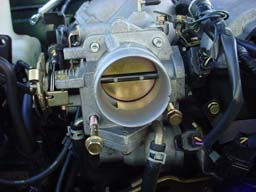
Step 9: Remove the 2 nuts from the top of the throttle body, and the two bolts at the bottom of the throttle body. If you want, remove the two coolant hoses (I wasn't particularly interested in cleaning the throttle body, so I left them on and just placed the TB out of the way. You should now be able to remove the throttle body for cleaning. |
|
|
Step 10: Six 14mm bolts line the left and right side of the intake manifold. Remove these! Isn't this tough?! |
|
|
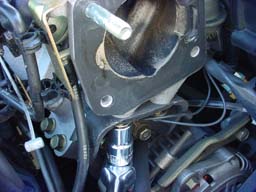
Step 11: Underneath the throttle body area is a black bracket. Remove the two bolts faced upwards into the bottom of the intake's inlet. |
|
|
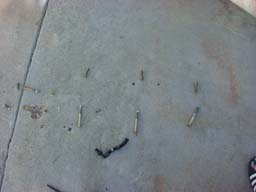
Step 12: Here you can see that I've layed out all the parts in relation to the engine. From left to right: two bolts from bracket under the throttle body, two lower bolts from the throttle body, two upper nuts from the throttle body, two front bolts from the manifold, one small bolt from the bracket on top of the manifold, two bolts from the middle of the manifold, and two bolts from the rear of the manifold. |
|
|
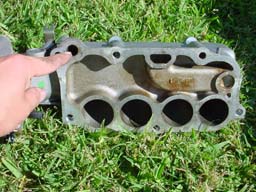
Step 13: Carefully remove the top of the manifold, it came right off for me. In this picture, you can see the thin metal gasket sitting on the bottom of the manifold. This is what you want to avoid damaging the most. |
|
|
Step 14: Here's the top of the throttle body, hmm, not too dirty. |
|
|
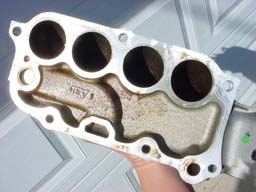
Step 15: Looking at the bottom, I'm pointing to the offending hole. This is the one that will require mass amounts of throttle body cleaner. It was totally clogged at the small end (see step below). When spraying the cleaner, protect your eyes and be careful! Also, I noticed that you should spray and wipe, as well as pour out the loosened liquid cleaner immediately. When I sprayed it, it would loosen the gunk, but evaporate quickly, and allow the carbon to redry onto the surface in a thin, hard to scrub film. |
|
|
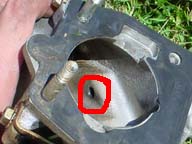
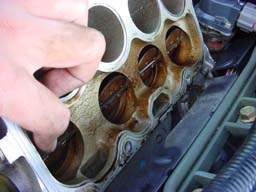
Step 16: Looking into the inlet of the manifold, you want to find this hole, roughly 4mm in size. It's on the right side of the tube. This is the other end of the hole. Of course, make sure to clean all other holes as well, the rest should be easy to spot by looking for the hoses that connect to the manifold on the outside. |
|
|
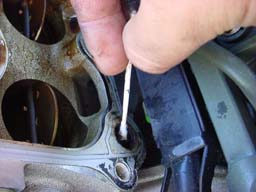
Step 17: This one area had more carbon buildup then the rest of the manifold top alone! After cleaning and loosening the crud with throttle body cleaner, I started sticking Q-tips into pull out loosened buildup. This is a picture of the 4th Q-tip used! Still plenty of gunk! Since the hole isn't straight through, you can't really judge how clean it is. So I used a flashlight in a dark room, and stuck it in one side of the hole. If I saw a good reflection, I just assumed it was clean enough and the sides weren't covered up. |
|
|
Step 18: At the matching hole for the lower part of the intake manifold, I sprayed a tiny bit of TB cleaner in and used a Q-tip. Cleaned as much as I could, but wasn't as effective as the top manifold. Some people warn not to spray in here, as the gunk will get into the engine. Others have said it only made their engine run rough for a few minutes afterwards, but it then went away. Your decision here. The TB cleaner didn't loosen it up enough for me, so next time, I'd probably just use a Q-tip alone. |
|
|
Step 19: There were many writeups on this procedure, but I happened to follow the post written by DudeFish. Instructions were to locate the lower manifold butterfly valves, move them and make noises, so in homage, here it is - "Vroom, vroom!!". Thanks again, DudeFish! Putting it all back together took about 20 minutes. As you will have noticed many of the bolts are simply to hold things in place, so they don't need to be super tight. The bolts that hold the intake manifold together need to be torqued to a specific number. I've been notified (as of May 28, 2003 - thanks Darron) that the torque for all 12mm bolts should be set to 14-18 ft-lbs. Lastly, screw all bolts on a little at a time, similar to when you put the lugs back on for a wheel. For example, I lightly screwed in all bolts, then tightened a corner bolt, then the one opposite corner from it, etc. This helped to evenly screw in the bolts correctly. Thanks to CC Rider's input: "When tightening down the plenum, my mechanic (30 years experience including Toyota Factory Training) says to start at the MIDDLE, not an end or corner. This provides a more consistent pressure and is less likely to cause warping or misalignment." |
| Back to the Garage |
17 January, 2004 |