| Image |
Notes |
|
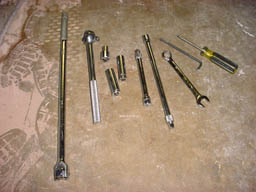
Step 1: Parts Required:
- 14mm Ratchet
- 5mm Allen Key
- Phillips head screwdriver
- Ratchet set with 10, 12, and 14mm attachments
- Open 10mm wrench
- Ratchet extensions
- Jack (the one in your trunk is fine)
- Ramps (not required if you use jackstands, but highly recommended)
- Breaker bar (optional, but will help against tight parts)
- Anti-seize compound (optional)
|
|
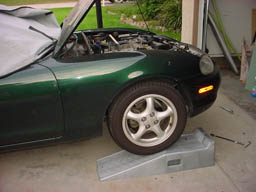
Step 2: Raise the car, and open the hood so you can
get some light down under the car. Ramps are preferable to jackstands,
because you'll need to tighten the end links back up with the weight on
the car. |
|
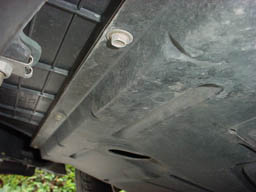
Step 3: First, you need to remove the plastic cover
beneath the engine. This consists of 11 screws. The first are three
tap screws just under the bumper. Use the 10mm socket here. |
|
Step 4: The next two are at the back of the
plastic cover, on each corner towards the middle of the car. Use the 10mm
socket. |
|
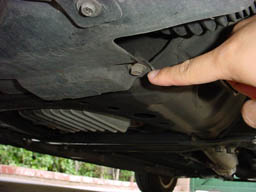
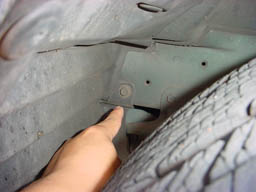
Step 5: The next two are in each wheel well.
This is a picture from the driver's side, in front of the wheel. |
|
Step 6: This is a tough shot to comprehend, but
there is one screw on each side again, near the ones from step 5. If you
get under the car and look up towards the front of each front wheel well,
you should see them. |

|
Step 7: The last two are inside the bumper
area. So you'll have to get in past the plastic area that covers the front
of the inner wheel wells. My passenger side has a rectangular hole in it
for some reason, so this was easy to get to. This one is just the
nut. |
|
Step 8: The driver's side is not as easy, so I used
the phillip's head screw driver, and removed three tap screws from the
bottom of the front inner fender cover. This opened up enough space so my
hand could reach in. Then remove the nut just as in step 7 |
|
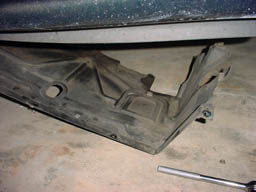
Step 9: Success! You can pull the plastic cover off
now! |
|
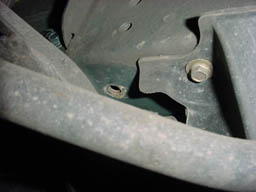
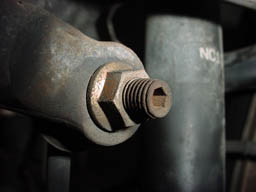
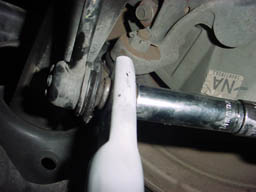
Step 10: Here is a snapshot of the end link bolt.
Many people, including me, missed this and made it a pain, because you can
usually get the nut off part way, but then the whole bolt begins to turn
with a ratchet. You'll notice there's a hole here to place an allen
key. |
|
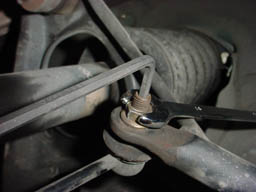
Step 11: Use a breaker bar or ratchet to initially
loosen the nut. But then use the allen key to hold the bolt in place, then
use the open ended wrench to turn the nut off. |
|
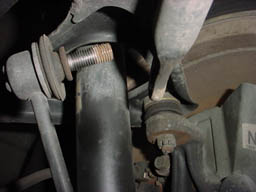
Step 12: Pull the end link out. |

|
Step 13: I missed a snapshot here, so don't get
confused why the new bar's already on. But now, remove the nuts from the
sway bar brackets. You're now all ready to remove the bar. I pulled
it out through the passenger side, because there are a few metal coolant
lines that look a bit delicate. It took a few minutes, but not too bad.
The hard part was getting the new, larger bar in.
Many people have
a hard time getting it back in, usually because if you insert it from the
passenger side fender area, the bar can't get over the lower radiator
hose. Every time you try and raise one side of the bar, the other side
hits the ground and prevents you from raising it further.
If you
use the jack to raise the passenger side of the car a few inches, you can
get more leverage to move the sway bar around and get it over the radiator
hose. After that, I lowered the car back on the ramp. Don't do this if you
don't feel comfortable or safe!. I figured even if the jack fell, it would
land on the ramp (which was only 2 inches below the wheel). |
|
Step 14: Put the end link in the new sway bar. FM
instructions said to try the outermost hole first. |
|
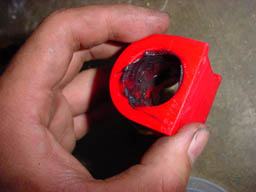
Step 15: Grease up the new bushings. |
|
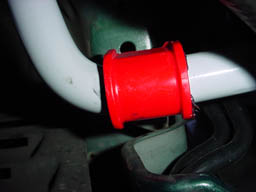
Step 16: Pop the new bushings on the bar, then apply
the brackets. |
|
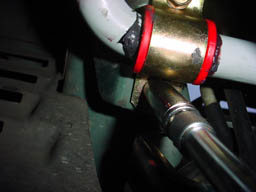
Step 17: Tighten up the bracket bolts. I went around
to each bolt and tightened little by little. |
|
Step 18: Tighten up the end links! The bar is much thicker, so
you'll notice that the screw doesn't go as far in as before. Replace the
plastic engine shield, and you're done! |