
 A
Driving Tour of Road Atlanta
A
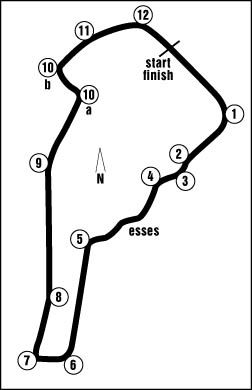
Driving Tour of Road AtlantaHere's how I drive Rd. Atlanta in a 92 showroom stock Miata
As you enter the front straight you'll keep to driver's left in prep for the braking zone of T1. Ideally you'll begin braking after the end of the pit road guard rail- but that's something to work up to. What is crucial entering this turn is that the car is stable after braking. Turn is late- you'll see a noticeable "kink" on the left edge of the pavement where the track turns right and that's where you begin steering input. You should be able to get full throttle prior to the apex of T1. Here's what to keep in mind about T1: Brake zone is down hill, turn in is slightly on camber, then goes immediately to off camber. Correct speed at the entry will feel as though the car's rear is about to come around- essentially it feels wrong as in "too fast". But here's the catch- T1 becomes "on camber" and up hill as you get closer to the apex. And this is what "catches" the car. If you enter at a speed that feels correct, you exit at speed that feels slow. A stock 1.6 Miata will _accelerate_ all the way up hill after T1 in fourth gear and this is the true indicator of whether or not the driver is carrying enough speed.
 T2
is a quick jog to the left as you crest the hill. Keep your foot in the gas and
turn left through T2 lining the left wheels up with the
left curb and immediately brake for T3. Depending on your
power, you may have to wait for your turn in at 2 because of the crest of the
hill. Believe it or not only the suspension mods allowed in ITA, the SSC Miata
could carry just enough added speed through T1, that the increased speed at T2
was getting the front wheels light and relinquishing traction needed for turn
in. So I had to wait a little longer with a modified car, to get some load on
the front tires. The other option is to do the turn-in prior to the crest by
running a little closer to the inside of the track. After braking immediately
after T2, you'll turn hard right for T3 and run over the curbing on the right at
T3. Because the load on the left side of the car is so intense the right gets
very light and has no effect on the handling of the car as it "jumps"
the curbing. The tighter the "cut" the straighter the turn and the
more speed you can keep as you go through T2 and T3. At this point you have
noticed you're still in fourth gear. This is the case in the stock Miata and is
evidence of the amount of speed that you can carry through this part of the
course. If you're speed is greater entering T2 then adjust accordingly.
T2
is a quick jog to the left as you crest the hill. Keep your foot in the gas and
turn left through T2 lining the left wheels up with the
left curb and immediately brake for T3. Depending on your
power, you may have to wait for your turn in at 2 because of the crest of the
hill. Believe it or not only the suspension mods allowed in ITA, the SSC Miata
could carry just enough added speed through T1, that the increased speed at T2
was getting the front wheels light and relinquishing traction needed for turn
in. So I had to wait a little longer with a modified car, to get some load on
the front tires. The other option is to do the turn-in prior to the crest by
running a little closer to the inside of the track. After braking immediately
after T2, you'll turn hard right for T3 and run over the curbing on the right at
T3. Because the load on the left side of the car is so intense the right gets
very light and has no effect on the handling of the car as it "jumps"
the curbing. The tighter the "cut" the straighter the turn and the
more speed you can keep as you go through T2 and T3. At this point you have
noticed you're still in fourth gear. This is the case in the stock Miata and is
evidence of the amount of speed that you can carry through this part of the
course. If you're speed is greater entering T2 then adjust accordingly.
As you enter T3 you should be at full throttle. This continues into T4, a long off camber left sweeper. Keep the left wheels at the left edge of the track. Near the end of the sweeper (T4) the track's decreasing radius will tighten up and the car will drift out a little from the edge. This is ok- the track will come back to the car as it begins the right turn into the esses. At the point where the track pulls to the left, concentrate on leveling the car and prep for the esses turn-in an off camber, blind, downhill turn into the esses. When this turn is done right (full throttle still from T3 entry) it is an absolute rush. The key to T4 is turning in just prior to seeing the apex. I usually cut a couple of slow laps and pick a visual that appears over the hill just above the actual apex. Turning in "too" early is key here, since the car will drift as T4 becomes off camber and downhill. Done right, the car will drift just across the apex of the curbing (think of a rock skimming across water) and over to the left side of the track.
You are now in the esses and you're priority is to prep for T5 at the end of this sequence. The esses is really just a simple slalom- an obstacle to a more critical turn, T5. At the last left kink in the esses you'll need to turn in early to create a straight braking area. As you enter the brake zone for T5 avoid touching the curbing on the right as it will upset the car dramatically. It's essential to brake early if the car is to maintain momentum and accelerate up this steep left hander. Exit line is the drivers choice- as maximum speed will be attained by driving over all the curbing and running through the concrete area of the new "cut-through". Though a bumpy ride- it is faster in a relatively stock car. As you pass the crest of the hill begin a gradual progression to the left side of the track from the right.
 T6
is a heavily banked right hander. Very textbook as it will usually handle all
the speed you can throw at it. Of course the penalty of too much speed is a good
launch into the "green yonder" thanks to it's ramp-like banking. The
key to T6 is the car's attitude at the exit. The car must be absolutely stable
for entry into T7 as this is arguably the most important turn of the track for
the small bore cars.
T6
is a heavily banked right hander. Very textbook as it will usually handle all
the speed you can throw at it. Of course the penalty of too much speed is a good
launch into the "green yonder" thanks to it's ramp-like banking. The
key to T6 is the car's attitude at the exit. The car must be absolutely stable
for entry into T7 as this is arguably the most important turn of the track for
the small bore cars.
T7 is an autocross turn. Lots of steering input immediately after braking has ceased. Then a quick release of input prior to the apex- usually about 75% percent of the input will be released by the apex so that throttle input can begin ASAP. My best runs through this turn have been the ones that felt like they were too slow at entry. Most common mistakes are too hot in and too early an apex. T8 is the seldom used chicane and top of the hill after T7. I begin a slow trek from the left edge of the track to a far most right point at the horizon of the track- T9. 600 hp GT cars will stay left to set themselves up for the turn- but your average daily driver doesn't need to- so we'll travel the shortest distance between two points. You'll save about 15ft.!
 As
you round T9 you'll immediately head downhill for the new "chicane"
turns 10A and B. Stay right and get ready to smell your brakes. I was surprised
out just how late you can brake going into A- past the plateau and where the
ascent begins. Of course the gravel pit is there if you go further. This is
another autocross turn requiring a hard left and immediate throttle for the
uphill climb through 10B. At the exit of 10B I aim the car straight under the
caution lights on the bridge. This is basically a straight line to the track out
of T11 (bridge) and it's primary purpose is to set up the car for T12.
It's full throttle all the way to the front straight from the exit T10A. T12 is
a late apex and somewhat off camber. Turn in is near where the left hand curbing
ends and the hill starts to flatten at the base. A good line through T12 will
put you track out on the left curbing right at the starter stand.
As
you round T9 you'll immediately head downhill for the new "chicane"
turns 10A and B. Stay right and get ready to smell your brakes. I was surprised
out just how late you can brake going into A- past the plateau and where the
ascent begins. Of course the gravel pit is there if you go further. This is
another autocross turn requiring a hard left and immediate throttle for the
uphill climb through 10B. At the exit of 10B I aim the car straight under the
caution lights on the bridge. This is basically a straight line to the track out
of T11 (bridge) and it's primary purpose is to set up the car for T12.
It's full throttle all the way to the front straight from the exit T10A. T12 is
a late apex and somewhat off camber. Turn in is near where the left hand curbing
ends and the hill starts to flatten at the base. A good line through T12 will
put you track out on the left curbing right at the starter stand.
| Back to Motorsport | 21 November, 1999 |
| [Home] - [FAQ] - [Search] - [Sponsors] - [Forums] |
| [Garage] - [Clubs] - [Contact Us] - [Disclosures] - [More...] |
Copyright
©1994-2024, Eunos Communications LLC
|