
NA automatic owners complain about their shifter feeling 'sloppy' or 'loose'. This is a symptom of worn bushings. Replacement of these bushings isn't a very difficult job. Most report that they managed to complete the task in about an hour. This article is a collection of information submitted by NA owners to help get the job done.
1: park your car, secure the emergency brake, jack up your car and put on jack stands (BELIEVE ME THIS IS FOR YOUR OWN GOOD) turn the key to "on" (don't start the car) and move the shifter to drive.
2: Take out the center console. (you do not need to remove the t-handle shifter yet)
3:unscrew the 4 Phillips head screws holding the black plastic trim around the shifter that has "P,N,D,2,1"
4: remove the 4, 10mm bolts that hold the shifter body to the car.
5: Go under the car and find the shifter linkage, it is a long skinny bar the is on the passenger side of the transmission. The bar connects the shifter to the transmission. This bar is held on with a small cotter pin (spring pin) where it connects to the bottom of the shifter lever. Remove the pin and disconnect.
6: You should now be able to lift the entire shifter and rubber bootie out of the car (the overdrive wire may be tight, however it should give you enough room to work.
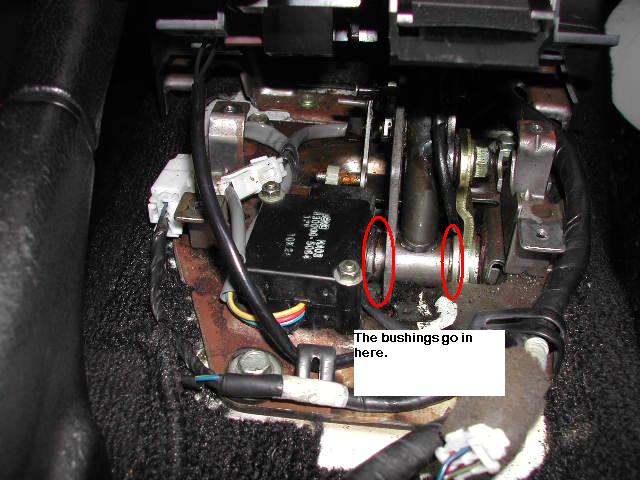
7 :Remove the rubber bootie from the 4 holes (careful not to loose the metal sleeves that go in each hole) This will give you access to the bolt and nut that has to be removed to replace the bushings.
8: Remove the nut and long bolt from the bottom of the shifter t-handle.
9: You may or may not have any original bushings in there (mine were just a pile of brown ground up plastic in the bottom of the rubber bootie) push the new bushings into each side of the the t-bar and grease up.
10: line up the t-bar handle with the rest of the shifter body and reinstall the parts, they will be hard to fit together, but they will fit (grease helps get the bolt back through).
11: GREASE UP EVERYTHING THAT MOVES!!!! then put the black rubber bootie back on the bottom of the shift body (it helps if you remove the metal sleeves before pushing the rubber through the holes and then slide the sleeves back in the rubber)
12: Bolt the shifter body back onto the car
13: Screw the black plastic shifter trim back on the shifter body (check the light bulb first to make sure it is working, good time to replace it if it needs it)
14: Re-install the center console.
15: Get under the car and attach the transmission shifter linkage to the shifter body (use a new cotter pin and washer!!! GREASE IT UP GOOD)
DONE!!!!
When I did my bushings, I didn't remove the linkage under the car. I did it all from inside the car, everything seemed to go back together and felt great, however, when I was 2 miles into my Midnight Run drive (with 6 Miatas following me), the shifter linkage get go and I was stuck in low 1. I had to limp back to my house in first gear and leave my car there. I ended up driving with another person on the ride, I was upset not to be in my car. The next morning I looked under the car and saw the linkage bar disconnected, my 1991 must have had a rusted old cotter pin that broke off when I was twisting the shifter body to get the new bushings installed from inside the car. I installed a new cotter pin and washer, greased it all up and it works great now. I hope this helps.
-Cheers,
Jim (aka Cherry Bomb)
Where to get new bushings? Some have found them on ebay. In the past we had a forum member who made some and were nice enough to share. One of out forum sponsors provided us with part numbers:
J00146684 $6.00
H00246085 $5.00
Tommy
Mazda Parts Specialist
Rosenthal Mazda Arlington
750 N Glebe Road
Arlington, Virginia 22203
1-800-347-3493 / 703-875-2757
Give them a call to make sure get the ones you need.
www.finishlineperformance.com
"A buddy of mine, who's well versed in mechanical auto repairs, had mine done in a little over an hour. It is a straightforward affair with only basic wrenches and a socket set to complete.
This would be an excellent time to replace the factory auto shift console with a manual boot if you're considering it."
mthomson
"If yours is anything like mine was it won't be too long before you start noticing that it won't always register as in PARK. I would put the car in park, take the key out then when I went back to restart the car I would turn the key and get nothing. Had to put pressure on the shifter to read in park so I could start the car. It would have probably gotten worse but I opted to replace the bushings. Took about an hour and the repair made the shifter feel brand new. Three years later and it still feels and works great. Well worth the time and effort."
RI ZoomZoom
"bushings installed,took 1 hour. shifter feels fantastic. fyi the bushings are plastic, my original bushings were simply gone, no trace of them at all. while i had the console cover off i installed a fuel pump kill switch to keep my miata."
Stonecreek
"I did the bushings on my daughter's 91 this morning. I removed the console, removed the gear idicator plate, and removed the for 10mm (head bolts.) I also released the wiring connector on the left side and freed the wiring harness from the strain relief holddowns. I pulled the rubber boot down (underside) to expose the pivot bolt and nut. Some people disconnect the linkage, but I was able to pull the pivot bolt and replace the bushings without disconnecting the linkage. I used a bit of lithium grease on the bolt. Reassembled.... Works like new, nice firm action."
ross_t
| Back to Product Reviews |
29 June, 2010 |
| [Home] - [FAQ] - [Search] - [Sponsors] - [Forums] |
| [Garage] - [Clubs] - [Contact Us] - [Disclosures] - [More...] |
Copyright
©1994-2024, Eunos Communications LLC
|